
1/
On the subject of thoracentesis.
On the subject of thoracentesis.

2/
There are 2 main components to all procedures: cognitive aspects (indications, contraindications, complications) and technical aspects (steps of procedure, hand positioning, etc.).
Let’s start with the cognitive aspects.
There are 2 main components to all procedures: cognitive aspects (indications, contraindications, complications) and technical aspects (steps of procedure, hand positioning, etc.).
Let’s start with the cognitive aspects.
3/
Indications. As with most procedures there are 2 broad indications: diagnostic and therapeutic. In order to understand the nature of the fluid and approach the broad differential diagnosis, it must be sampled. Transudate vs exudate.
Indications. As with most procedures there are 2 broad indications: diagnostic and therapeutic. In order to understand the nature of the fluid and approach the broad differential diagnosis, it must be sampled. Transudate vs exudate.


4/
Fluid can also be removed to provide comfort. And it’s important to remember that re-imaging the lungs after significant pleural fluid is removed can allow for visualization of parenchymal abnormalities previously obscured by the fluid (eg, tumor).
Fluid can also be removed to provide comfort. And it’s important to remember that re-imaging the lungs after significant pleural fluid is removed can allow for visualization of parenchymal abnormalities previously obscured by the fluid (eg, tumor).
5/
Contraindications. The closest thing to an absolute contraindication is cellulitis overlying the needle entry point. Bleeding risks must be individualized. Elevated INR from cirrhosis does not increase bleeding risk. But what about antiocoagulants? Unclear (at least to me).
Contraindications. The closest thing to an absolute contraindication is cellulitis overlying the needle entry point. Bleeding risks must be individualized. Elevated INR from cirrhosis does not increase bleeding risk. But what about antiocoagulants? Unclear (at least to me).
6/
Complications. Pneumothorax. There are 2 ways air can enter the pleural space: via punctured lung (bad) or from outside (sometimes unavoidable as in the case of trapped lung with pneumothorax ex vacuo and therefore not a true complication – and generally not a big deal).
Complications. Pneumothorax. There are 2 ways air can enter the pleural space: via punctured lung (bad) or from outside (sometimes unavoidable as in the case of trapped lung with pneumothorax ex vacuo and therefore not a true complication – and generally not a big deal).

7/
Other important complications include hemothorax (avoid intercostal) and reexpansion pulmonary edema.
Let’s move on to the technical aspects of the procedure. Some steps will be skipped in the interest of space.
Other important complications include hemothorax (avoid intercostal) and reexpansion pulmonary edema.
Let’s move on to the technical aspects of the procedure. Some steps will be skipped in the interest of space.
8/
Patient should be seated upright on the side of the bed leaning over a bedside tray. Patient comfort is crucial to the success of your procedure. Your comfort and convenience is equally so. Make sure to adjust height of bed. Good lighting. Have an empty garbage can near by.
Patient should be seated upright on the side of the bed leaning over a bedside tray. Patient comfort is crucial to the success of your procedure. Your comfort and convenience is equally so. Make sure to adjust height of bed. Good lighting. Have an empty garbage can near by.
9/
Finding needle entry site.
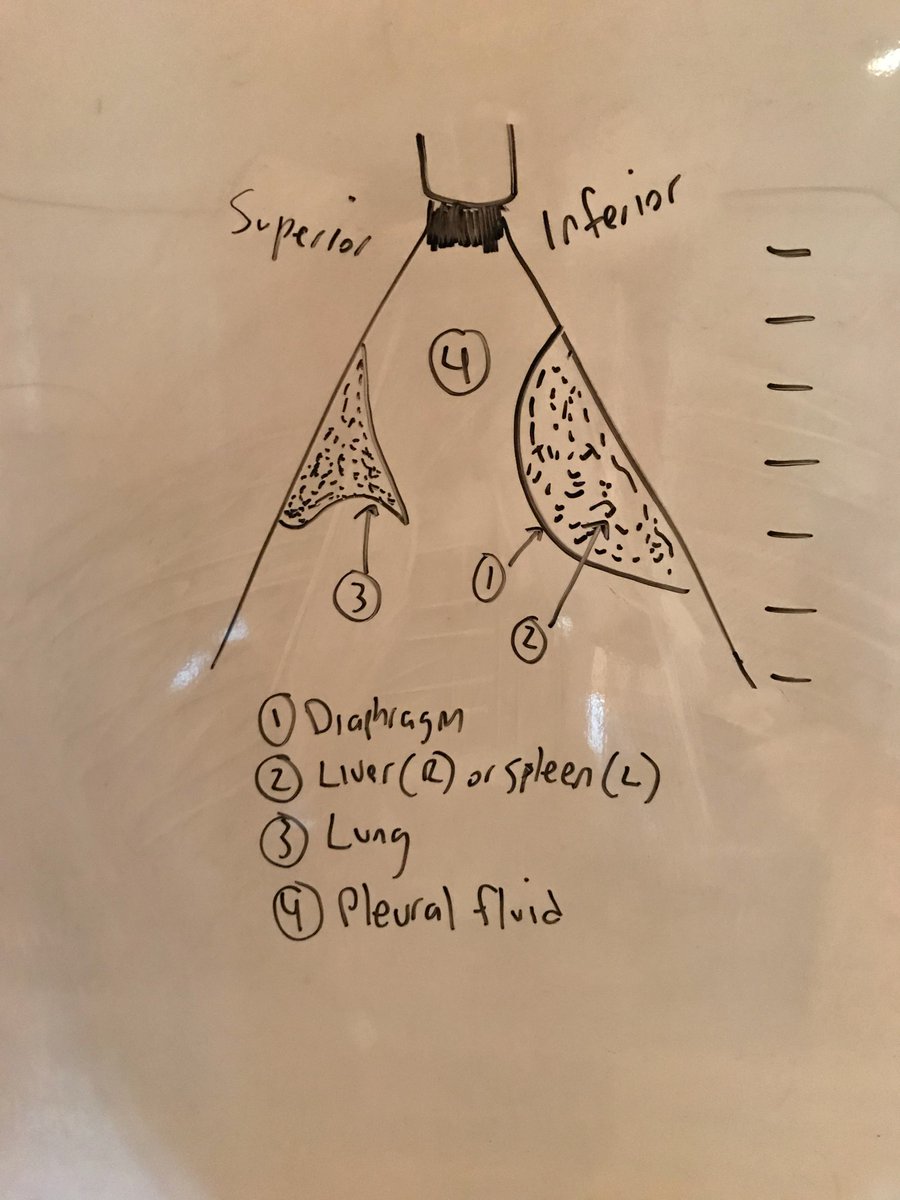
Use percussion and US to find your needle entry point. For US, I was taught by @DRsonosRD to start with longitudinal/sagittal view at the costophrenic angle and look for classic image (see below). Most sensitive view to find pleural fluid.
Finding needle entry site.
Use percussion and US to find your needle entry point. For US, I was taught by @DRsonosRD to start with longitudinal/sagittal view at the costophrenic angle and look for classic image (see below). Most sensitive view to find pleural fluid.

10/
If present, switch to transverse/coronal view and look between ribs to locate the best space. Mark the top third of the rib below the space of interest. Importantly, the screen will be dark (shadow) when probe is over a rib.
If present, switch to transverse/coronal view and look between ribs to locate the best space. Mark the top third of the rib below the space of interest. Importantly, the screen will be dark (shadow) when probe is over a rib.


11/
Next, put US probe directly over the marked site. The screen should be dark (rib shadow). Then slowly slide it up and the view of the effusion should appear on the screen. A noninvasive way to rehearse the steps of the procedure, confirming your mark is where it should be.
Next, put US probe directly over the marked site. The screen should be dark (rib shadow). Then slowly slide it up and the view of the effusion should appear on the screen. A noninvasive way to rehearse the steps of the procedure, confirming your mark is where it should be.
12/
Lidocaine does 4 things for you: 1) it numbs the patient, 2) it allows you to rehearse the steps of the procedure with a much smaller needle, 3) it tells you exactly how deep the pleural space is, 4) it informs you about the nature of the fluid. More on 3 and 4 below.
Lidocaine does 4 things for you: 1) it numbs the patient, 2) it allows you to rehearse the steps of the procedure with a much smaller needle, 3) it tells you exactly how deep the pleural space is, 4) it informs you about the nature of the fluid. More on 3 and 4 below.
13/
Body habitus and US provide a sense of the depth of the pleural space. The lidocaine needle provides exact depth. Why important?
Body habitus and US provide a sense of the depth of the pleural space. The lidocaine needle provides exact depth. Why important?
14/
If the needle is nonfunctional out of the kit or becomes clogged, you will never aspirate fluid and the tendency will be to keep going deeper, risking injury. If you know the depth of the pleural space, you will immediately recognize there is an issue w the equipment.
If the needle is nonfunctional out of the kit or becomes clogged, you will never aspirate fluid and the tendency will be to keep going deeper, risking injury. If you know the depth of the pleural space, you will immediately recognize there is an issue w the equipment.
15/
Why helpful to know the nature of the fluid before going in w larger catheter? Peace of mind. Many become anxious when bloody fluid begins draining into the collection bag. If the fluid was bloody with the small lidocaine needle (unlikely to do any damage), then rest easy.
Why helpful to know the nature of the fluid before going in w larger catheter? Peace of mind. Many become anxious when bloody fluid begins draining into the collection bag. If the fluid was bloody with the small lidocaine needle (unlikely to do any damage), then rest easy.
16/
Make your wheel. Then enter with a downward angle of ~5 degrees. Why downward angle? For safety. Even if you are unlucky and run right by bottom of rib, the downward angle will prevent hitting the intercostal artery. Goal is to run into the rib with your lidocaine needle.
Make your wheel. Then enter with a downward angle of ~5 degrees. Why downward angle? For safety. Even if you are unlucky and run right by bottom of rib, the downward angle will prevent hitting the intercostal artery. Goal is to run into the rib with your lidocaine needle.
17/
When you run into the rib, the tendency is to change the angle of the needle to get over top of rib. Never do that. Doing so risks hitting the intercostal artery of the rib above. Rather, “walk” the needle over the rib (22G needle is better for this than the flimsy 25G).
When you run into the rib, the tendency is to change the angle of the needle to get over top of rib. Never do that. Doing so risks hitting the intercostal artery of the rib above. Rather, “walk” the needle over the rib (22G needle is better for this than the flimsy 25G).
18/
Typical issues: 1) miss rib entirely. Come out, readjust and reenter (Must find rib with lido needle. Never go in blind with the large catheter/needle.) 2) hit rib too low and “walking” starts to bend the needle. Come out and reenter a bit higher. Should be ~3-4 “walks” max
Typical issues: 1) miss rib entirely. Come out, readjust and reenter (Must find rib with lido needle. Never go in blind with the large catheter/needle.) 2) hit rib too low and “walking” starts to bend the needle. Come out and reenter a bit higher. Should be ~3-4 “walks” max
19/
Now that you have 1) numbed the patient, 2) rehearsed the procedure with a much smaller needle, 3) know exactly how deep the pleural space, and 4) know the nature of the fluid, you are ready to go in with the catheter/needle.
Now that you have 1) numbed the patient, 2) rehearsed the procedure with a much smaller needle, 3) know exactly how deep the pleural space, and 4) know the nature of the fluid, you are ready to go in with the catheter/needle.
20/
Hand positioning as pictured (non-dominant hand). This position achieves 2 things: 1. The 1st/2nd digits act as a break (needle will not go deeper if there is a sudden loss of resistance). 2. The 3rd/4th/5th digits provide balance/stability when pressed against the patient.
Hand positioning as pictured (non-dominant hand). This position achieves 2 things: 1. The 1st/2nd digits act as a break (needle will not go deeper if there is a sudden loss of resistance). 2. The 3rd/4th/5th digits provide balance/stability when pressed against the patient.


21/
The approach/technique described above for the lidocaine needle applies to the catheter/needle. Run into rib, "walk" it over the top.
The approach/technique described above for the lidocaine needle applies to the catheter/needle. Run into rib, "walk" it over the top.
22/
Once you crest over the rib and begin retracting the plunger on the syringe, the moment you get flash of pleural fluid, you must go forward with both needle/catheter a few millimeters before threading catheter to ensure that it enters pleural space and not soft tissue.
Once you crest over the rib and begin retracting the plunger on the syringe, the moment you get flash of pleural fluid, you must go forward with both needle/catheter a few millimeters before threading catheter to ensure that it enters pleural space and not soft tissue.
23/
Inoculating culture bottles at bedside increases yield (at least for peritoneal fluid).
Inoculating culture bottles at bedside increases yield (at least for peritoneal fluid).

24/
The end.
Not sure this is the best medium for something like this. But if you like it, will create similar content for other procedures. Thank you to @DRsonosRD for always answering ultrasound-related questions that come up.
The end.
Not sure this is the best medium for something like this. But if you like it, will create similar content for other procedures. Thank you to @DRsonosRD for always answering ultrasound-related questions that come up.


