,
26 tweets,
12 min read
Read on Twitter
Hello Everyone,
If you're a prospective photographer, or you just like taking pictures causally, I'll be showing you how to edit & improve your pictures. To make them look better. Its really easy
So, pay attention to this thread.
The app I'll be using is:
Adobe Lightroom Mobile
If you're a prospective photographer, or you just like taking pictures causally, I'll be showing you how to edit & improve your pictures. To make them look better. Its really easy
So, pay attention to this thread.
The app I'll be using is:
Adobe Lightroom Mobile

First of,
This app is available for both android and IOS.
So you should download it.
It's an excellent image editor and its really easy to use
This app is available for both android and IOS.
So you should download it.
It's an excellent image editor and its really easy to use


When you've done that,
Pictures are digital pieces of information captured by your phone's camera (sensor) through light, coloured light to be exact.
So we can edit a picture by working on the individual colors that make up the picture.
Pictures are digital pieces of information captured by your phone's camera (sensor) through light, coloured light to be exact.
So we can edit a picture by working on the individual colors that make up the picture.

The most important colors to pay attention to are Red to Blue ( from the left)
And this is because
Red,Yellow,Orange all affect our skin
Yellow, affects the color of sunlight, which affects anything sungligjt touches, be it the floor, the wall, or even your skin(sun kissed)...
And this is because
Red,Yellow,Orange all affect our skin
Yellow, affects the color of sunlight, which affects anything sungligjt touches, be it the floor, the wall, or even your skin(sun kissed)...

Green affects the grasses, trees, anything around you that is green.
Next to green is aqua, this colour affects the clouds( on a sunny day)
Blue effects the clouds on a sunny or a cloudy day, and also affects your Jeans, shoes, or anything that is blue...
Next to green is aqua, this colour affects the clouds( on a sunny day)
Blue effects the clouds on a sunny or a cloudy day, and also affects your Jeans, shoes, or anything that is blue...

When you open the app it asks you to sign in to an Adobe account.
You can just login with your Google account or your Facebook account
You can just login with your Google account or your Facebook account
When you log in successfully, it looks like this
Now what you want to do is swipe right, you'll see the next screen which has two buttons on the bottom right. The first one allows you import a photo from your gallery into lightroom to and the next opens your camera directly....
Now what you want to do is swipe right, you'll see the next screen which has two buttons on the bottom right. The first one allows you import a photo from your gallery into lightroom to and the next opens your camera directly....


For this purpose of this tutorial I'll be using this picture of my friend @ai_leo_hi I took on his nexus 6p a couple of weeks ago.
You can save it to use, or use a similar picture so you can follow.
You can save it to use, or use a similar picture so you can follow.
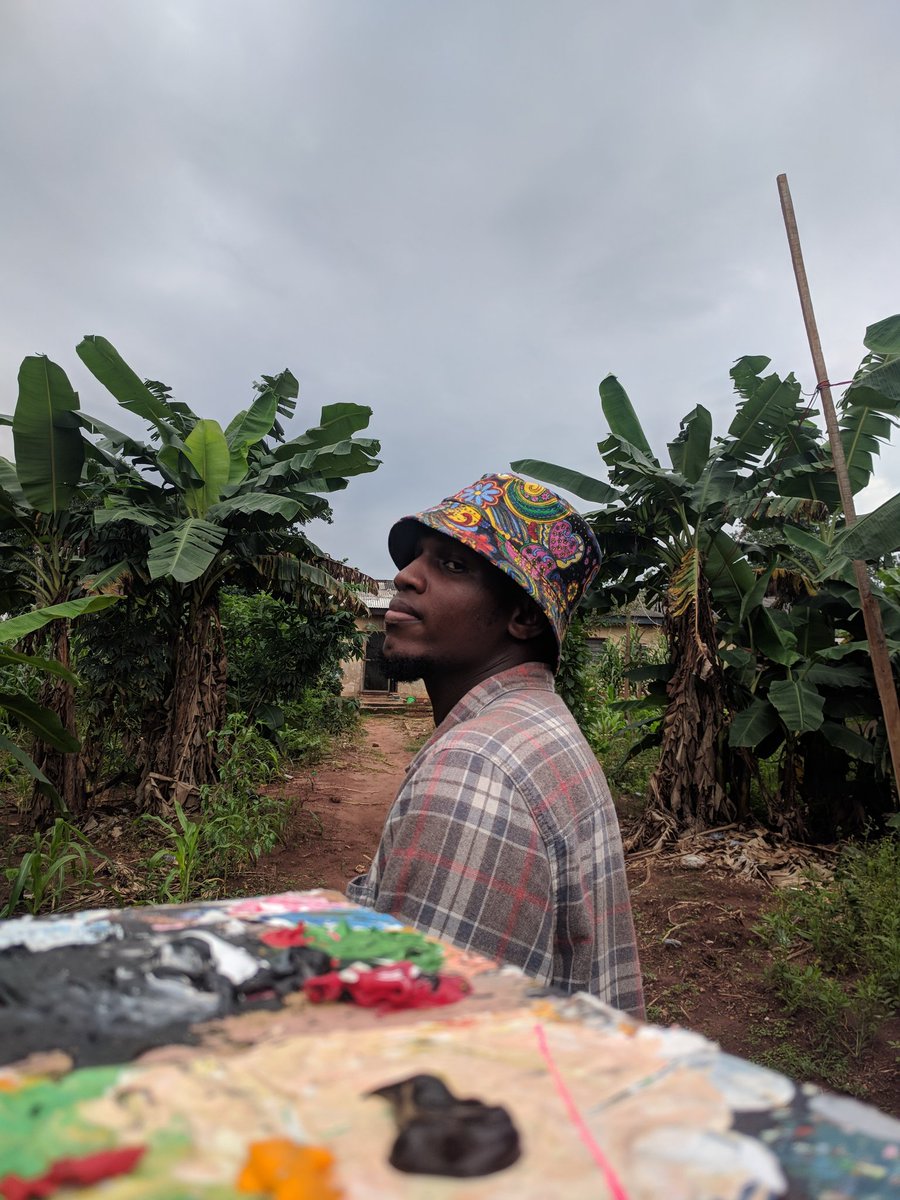
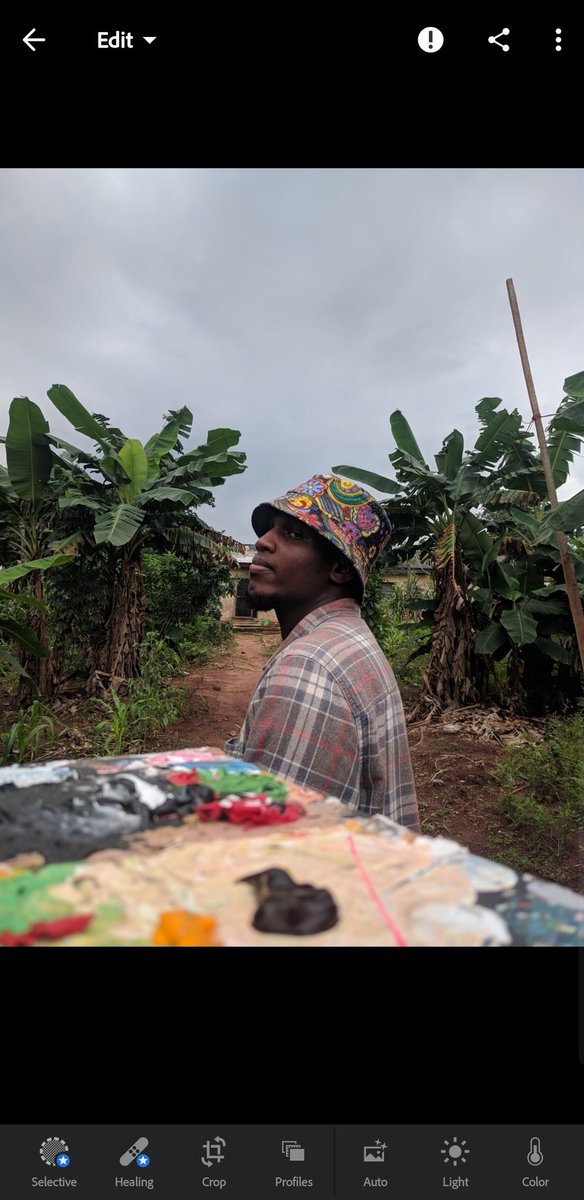
Import it into your lightroom and open it, it should look like this.
The first thing you should do its click the tab on the bottom of your screen that says "light"
Then a drawer comes up
Expose affects the brightness of the picture,
Contrast affects the individual aggressiveness of the colors
Highlights affects the bright parts of the picture...
Then a drawer comes up
Expose affects the brightness of the picture,
Contrast affects the individual aggressiveness of the colors
Highlights affects the bright parts of the picture...

Like the clouds,
Shadows affects the dark parts on the picture, the trees, his cap, any place that under any shade.
Whites affects the white in every color, white is a mixture of all colors, so adding white means you're basically adding light to the colors.
Black is the opposite
Shadows affects the dark parts on the picture, the trees, his cap, any place that under any shade.
Whites affects the white in every color, white is a mixture of all colors, so adding white means you're basically adding light to the colors.
Black is the opposite

Now sliding the bars of each one mentioned above affects the image.
So adjust them till it looks good enough for you.
Tip💡: always reduce highlights and increase whites a bit.
Increase shadows too, to add light to the dark parts and reduce blacks to make the image more punchy.
So adjust them till it looks good enough for you.
Tip💡: always reduce highlights and increase whites a bit.
Increase shadows too, to add light to the dark parts and reduce blacks to make the image more punchy.


Now we've made the image brighter, let's move to colors, on the bottom tab, swipe left you'll see more tabs, click "color". Its right next to light. When you that click on mix, you'll see the individual colors that make up the photo.


Now, looks closely you'll see not all the colors on the tab are in the picture, not to worry, the tab only targets the colors present on the photo.
NOTE: Colors that are similar might affect the same part of the photo e.g blue and aqua.
Hue affects the color shade e.g
Red as....
NOTE: Colors that are similar might affect the same part of the photo e.g blue and aqua.
Hue affects the color shade e.g
Red as....

Pink or orange on both sides, the left and right side makes the color more of the colors before or after the current color on the tab, so to make your red more pink, move left, more orange? move right. The same applies for all the colors.
Red down to Violet
Red down to Violet

Saturation affects how deep a color is,
Completely removing saturation makes a photo black and white.
Luminosity affects how bright a color is, more light means itll be more bright and look like white, less means it'll be deeper till its completely dark.
Completely removing saturation makes a photo black and white.
Luminosity affects how bright a color is, more light means itll be more bright and look like white, less means it'll be deeper till its completely dark.

So, adjust the sliders on each color represented till it looks more vibrant but still natural.
Always make sure your photos look natural.
Improve the individual colors by changing their hue(shade) saturation(how deep) luminosity(brightness).
Make your edits minimal and natural.
Always make sure your photos look natural.
Improve the individual colors by changing their hue(shade) saturation(how deep) luminosity(brightness).
Make your edits minimal and natural.


After working on colors,click done the click the next tab called Effects
Here we would be adding a tone to the highlights and shadows, a tone means a color.
So, well be adding a color to the highlights( bright parts of the photo) with option called 'split toning'
Here we would be adding a tone to the highlights and shadows, a tone means a color.
So, well be adding a color to the highlights( bright parts of the photo) with option called 'split toning'

Now, you dont always have to do this, but I'm doing this to remove the extra 'redness' in his skin, so we'll work on the color that affects redness of skin, which is orange.
Now on the color wheel the opposite of orange is blue.
So we'll be adding a blue tone to the highlights
Now on the color wheel the opposite of orange is blue.
So we'll be adding a blue tone to the highlights


Now its looking too blue, that because the blue tone spilled into the shadows as well,
To correct that we add the color opposite to blue on the color wheel, orange, to the shadows,
So, we'll be adding an orange tone to the shadows.
Remember to always keep edits minimal...
To correct that we add the color opposite to blue on the color wheel, orange, to the shadows,
So, we'll be adding an orange tone to the shadows.
Remember to always keep edits minimal...


Next thing we're to do is add a vignette to focus attention on the centre of the image,
Back in effects, you'll see vignette.
Drag it slighty to the left, to add a vignette to the image .
It removes light from the edges of the photo thereby making the centre seem brighter...
Back in effects, you'll see vignette.
Drag it slighty to the left, to add a vignette to the image .
It removes light from the edges of the photo thereby making the centre seem brighter...


Now the last thing we want to do is add a matte effect to make the picture look softer and calmer with all the many colors in it.
To do that, on your bottom tab scroll back to light and click on curve.
Now this line is divided into three sections....
To do that, on your bottom tab scroll back to light and click on curve.
Now this line is divided into three sections....


The top right part of the line affects the highlights(bright parts of the photo)
The bottom left affects the shadows( the dark part of the photos)
The middle section affects the mid tones ( everything else in the photo)
The bottom left affects the shadows( the dark part of the photos)
The middle section affects the mid tones ( everything else in the photo)

We pull the bottom left part up and a little to the left.
What this does is, it removes contrast from the shadows and darkens it. Reducing the vibrancy from the shadows while maintaining the midtone
So it's like throwing on a dark cover thats dark, but not reflective I.e. Matte!
What this does is, it removes contrast from the shadows and darkens it. Reducing the vibrancy from the shadows while maintaining the midtone
So it's like throwing on a dark cover thats dark, but not reflective I.e. Matte!


You don't want to drag it too much as that would make the change too drastic and ruin the image
So,
1. Make your edits natural.
2. Don't make them too saturated with color
3. All colors reflect light, so a red cap might reflect red to your face and make it "redder"
So,
1. Make your edits natural.
2. Don't make them too saturated with color
3. All colors reflect light, so a red cap might reflect red to your face and make it "redder"
Here is the end of this edit tutorial guys, I hope it helps,
Thanks for following.
Remember, pictures document moments, so take pictures. I'll be happy to answer questions in the comments section.
Please retweet this thread for others to see and learn from.
Happy Sunday!!
Thanks for following.
Remember, pictures document moments, so take pictures. I'll be happy to answer questions in the comments section.
Please retweet this thread for others to see and learn from.
Happy Sunday!!