,
178 tweets,
221 min read
Read on Twitter
#mylastpc
Ever since I was a kid, I've always built my main rig myself.
The time when that was practical or necessary passed a long while ago, but it was an eccentricity I couldn't ever let go.
Ever since I was a kid, I've always built my main rig myself.
The time when that was practical or necessary passed a long while ago, but it was an eccentricity I couldn't ever let go.
Some of it was borne out of the DIY punk rock impulse, some of it out of a sense of craftsmanship, some of it out of overindulgence of a control complex, I always preferred writing code on something that I built myself.
My main rig right now has lasted since 2009 and its retirement is nigh. While Sandy Bridge proved to be a durable platform, the models are finally getting too big to train in a timely fashion.
And this was the first time I paused before starting to look at components.
And this was the first time I paused before starting to look at components.
I work mostly with super sensitive data these days, but as I was spec'ing out the box I had this nagging feeling that if this machine lasts as long as my last one, the likelihood is not very high that I will have to build another one again.
Thinking about how much the cloud has changed from 2009 to today, I just can't imagine that it'll ever be better again for me to have this kind of computing power on premise.
It was the realization that I'm making #mylastpc.
It was the realization that I'm making #mylastpc.
So, if this is going to be the last one, I'm going HAM.
I've always wanted the fastest computer ever. Now I can finally build it.
I'm getting the last of the components over the next week, so I'll be documenting #mylastpc over the next little while.
I've always wanted the fastest computer ever. Now I can finally build it.
I'm getting the last of the components over the next week, so I'll be documenting #mylastpc over the next little while.
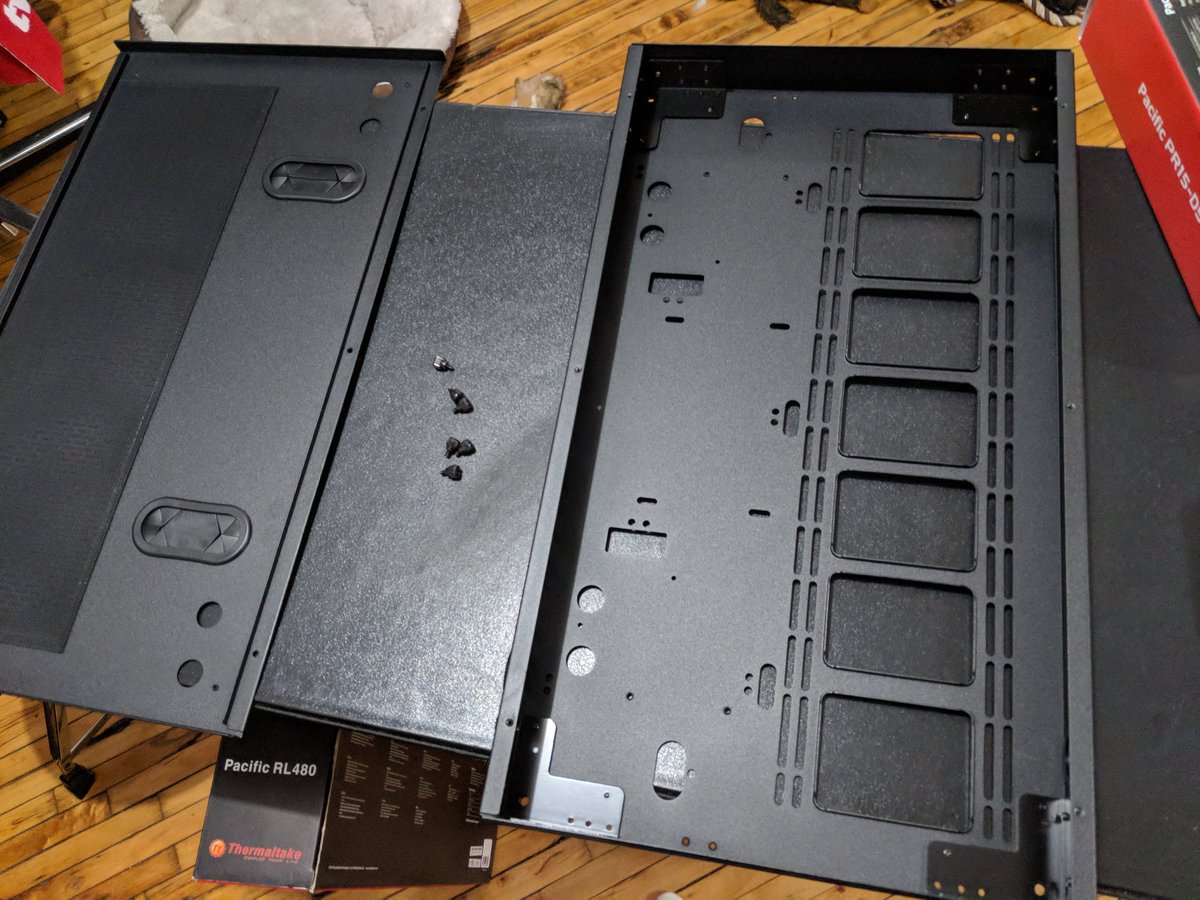
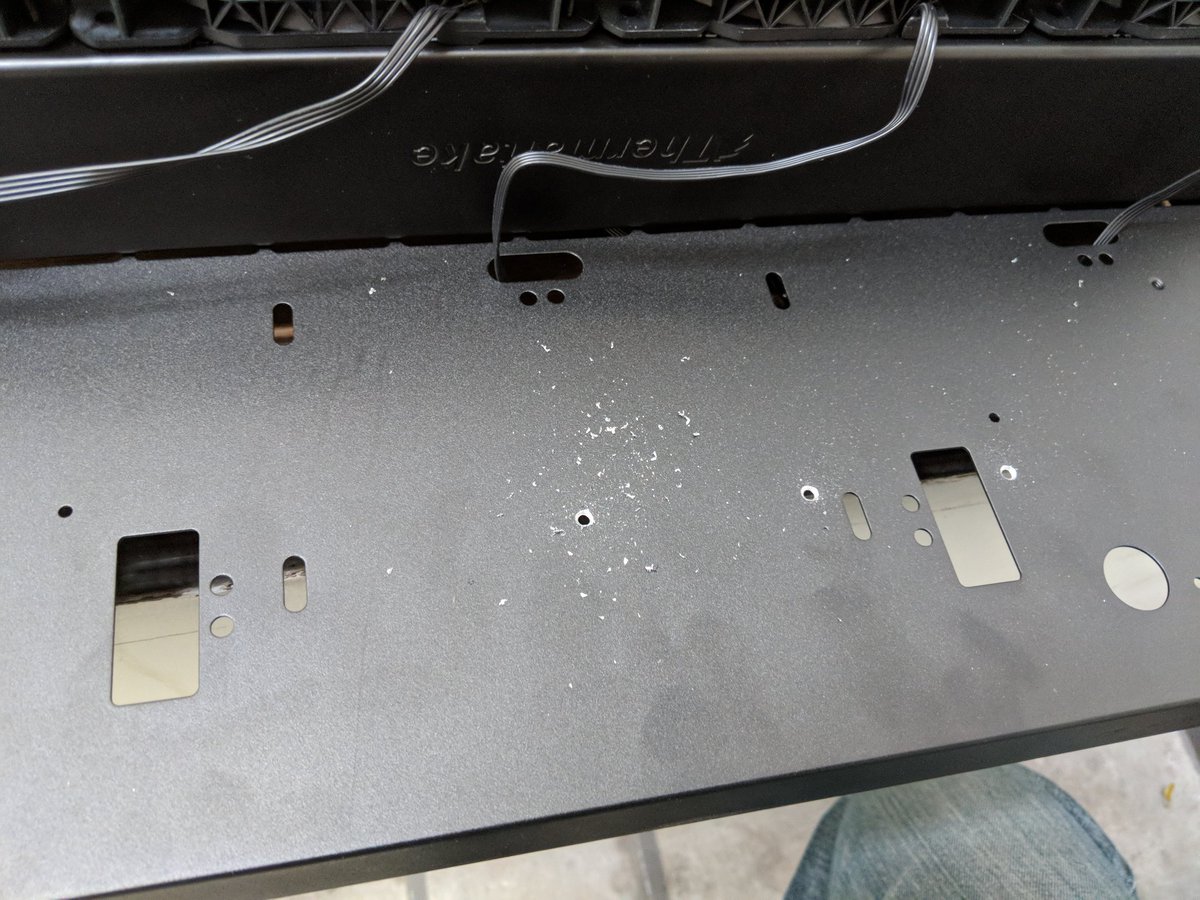
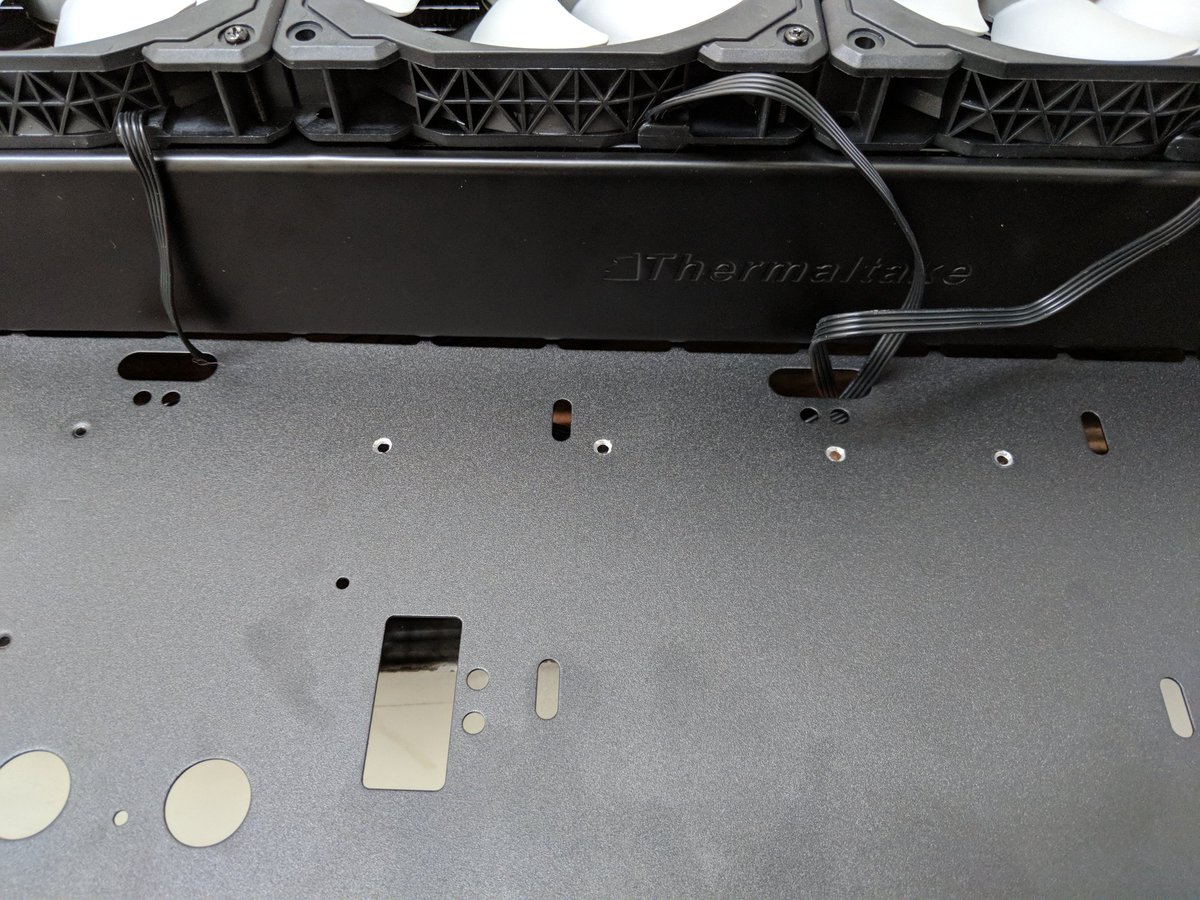
First up is the case. Not that my living room needs another overtly dork display, I want this machine to be something I can put on the wall. A rig that looks so good it can't be under a table.
I found the Thermaltake P7.
It has a main block for the rig itself and two expansion wings for the water cooling loops. We start #mylastpc disassembling one. 
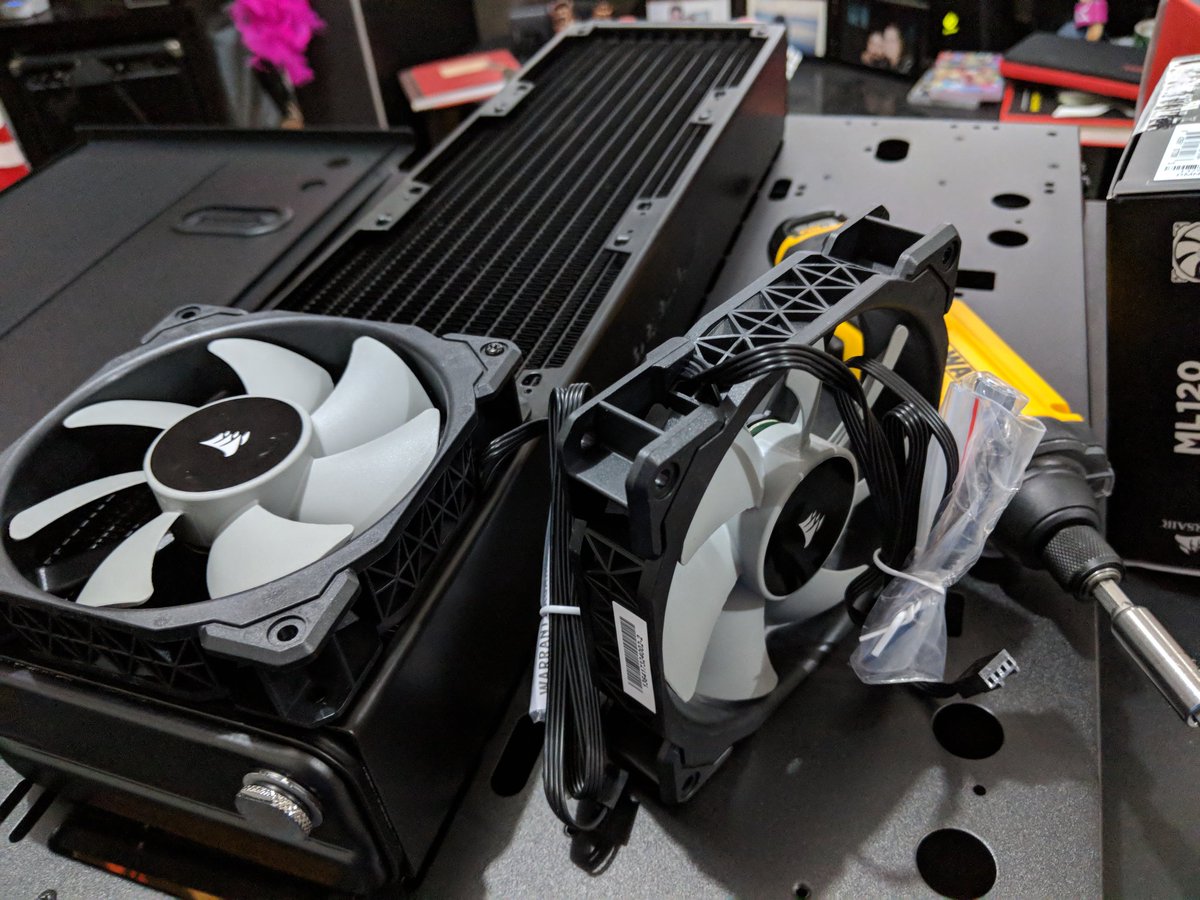
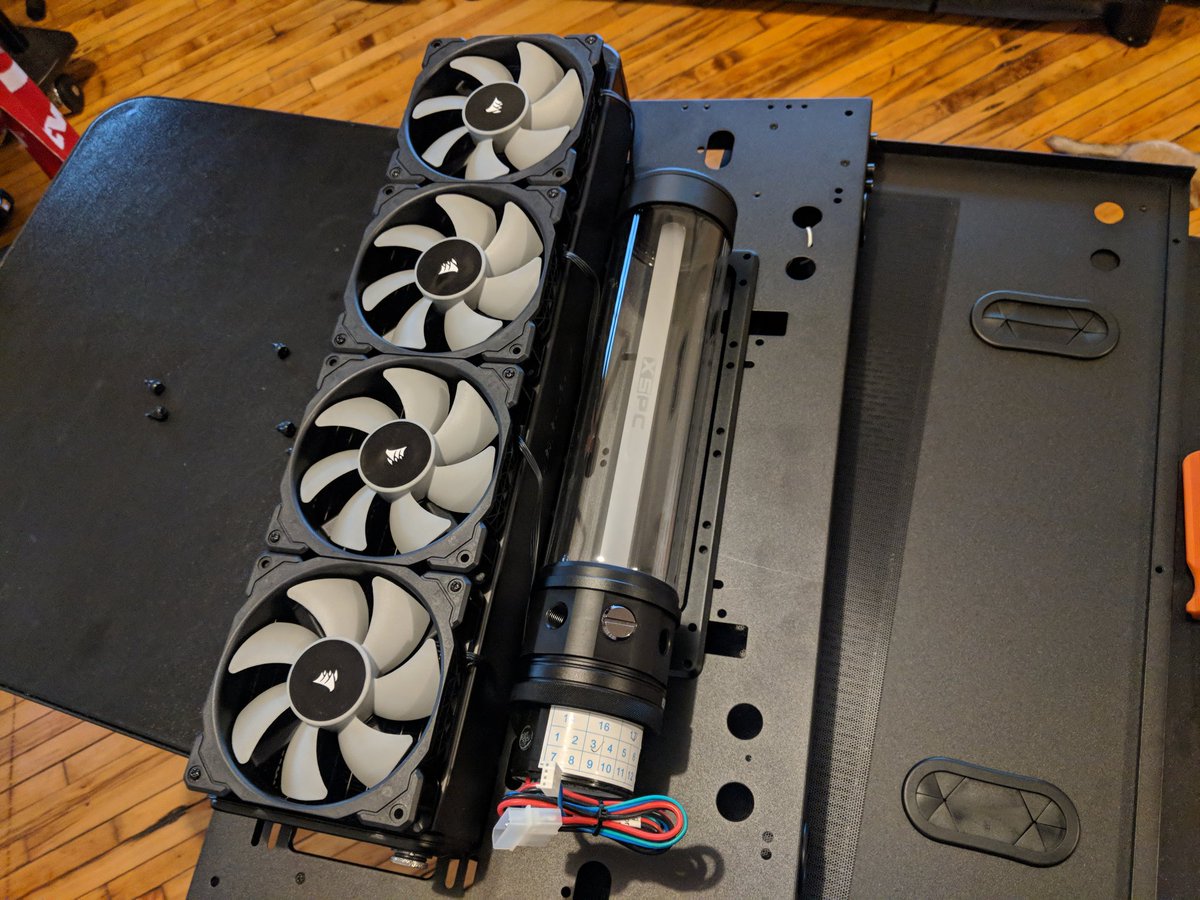
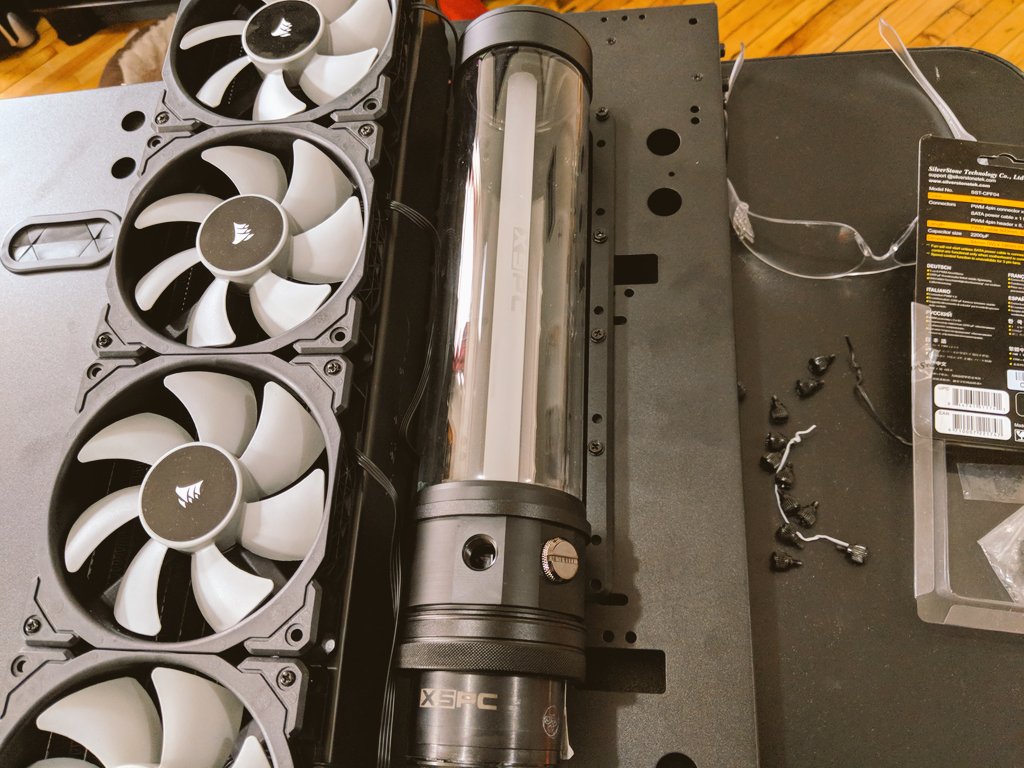
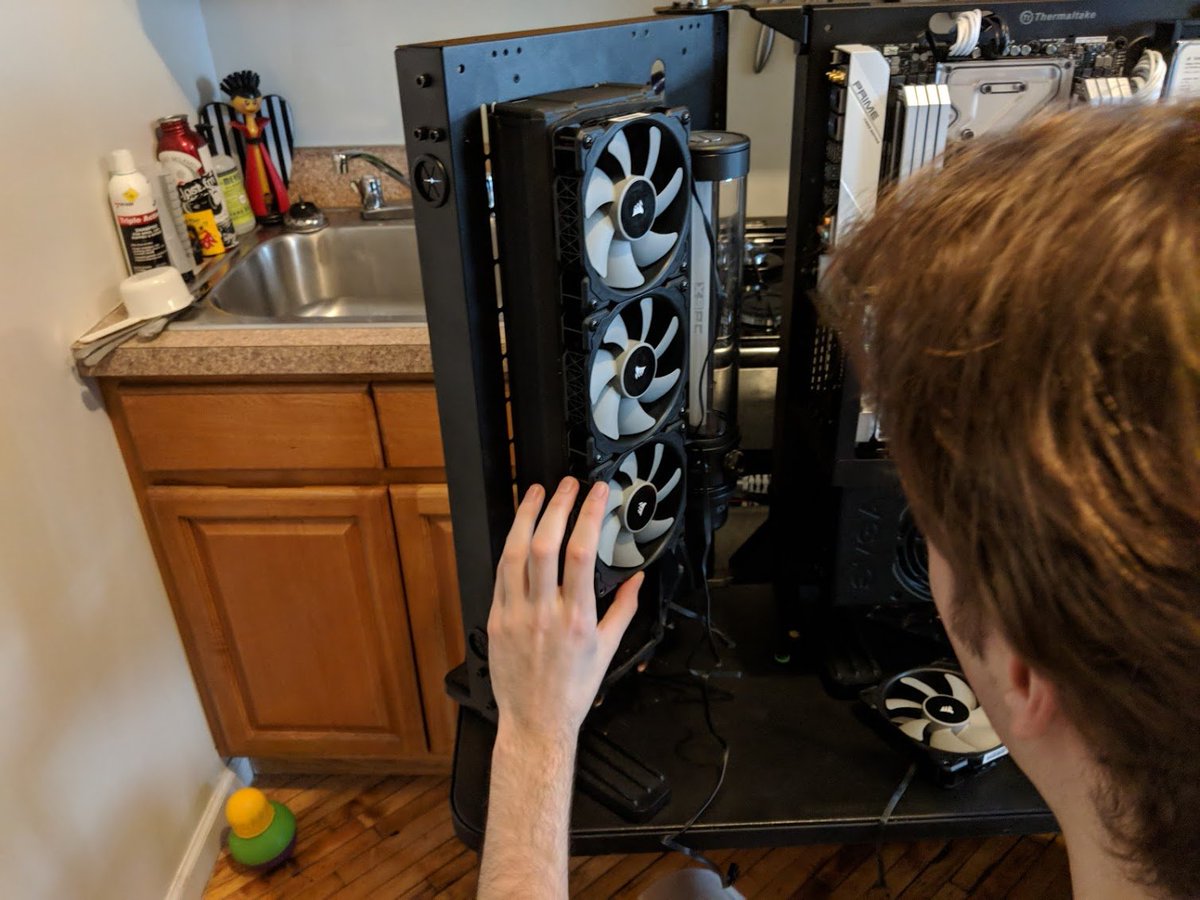
Next we mount a fatty-boom-batty 480mm dual row radiator from Thermaltake.

We're going to pop four 120mm Corsair maglevs on each radiator.
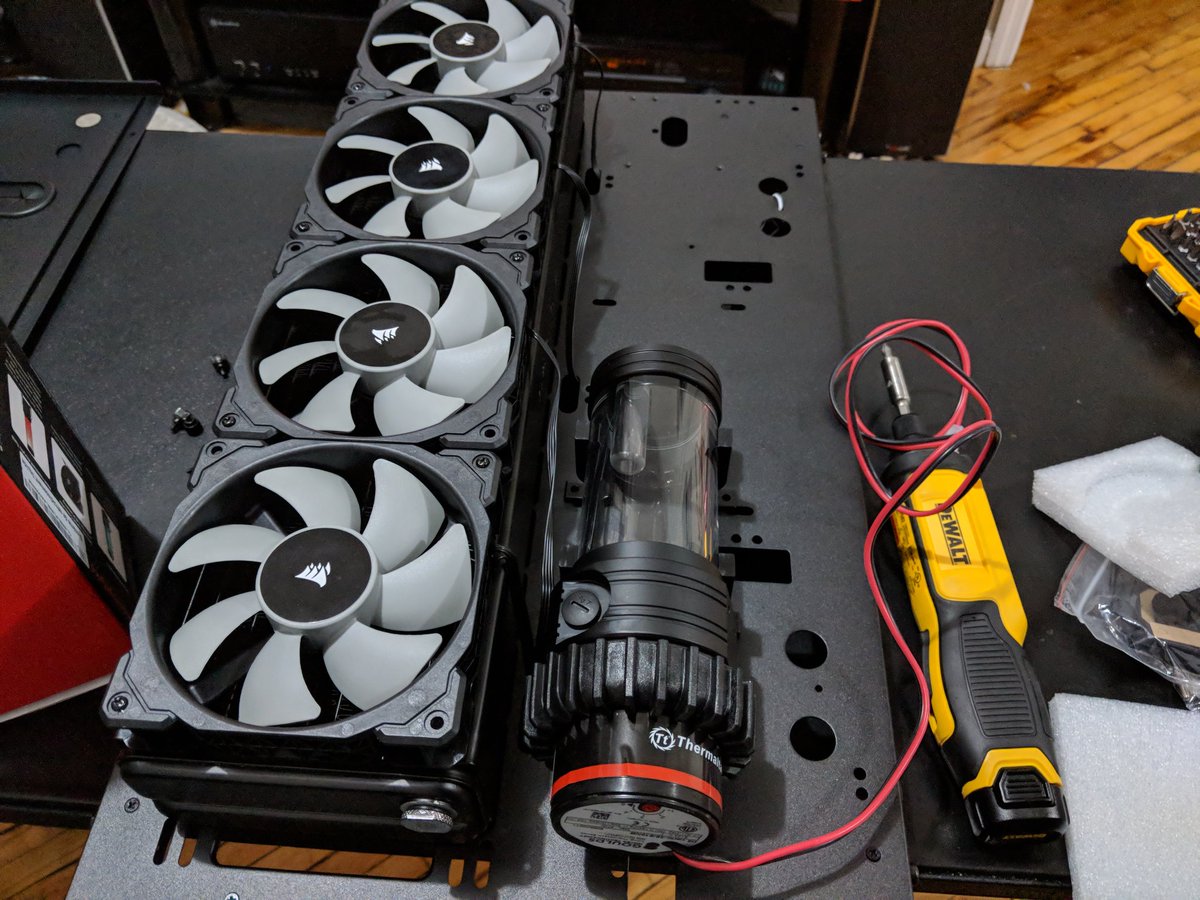
Ada with a finished radiator for scale.
We'll have one radiator, pump and reservoir for CPU, one for GPUs.
We'll have one radiator, pump and reservoir for CPU, one for GPUs.

Slight hitch - this D5 pump is beefy enough, but the scale of the reservoir just doesn't work. Need something bigger to match.
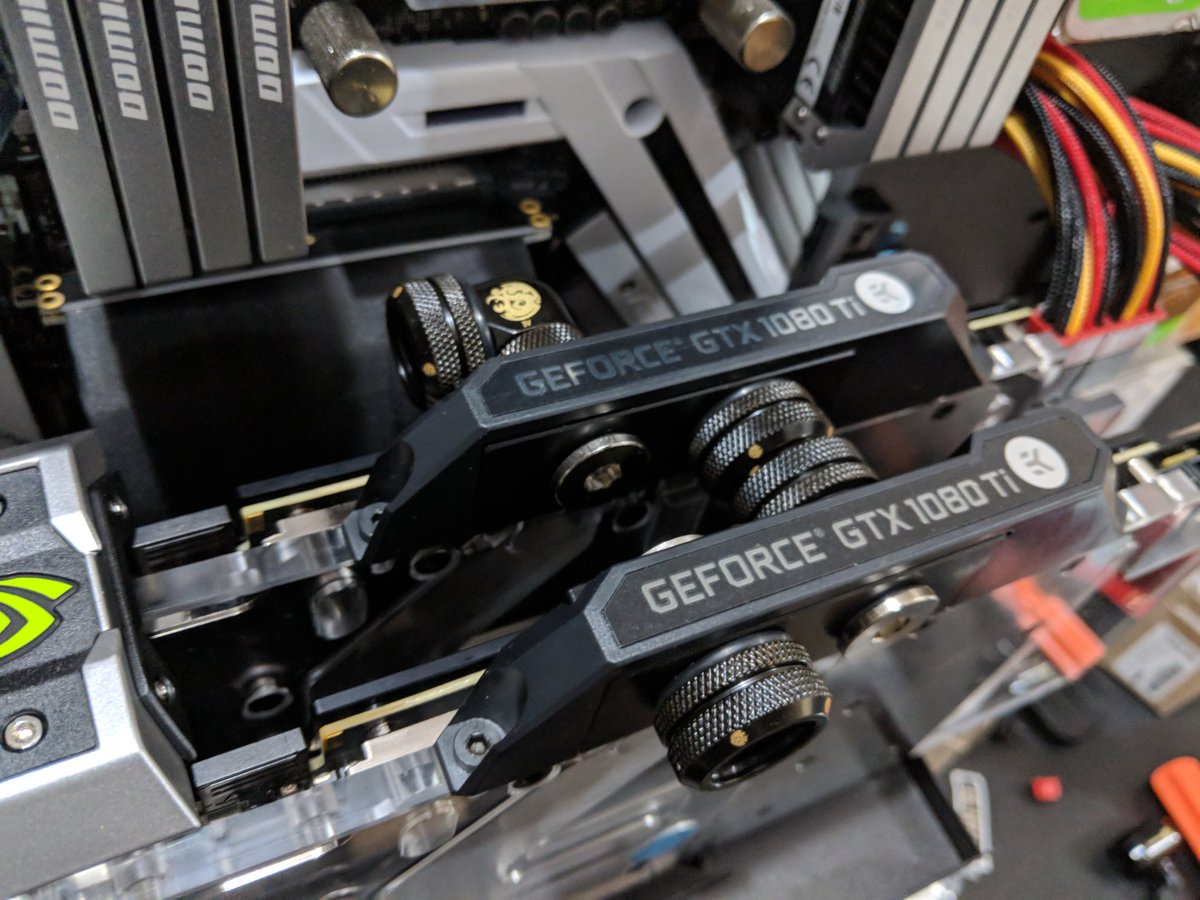
Next up - installing the water blocks on the GPUs.
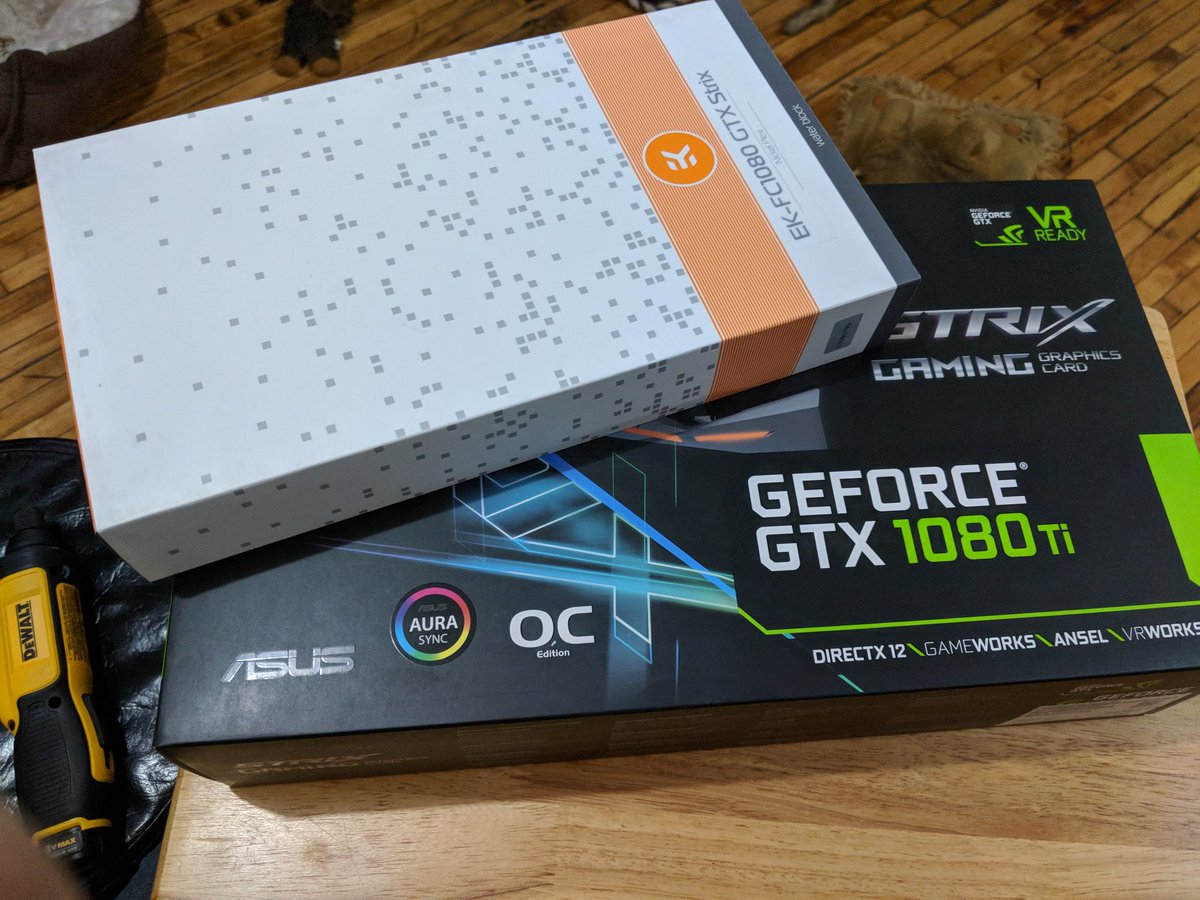

@nvidia The Strix cards are crazy easy to work with. Four tiny screws and the elaborate aircooler is off.
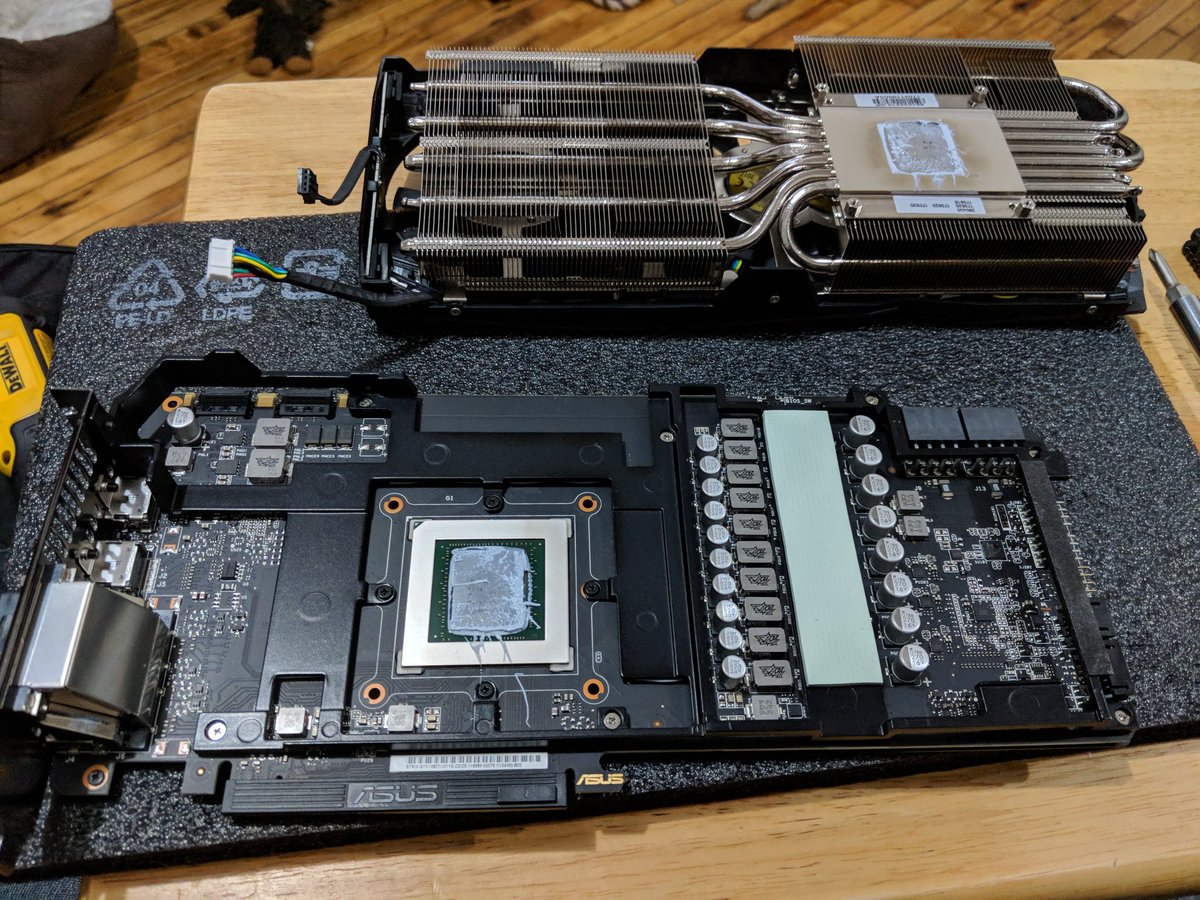
@nvidia Stripped screw made getting the backplate off difficult. Further bad news, this waterblock doesn't fit on the latest Strix 1080ti cards.
That cap on the top juuuuust doesn't fit.
That cap on the top juuuuust doesn't fit.
@nvidia Got another @ekwaterblocks order in - should be showing up shortly after the processor next week.
@nvidia @EKWaterBlocks Got the new reservoir and pump combos for #mylastpc in this weekend. Better proportion, but don't think I'll be hooking up the light in the cylinder.
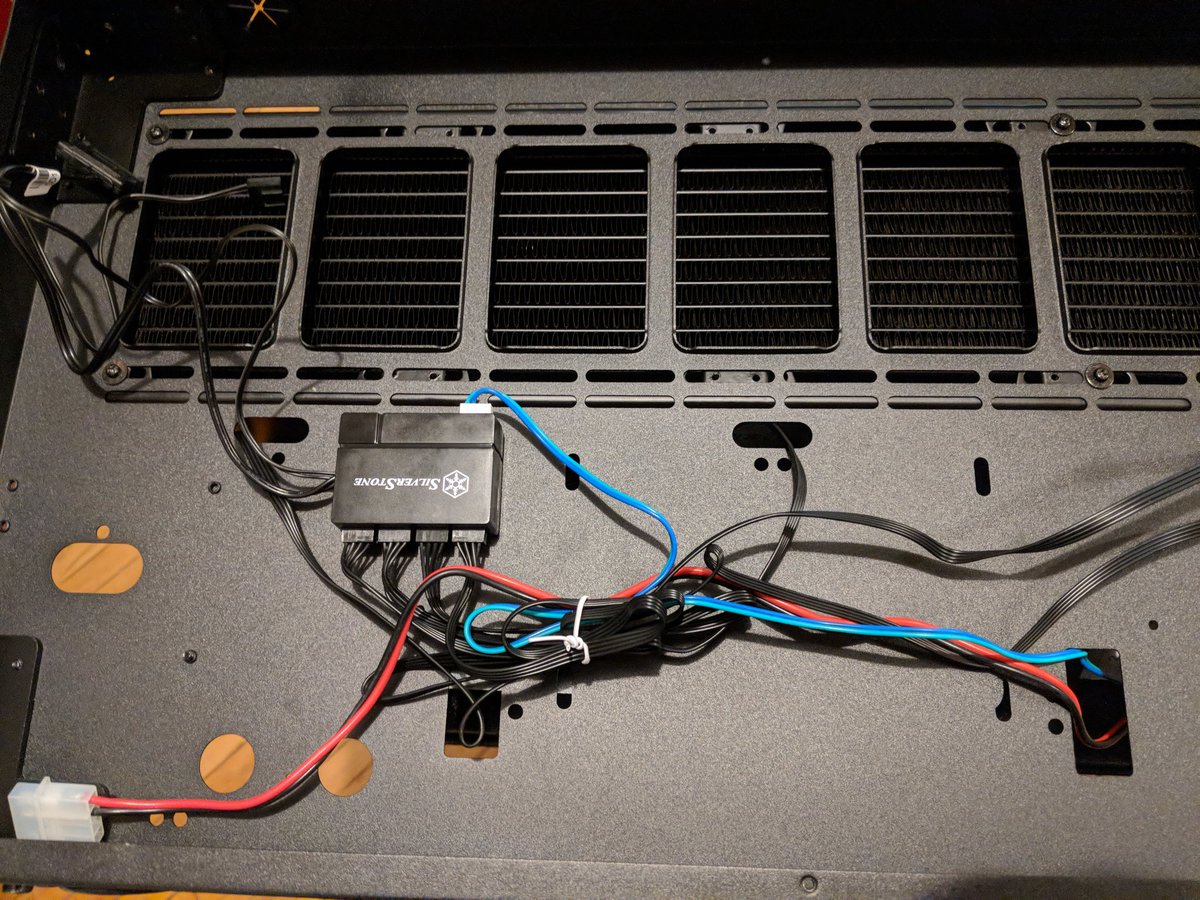
@nvidia @EKWaterBlocks Using Silverstone's 8-port power management hub to distribute power to each cooling loop. CPU and GPU PWM will control air and liquid flow.
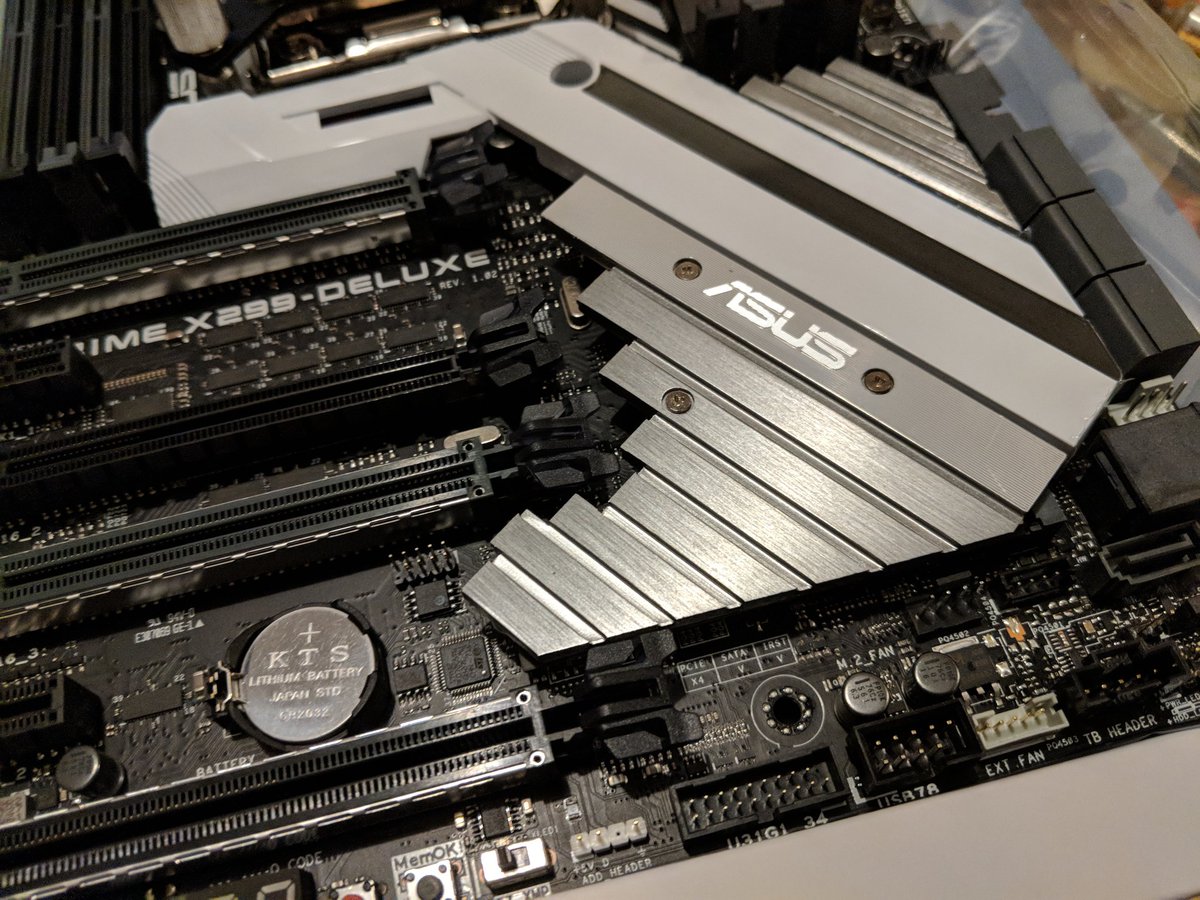
@nvidia @EKWaterBlocks Spoiling the rest of the build a bit, mobo is an @ASUS Prime X299 Deluxe.
Choice here was tough as there is no clear winner for this socket.
Choice here was tough as there is no clear winner for this socket.
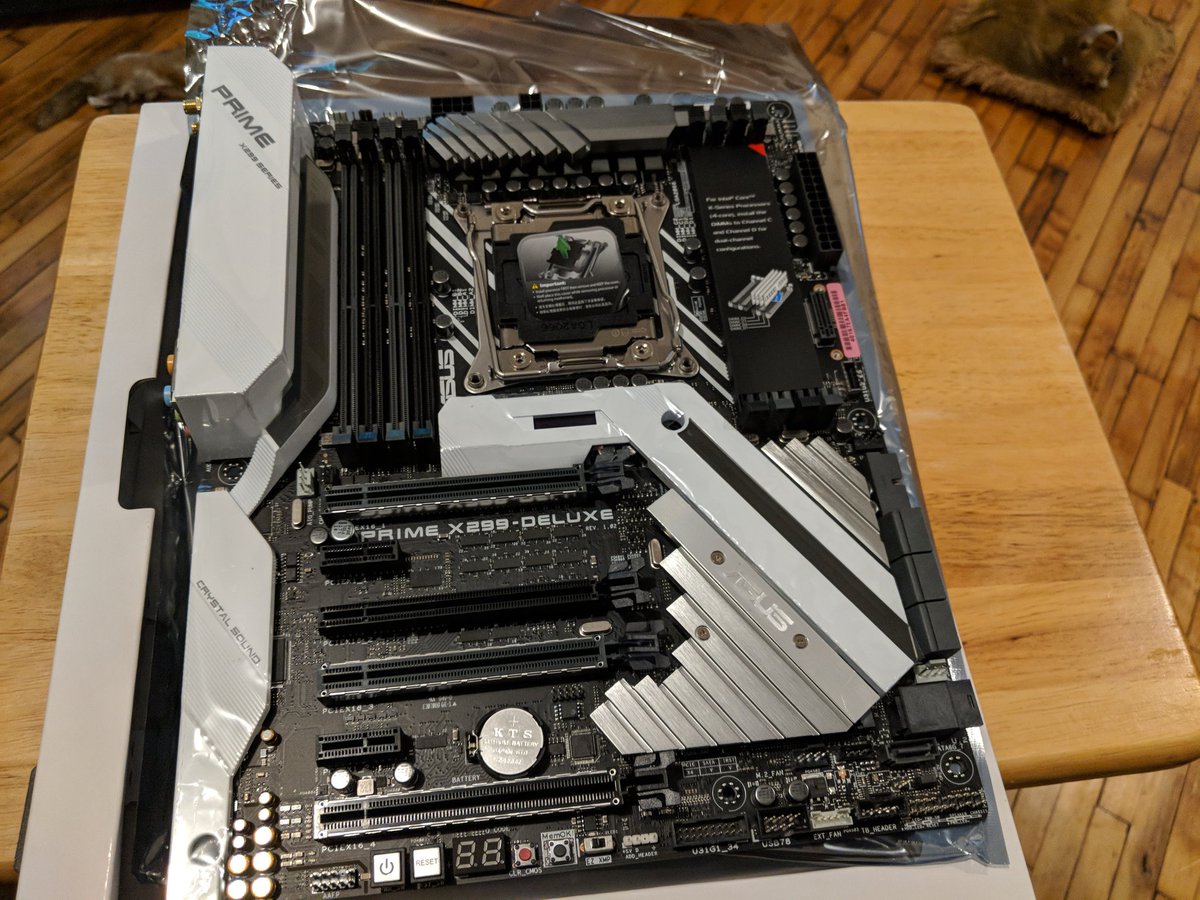
@nvidia @EKWaterBlocks @ASUS Primary issue was finding something with plenty SATA ports, PCI-E lanes, and M2 that doesn't block.
There just isn't a board that gives you everything yet. Most of the differentiation is in RGB lighting options, which aren't a good fit on this build.
There just isn't a board that gives you everything yet. Most of the differentiation is in RGB lighting options, which aren't a good fit on this build.
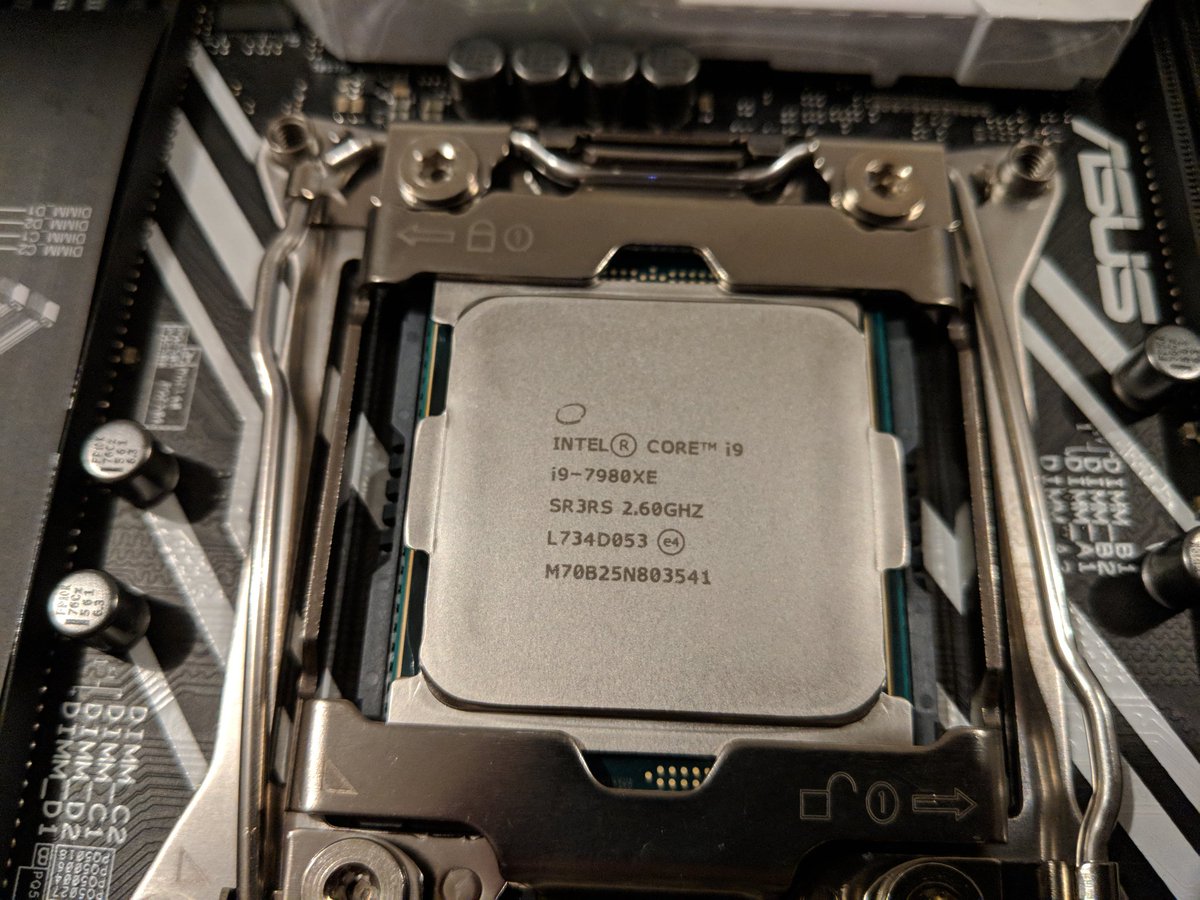
@nvidia @EKWaterBlocks @ASUS #mylastpc's centerpiece is the @intel Core i9-7980XE.
18 cores. 36 threads. Enough L3 cache to fit my apartment.
18 cores. 36 threads. Enough L3 cache to fit my apartment.

@nvidia @EKWaterBlocks @ASUS @intel This was another of the tough calls for #mylastpc. Still unsure I ended up in the right place.
Cores, not clock speed, are the primary gates on my workloads, so early on I wanted to go Xeon.
Cores, not clock speed, are the primary gates on my workloads, so early on I wanted to go Xeon.
@nvidia @EKWaterBlocks @ASUS @intel Primary issue again was motherboard selection. Couldn't find a dual and quad socket board with dual M2 support. PCI-E lanes were limited for the single socket boards. And it appears ECC hampers a lot of the model training I want to do.
@nvidia @EKWaterBlocks @ASUS @intel Skylake-X was the platform that paired the consumer I/O and lane width with a metric shit-ton of cores.
There are quite a few drawbacks though.
There are quite a few drawbacks though.
@nvidia @EKWaterBlocks @ASUS @intel Biggest one is thermal - the 7980XE's thermal density eliminates the possibility of air cooling.
Additionally, the clock speed on Skylake-X starts to take a diver with the addition of cores, making the 7980XE one of the slowest in Intel's current stable.
Additionally, the clock speed on Skylake-X starts to take a diver with the addition of cores, making the 7980XE one of the slowest in Intel's current stable.
@nvidia @EKWaterBlocks @ASUS @intel Much could be also said about the diminishing returns. Extreme Edition has almost never been worth the additional cost.
But hey. That's not what we're worried about with #mylastpc.
But hey. That's not what we're worried about with #mylastpc.
@nvidia @EKWaterBlocks @ASUS @intel This is the first time I've dropped the hottest chip going into a socket.
Not sure that feeling is worth the MSRP, but it did feel pretty great.
Not sure that feeling is worth the MSRP, but it did feel pretty great.
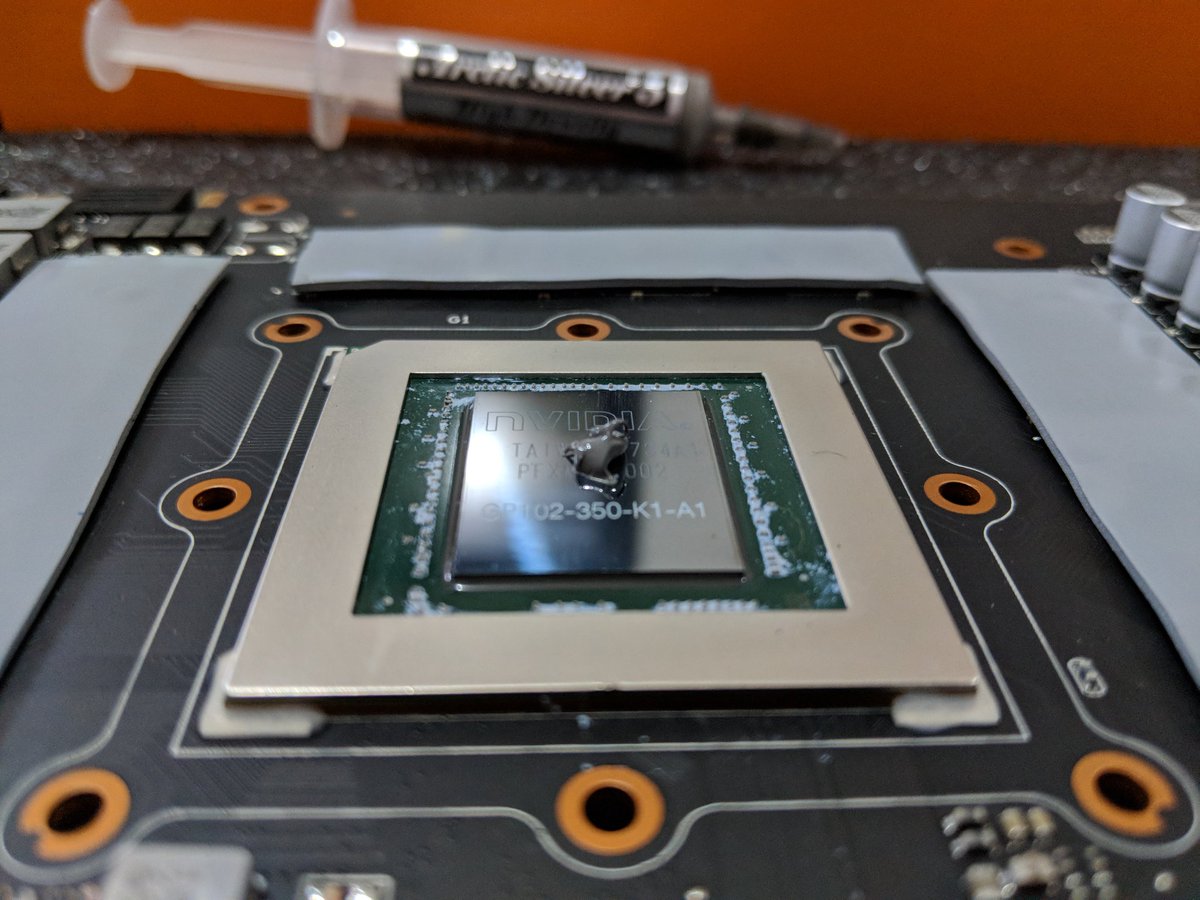
@nvidia @EKWaterBlocks @ASUS @intel Kept my long time favored thermal grease of choice with Arctic Silver.
My application game has suffered greatly.
My application game has suffered greatly.
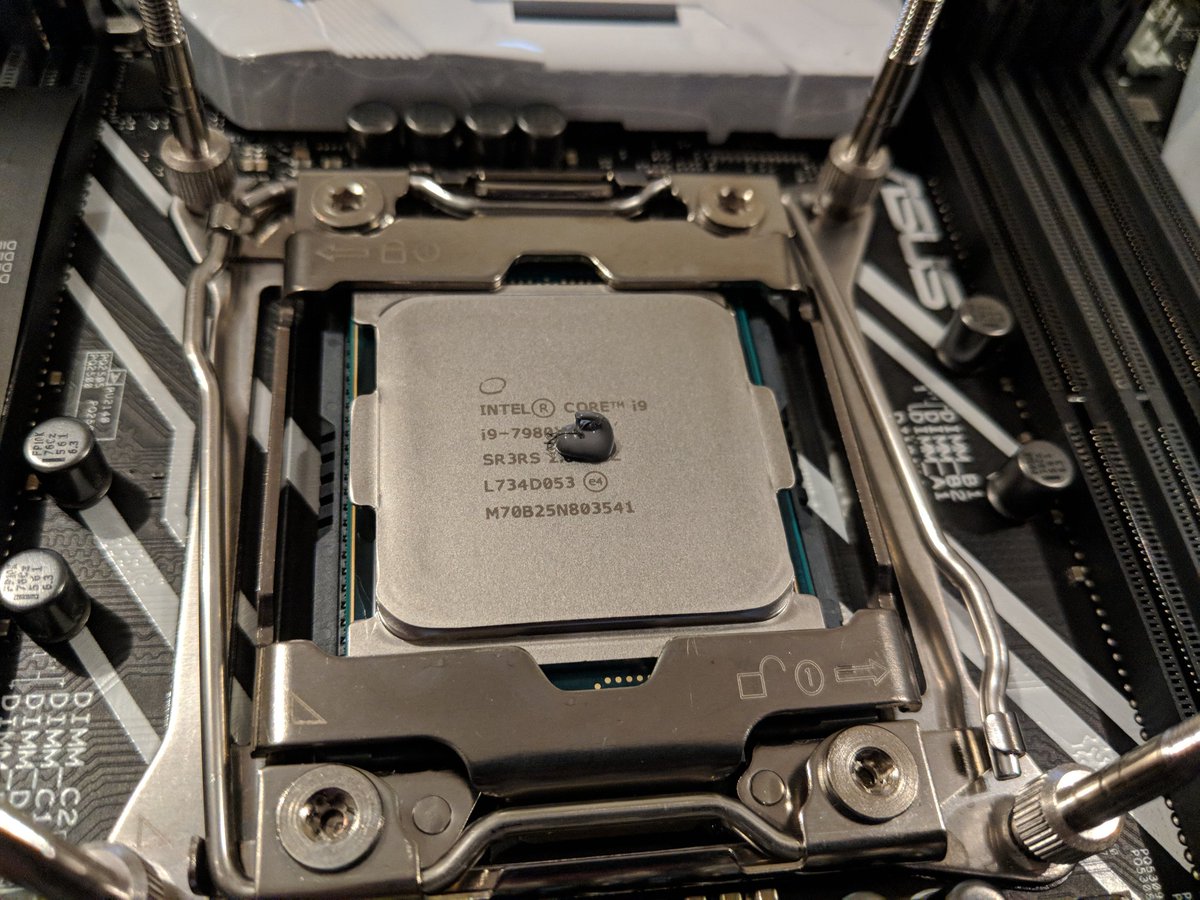
@nvidia @EKWaterBlocks @ASUS @intel .@intel didn't even bother shipping an air cooler with the 7980XE whose TDP is driving the decision to liquid cool.
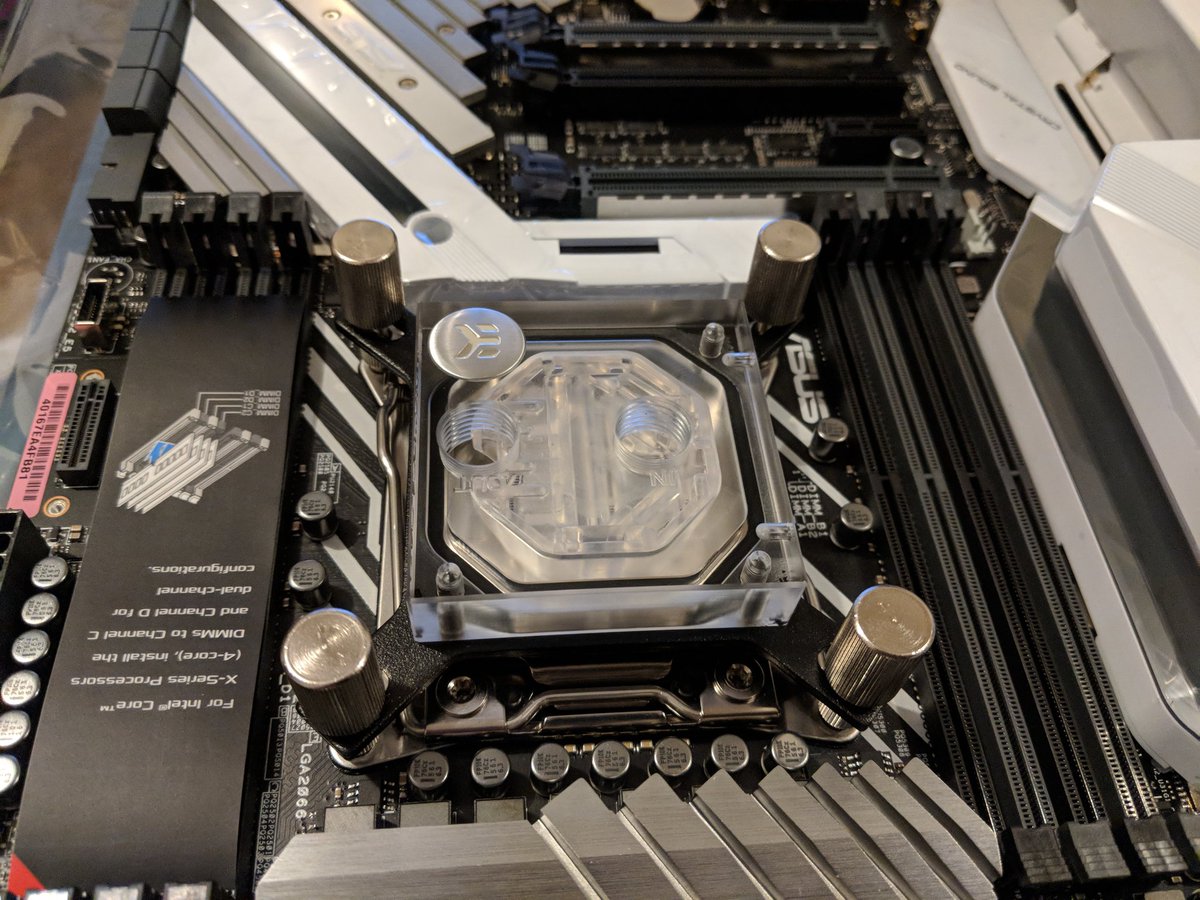
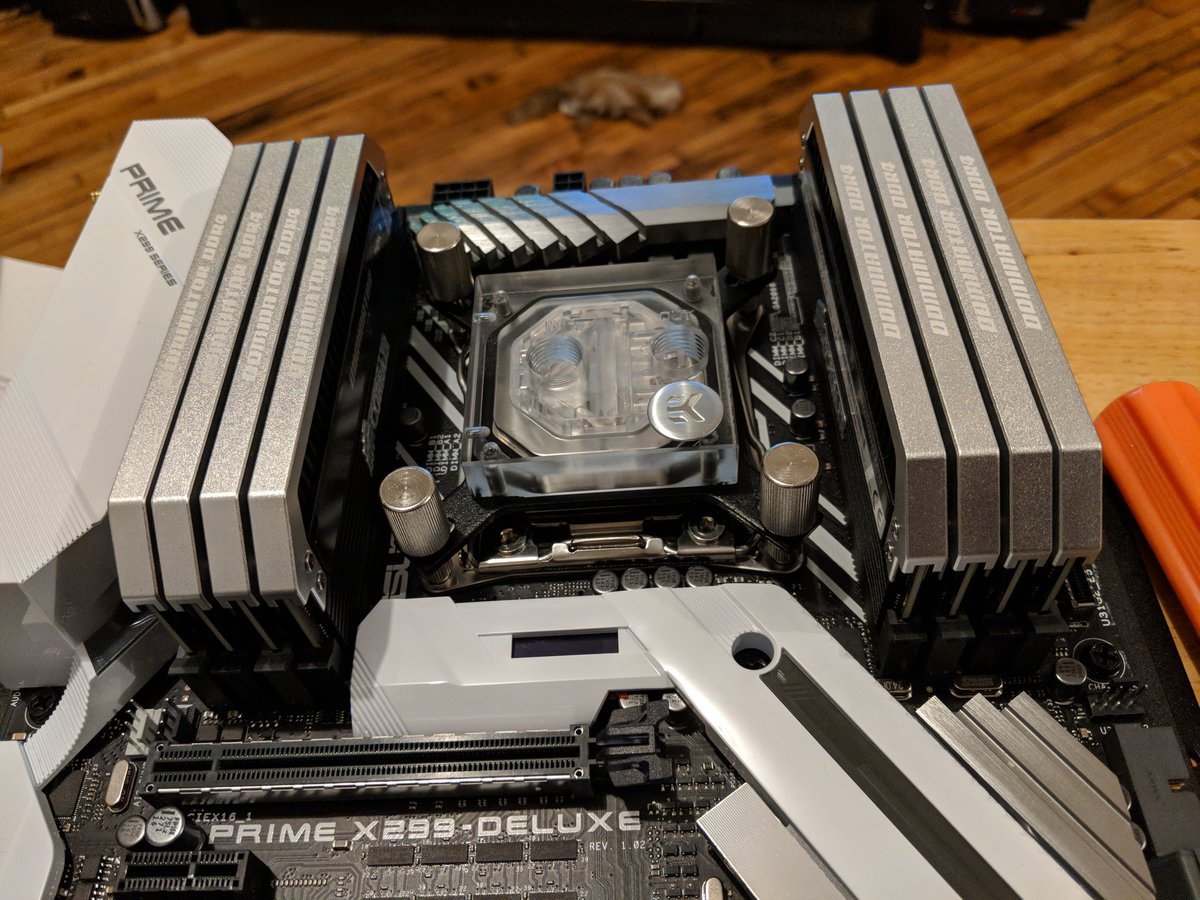
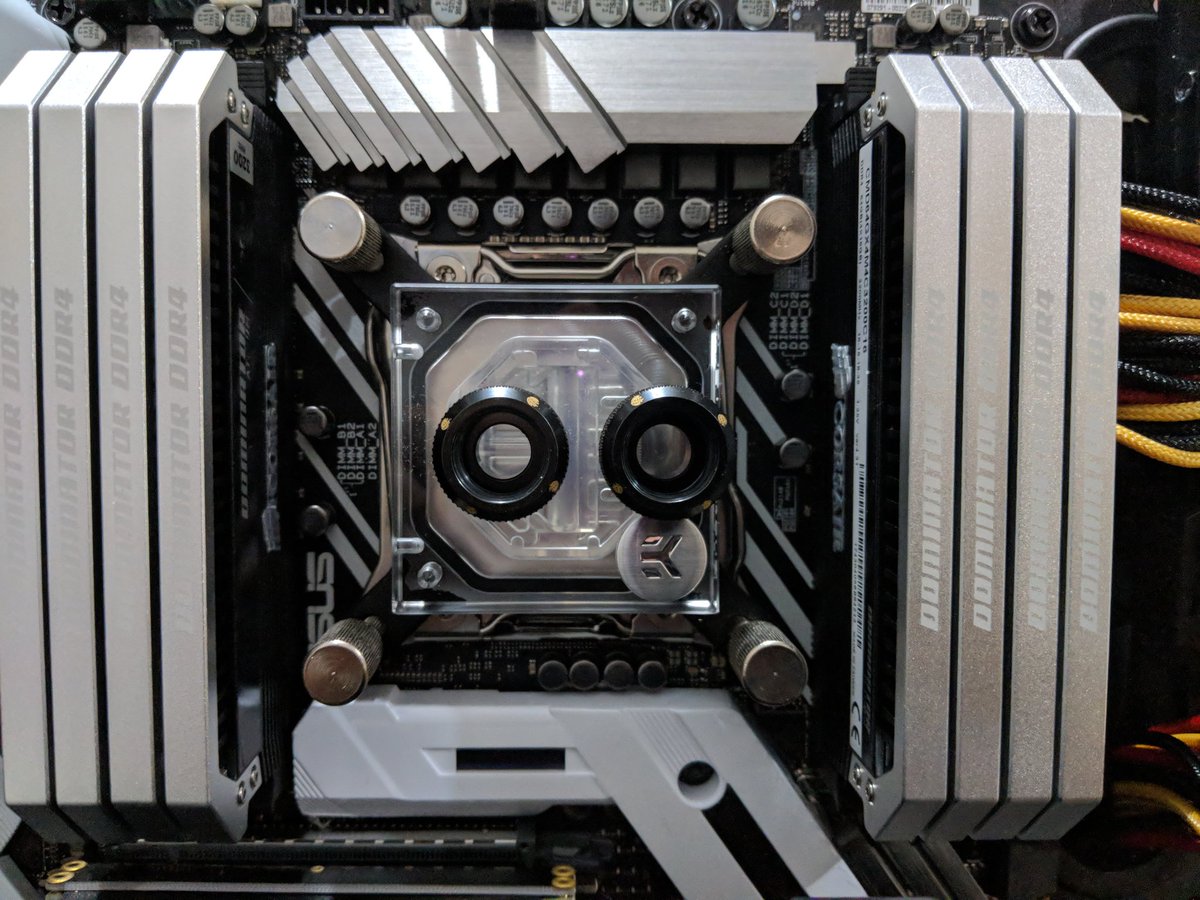
We go with the @EKWaterBlocks Supremecy Evo to try to tame these insane thermals.
Super easy install on the Asus board - no backplate needed.
We go with the @EKWaterBlocks Supremecy Evo to try to tame these insane thermals.
Super easy install on the Asus board - no backplate needed.
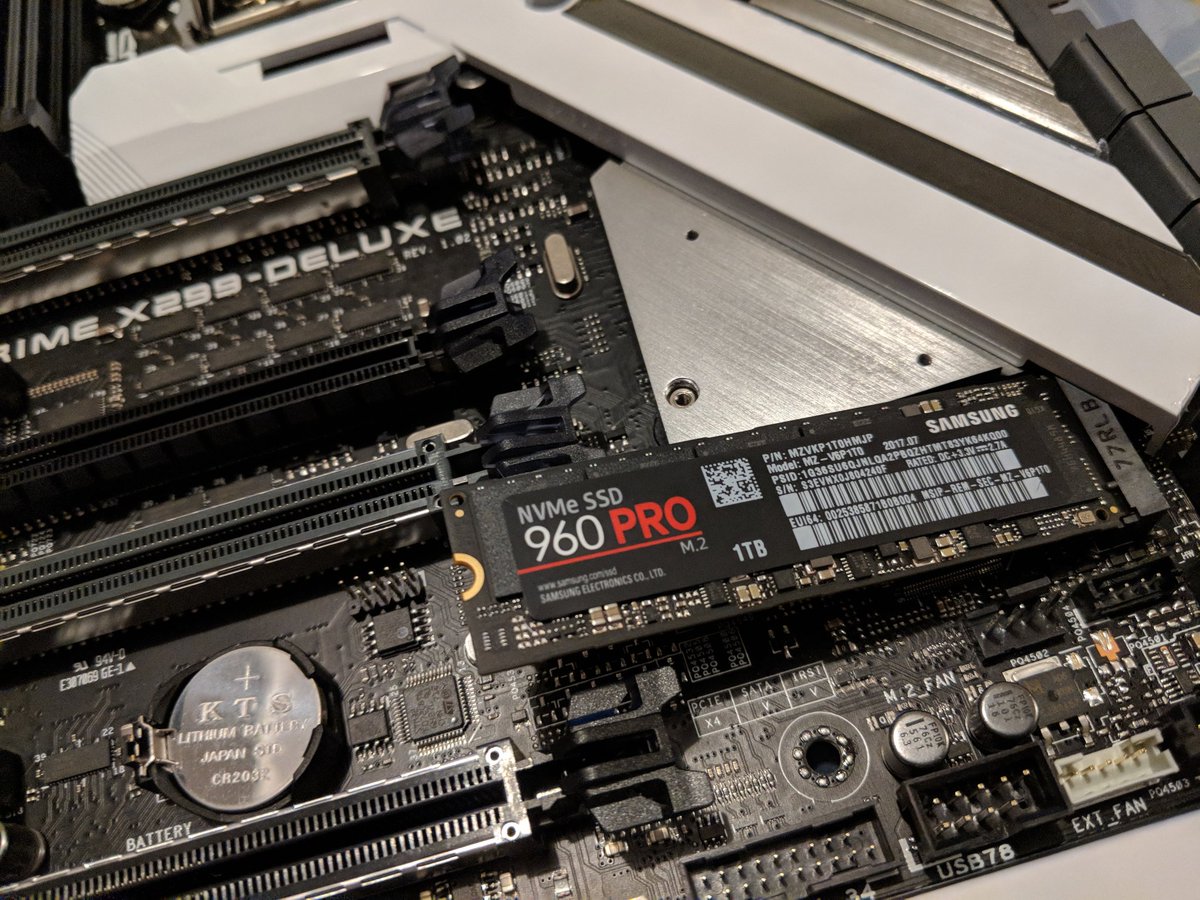
@nvidia @EKWaterBlocks @ASUS @intel For quick data exploration, we're dropping in a M2 SSD stripe with two 1TB Samsung 960 Pros.
Killer feature of this mobo is a discrete heatsink for one of the M2 slots.
Killer feature of this mobo is a discrete heatsink for one of the M2 slots.
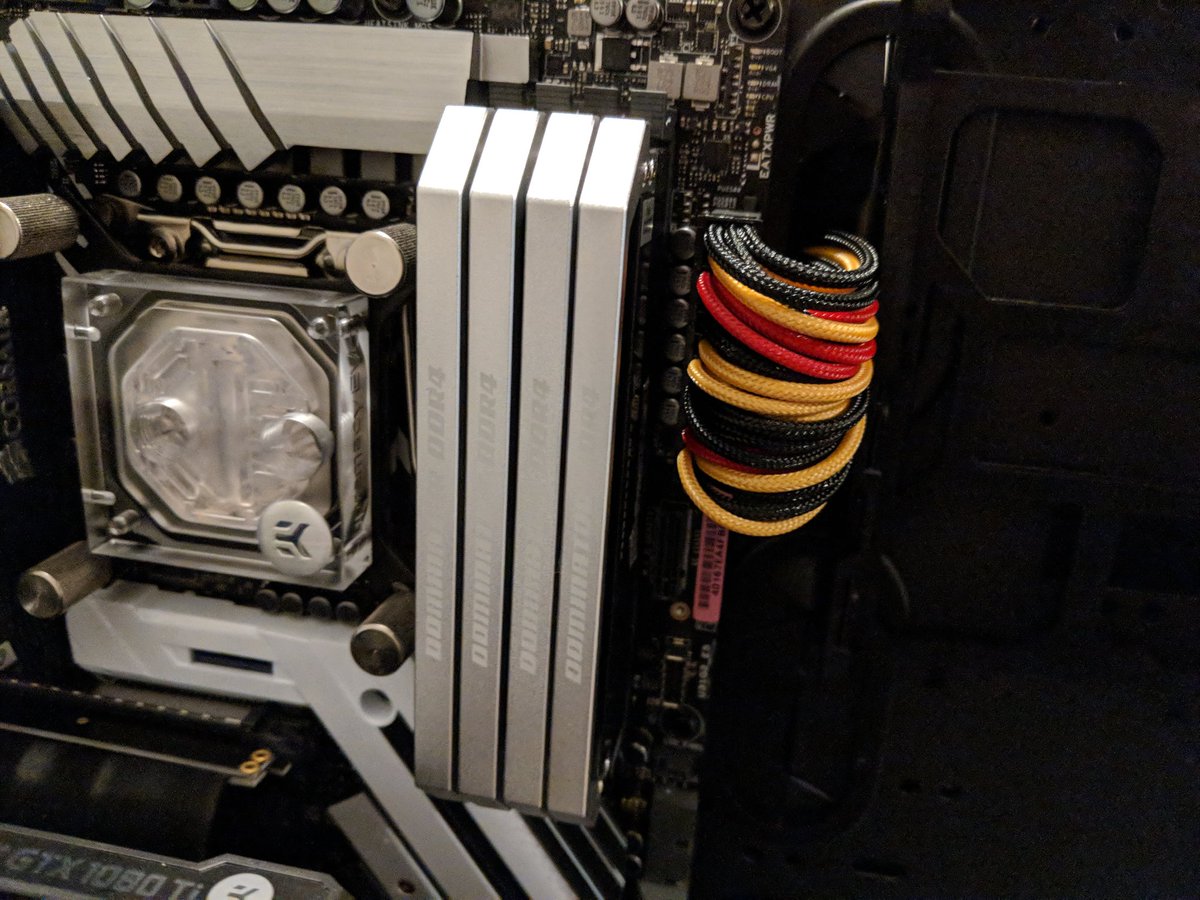
@nvidia @EKWaterBlocks @ASUS @intel Finishing out the evening's work, we'll drop in an aircraft carrier of RAM. Maxing out the platform with 128GB of @CORSAIR Dominator Platinum.
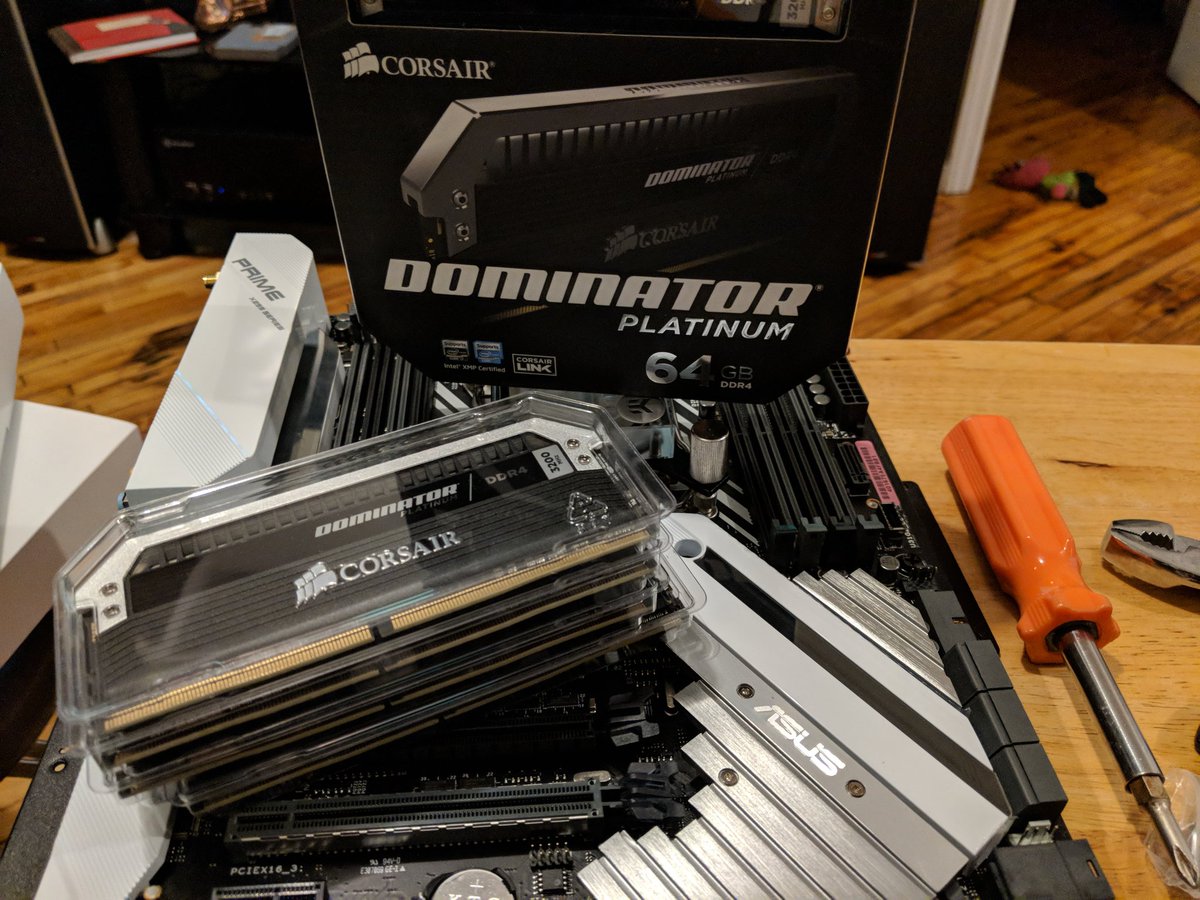
@nvidia @EKWaterBlocks @ASUS @intel @CORSAIR I've been a Mushkin fan for ages, but looks like they've lost the latency crown to the Dominator line.
This boat of DDR4 3200 will ferry some pretty hefty dataframes.
This boat of DDR4 3200 will ferry some pretty hefty dataframes.
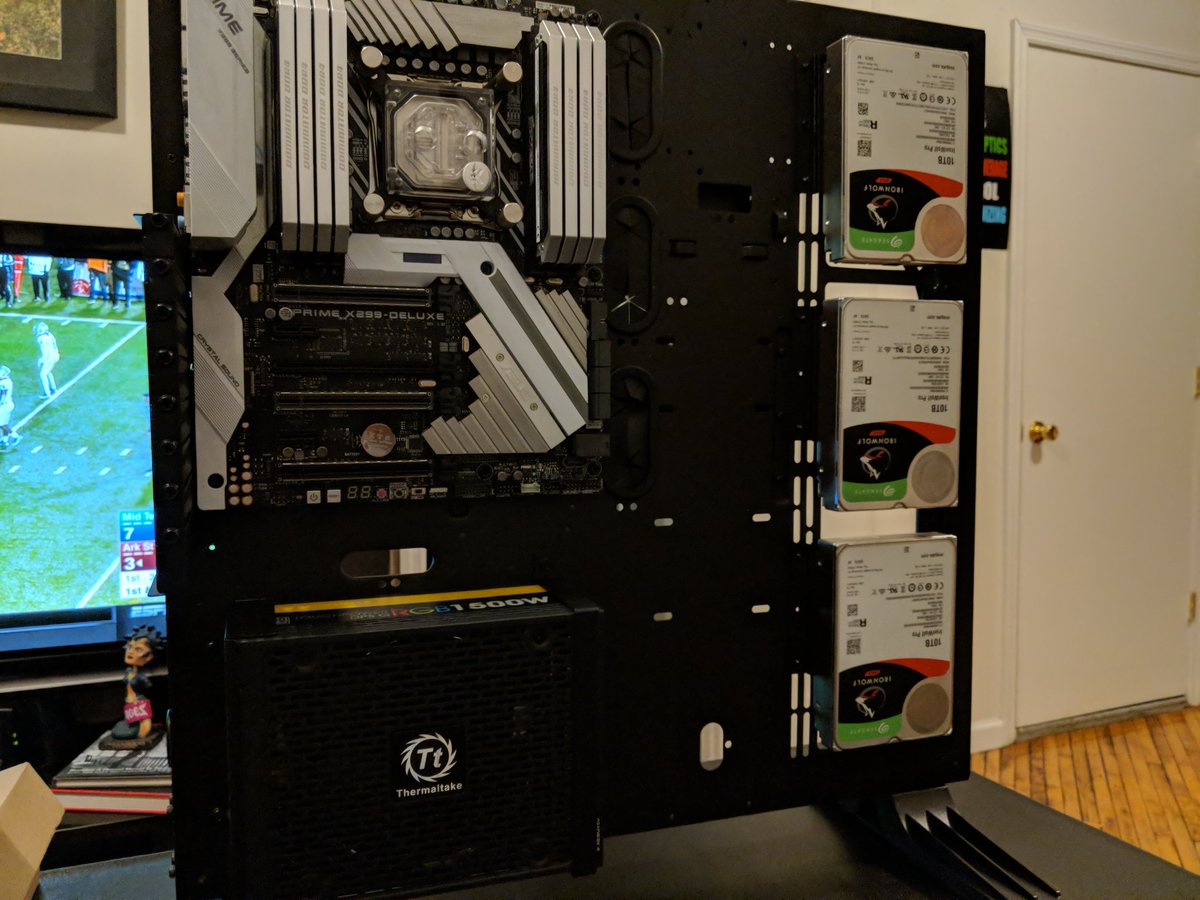
@nvidia @EKWaterBlocks @ASUS @intel @CORSAIR Got the mobo for #mylastpc mounted on the main panel.
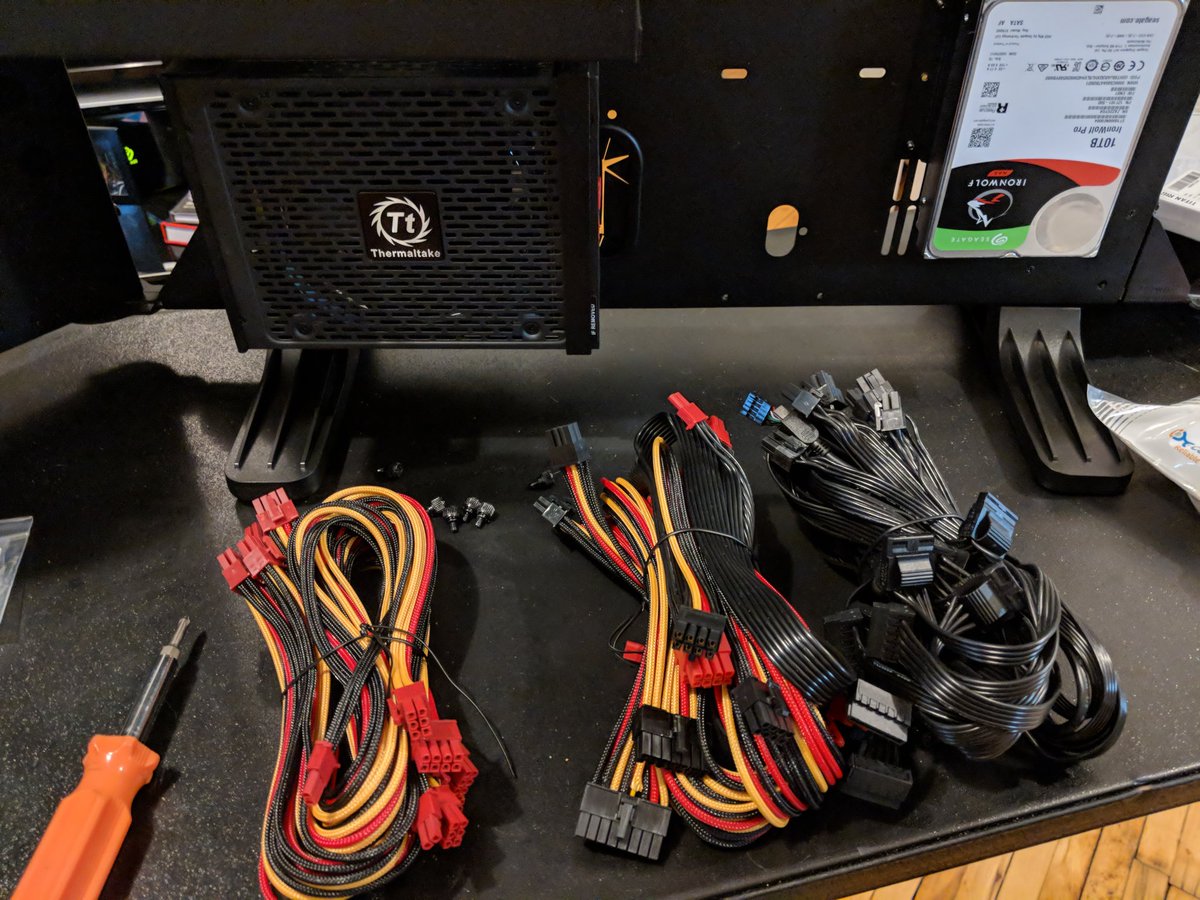
Also mounted is our power supply, 1500 watts of @Thermaltake RoughPower.
Also mounted is our power supply, 1500 watts of @Thermaltake RoughPower.
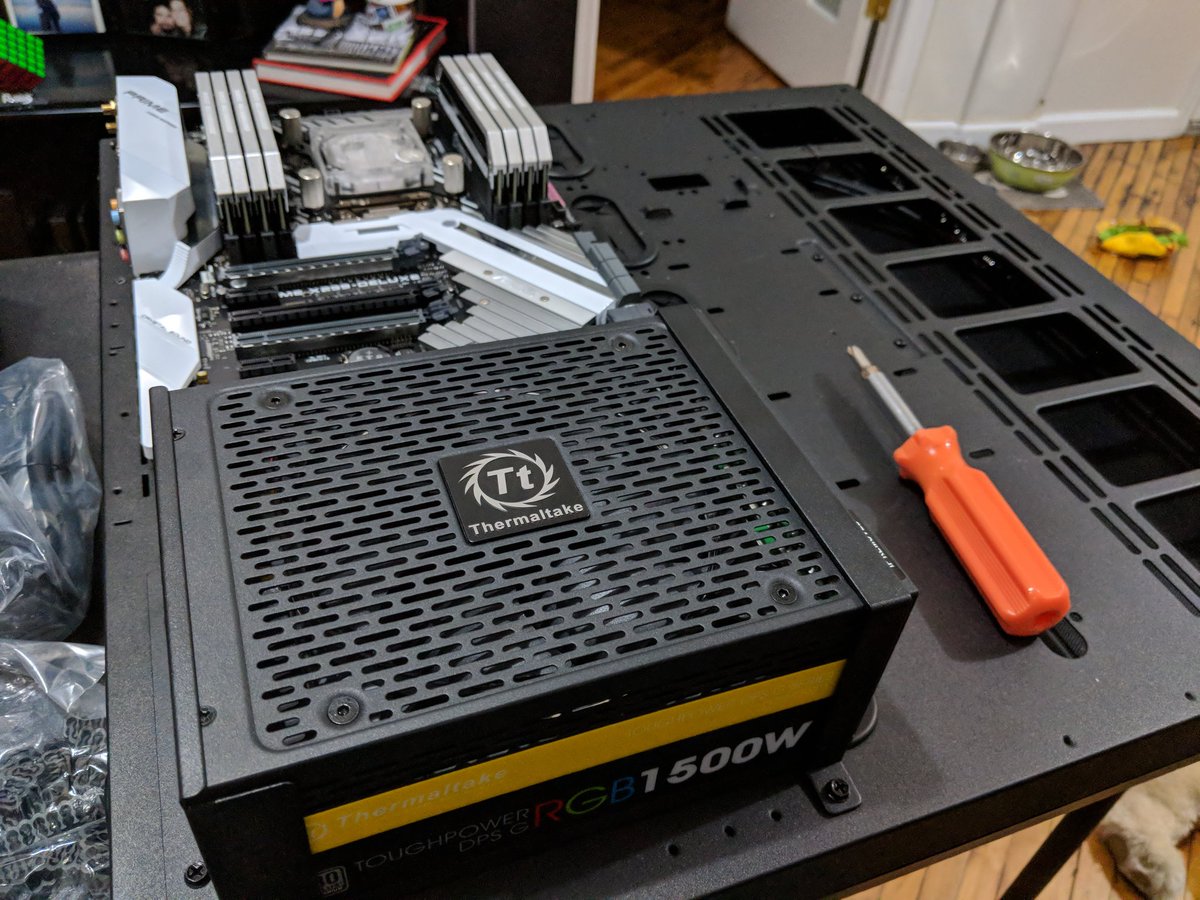
@nvidia @EKWaterBlocks @ASUS @intel @CORSAIR @Thermaltake At last spec, #mylastpc should consume ~400 watts idle and ~920 watts at peak. The rule of doubling peak consumption for PSU capacity is one that served me well with previous machines, but tough to find one that big that would fit on this chassis.
Think it's still enough.
Think it's still enough.
@nvidia @EKWaterBlocks @ASUS @intel @CORSAIR @Thermaltake I fully expect to descend further on Con Edison's Brooklyn shit list.
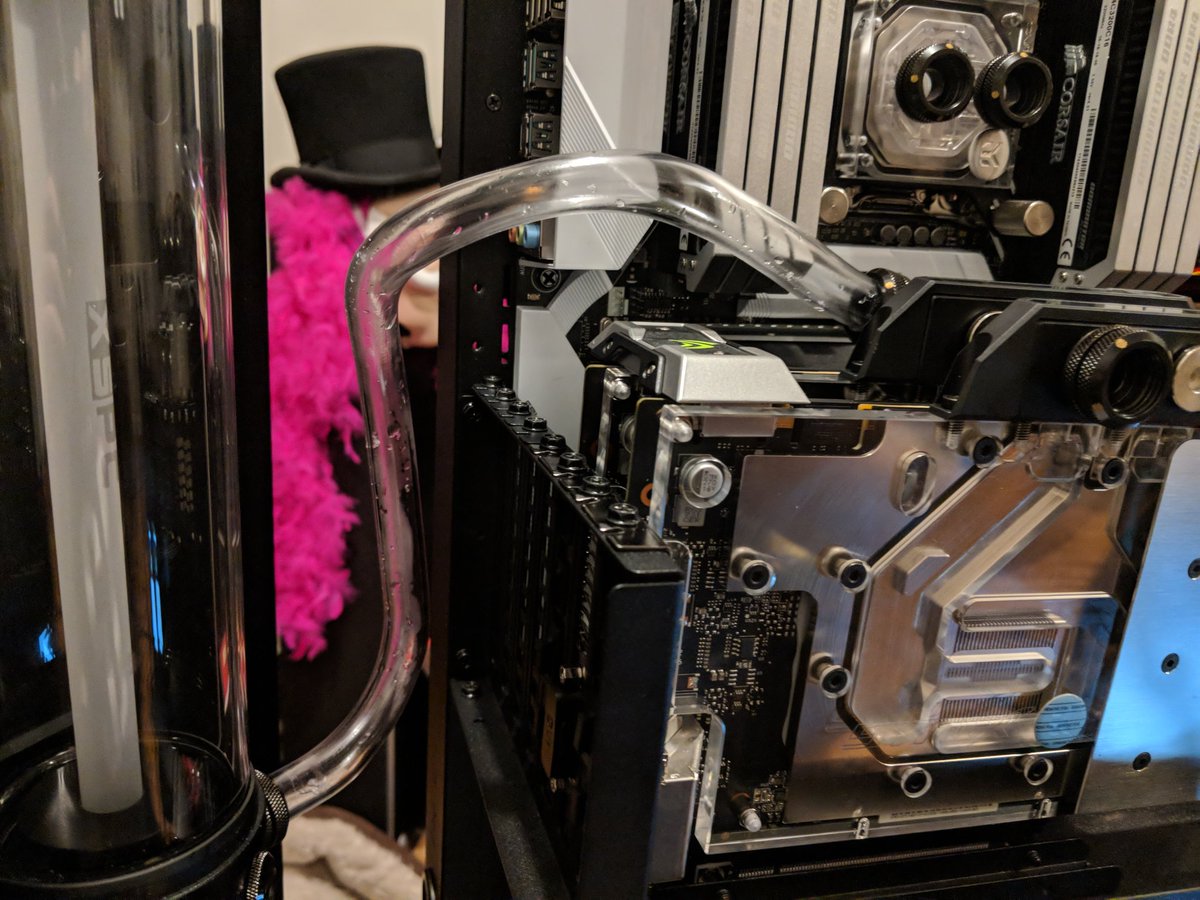
@nvidia @EKWaterBlocks @ASUS @intel @CORSAIR @Thermaltake Got a full afternoon to work on the rig. First stop is fitting the new @EKWaterBlocks on the GPUs.
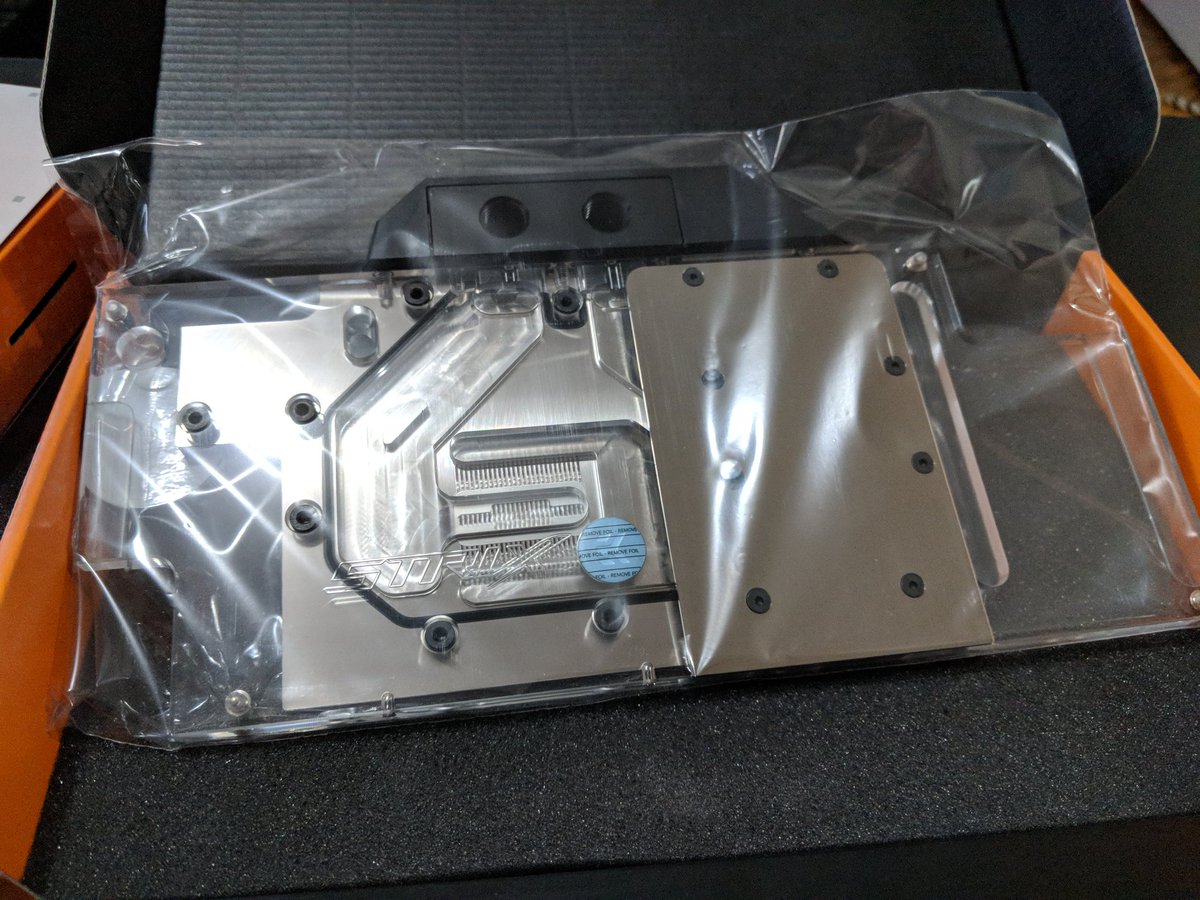
@nvidia @EKWaterBlocks @ASUS @intel @CORSAIR @Thermaltake When last we left our hero, the Asus RoG Strix GeForce GTX 1080ti, we had removed the air cooler.
Now we take off the backplate with the garish RGB.
Now we take off the backplate with the garish RGB.
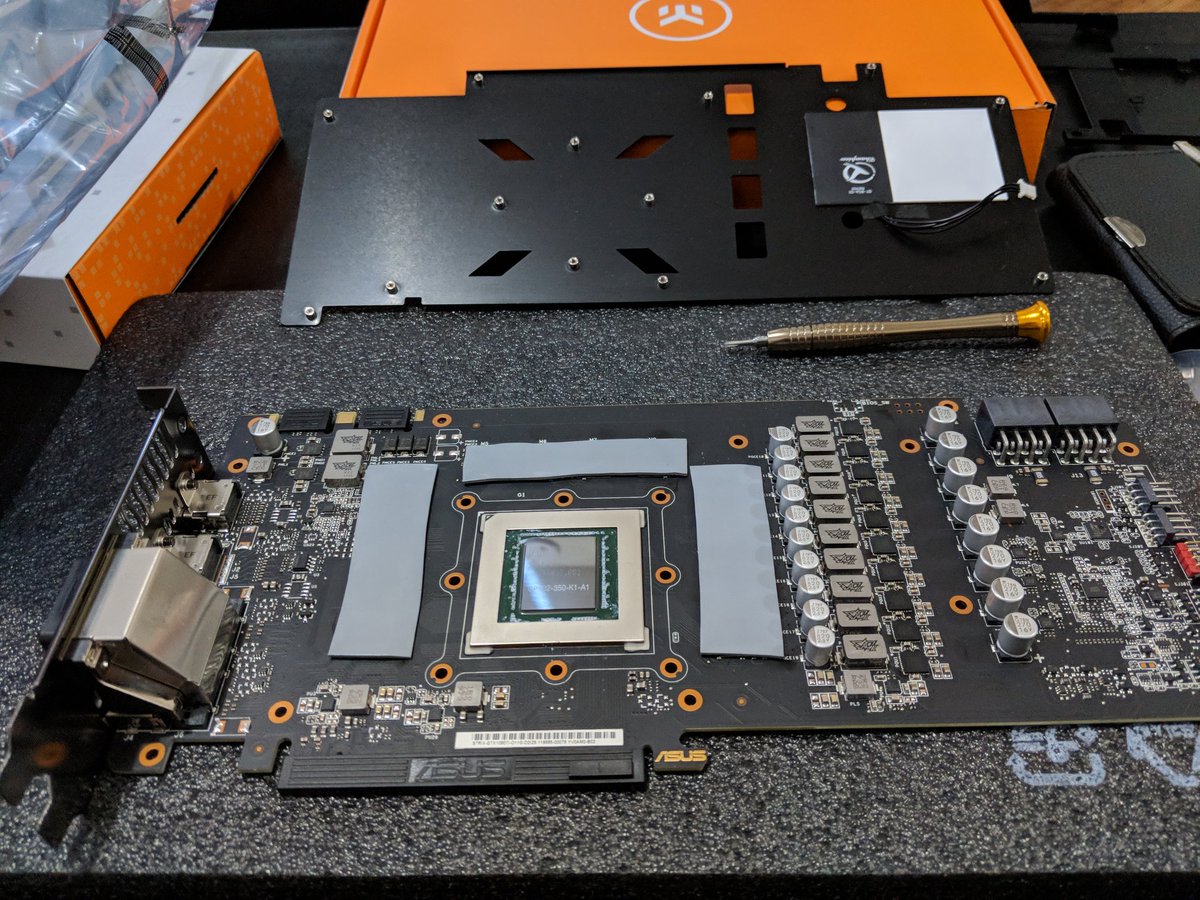
@nvidia @EKWaterBlocks @ASUS @intel @CORSAIR @Thermaltake After cleaning the GPU with alcohol, we apply some more Arctic Silver thermal grease.
Marginal improvement in application.
Marginal improvement in application.
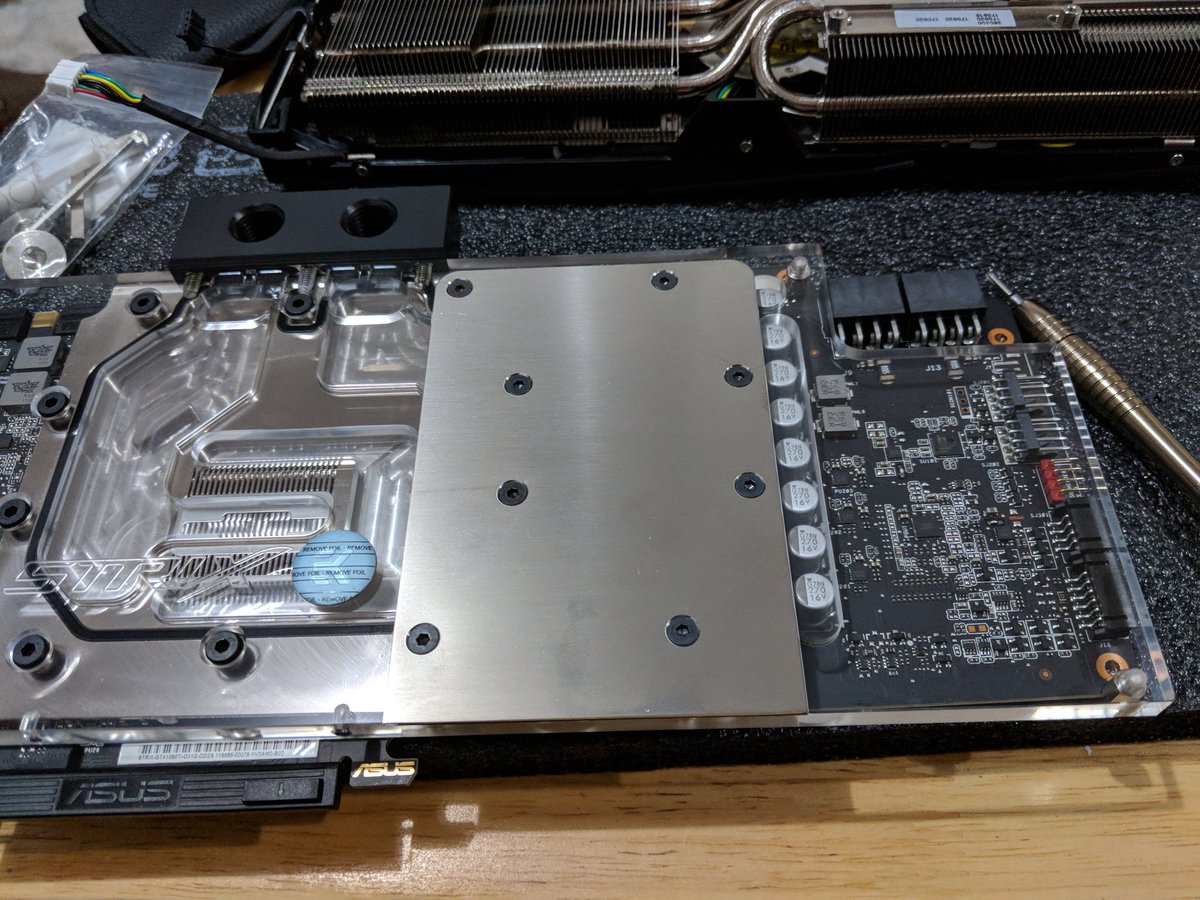
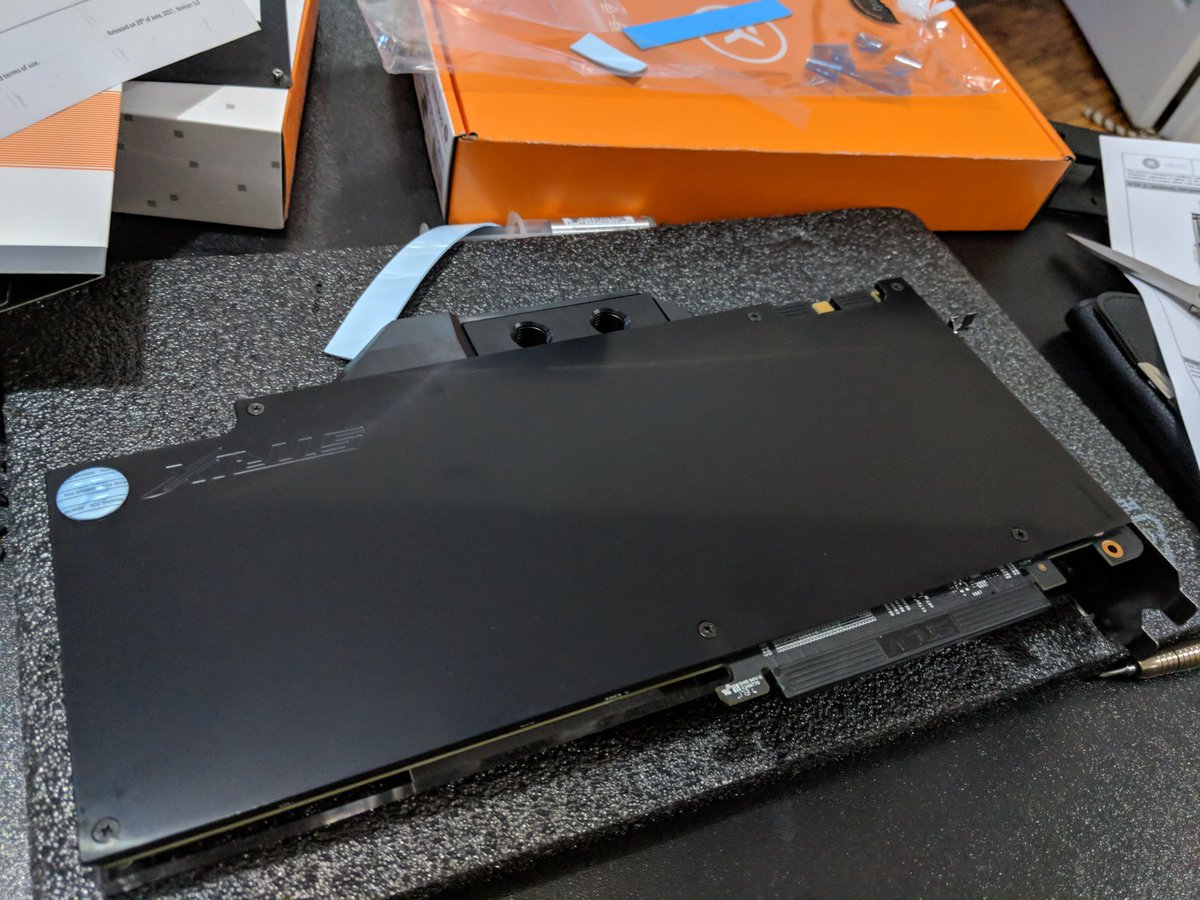
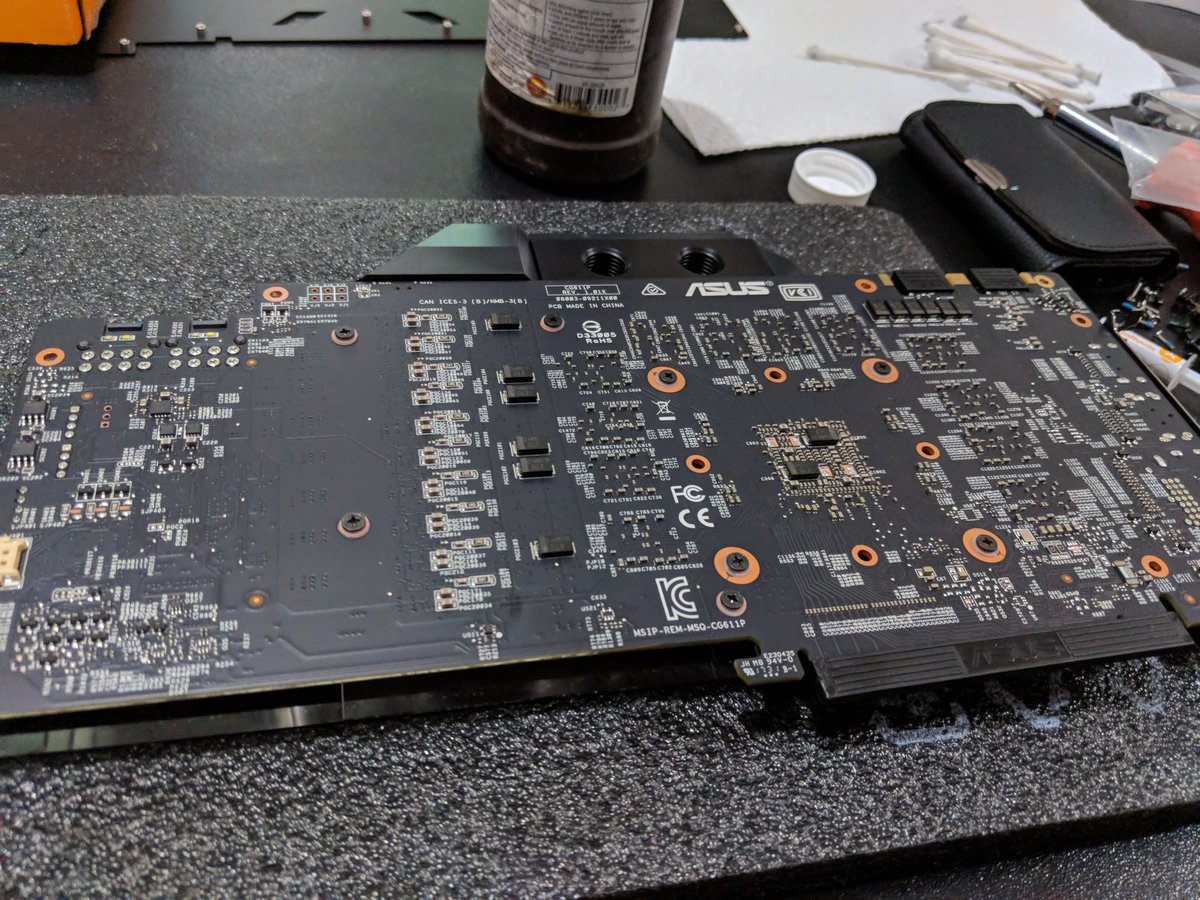
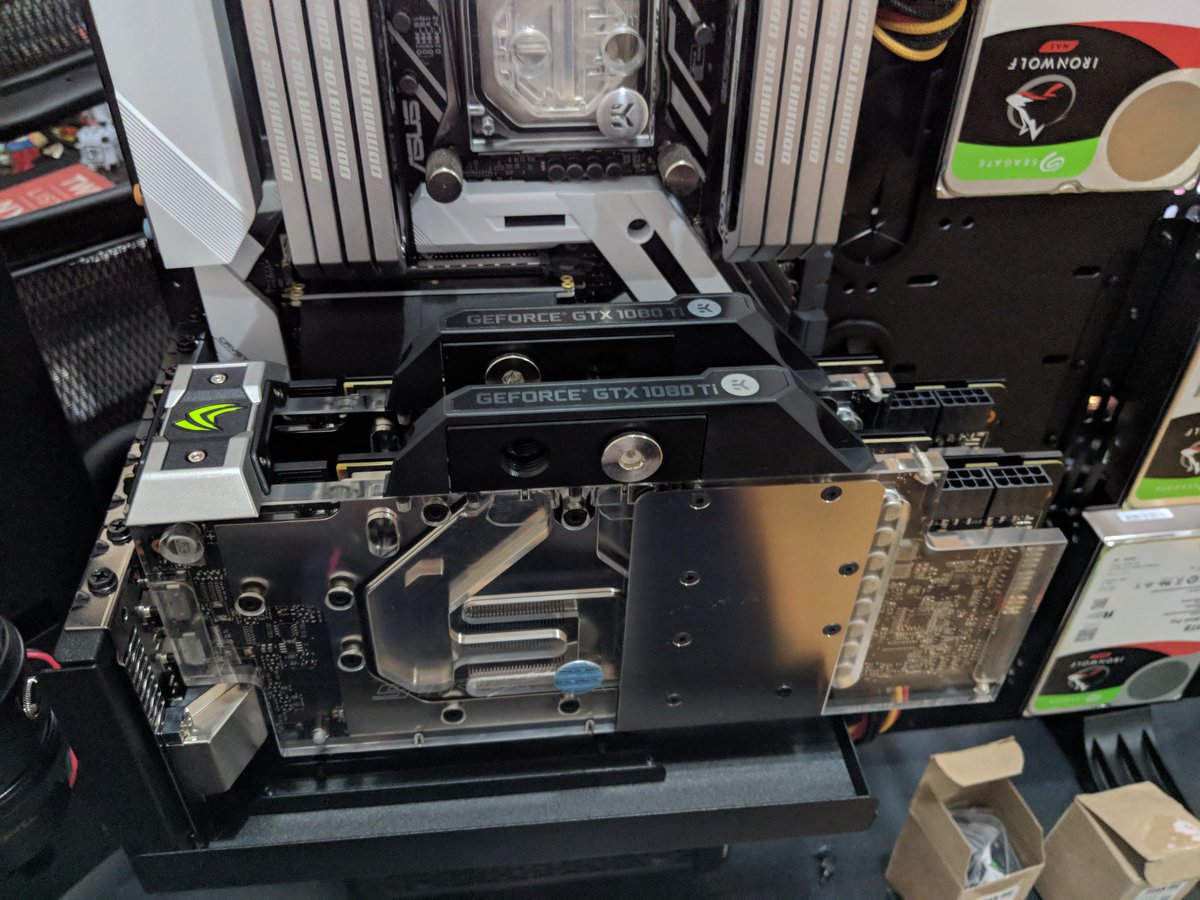
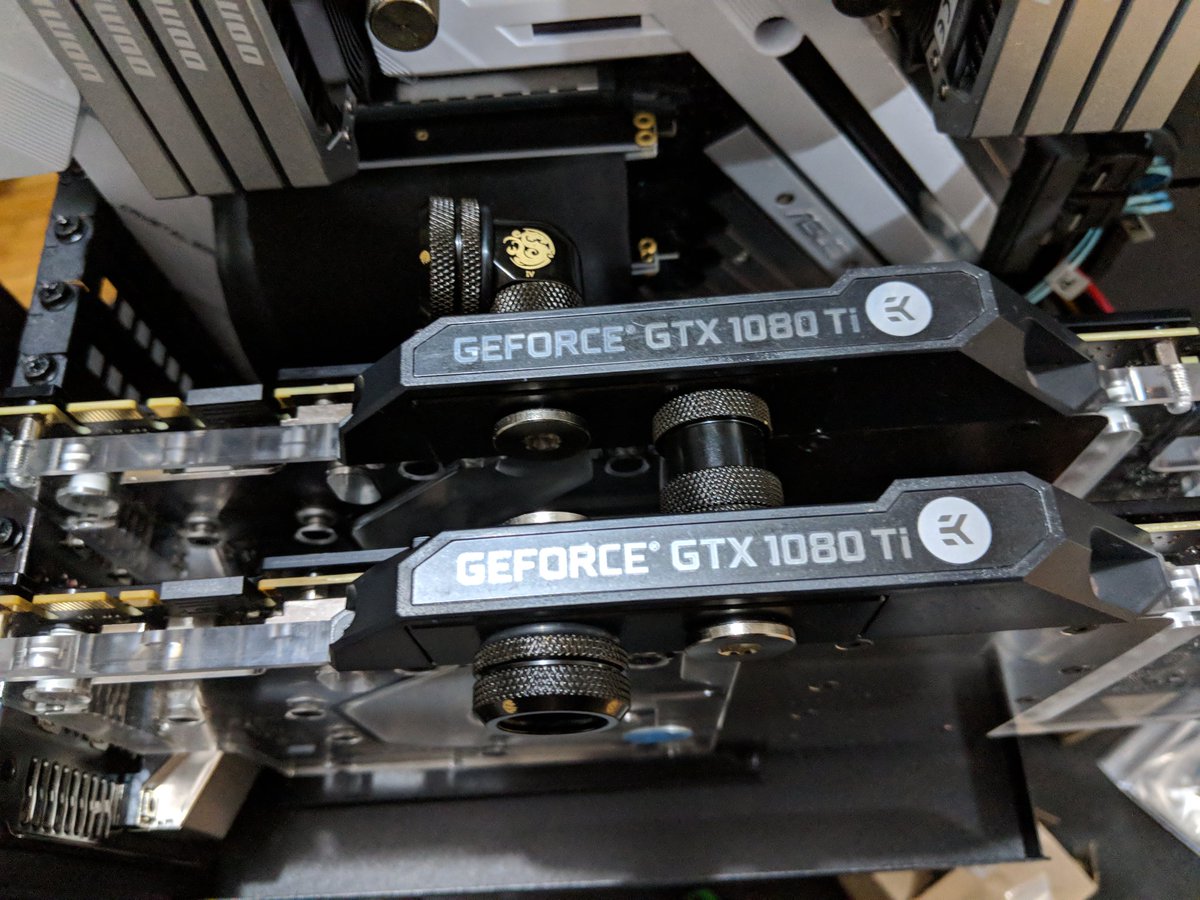
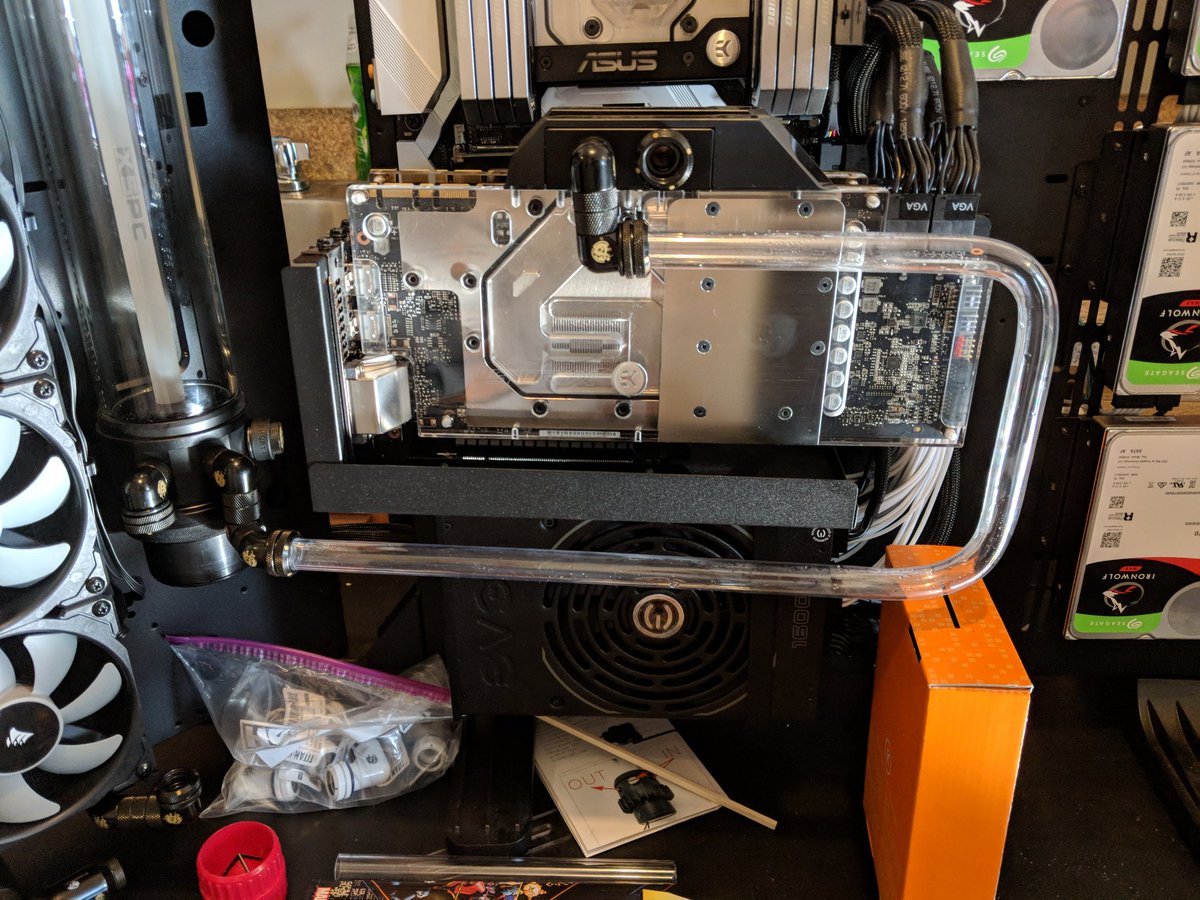
@nvidia @EKWaterBlocks @ASUS @intel @CORSAIR @Thermaltake This full waterblock fits like a glove. Ample coverage on the GPU, VRMs and RAM.
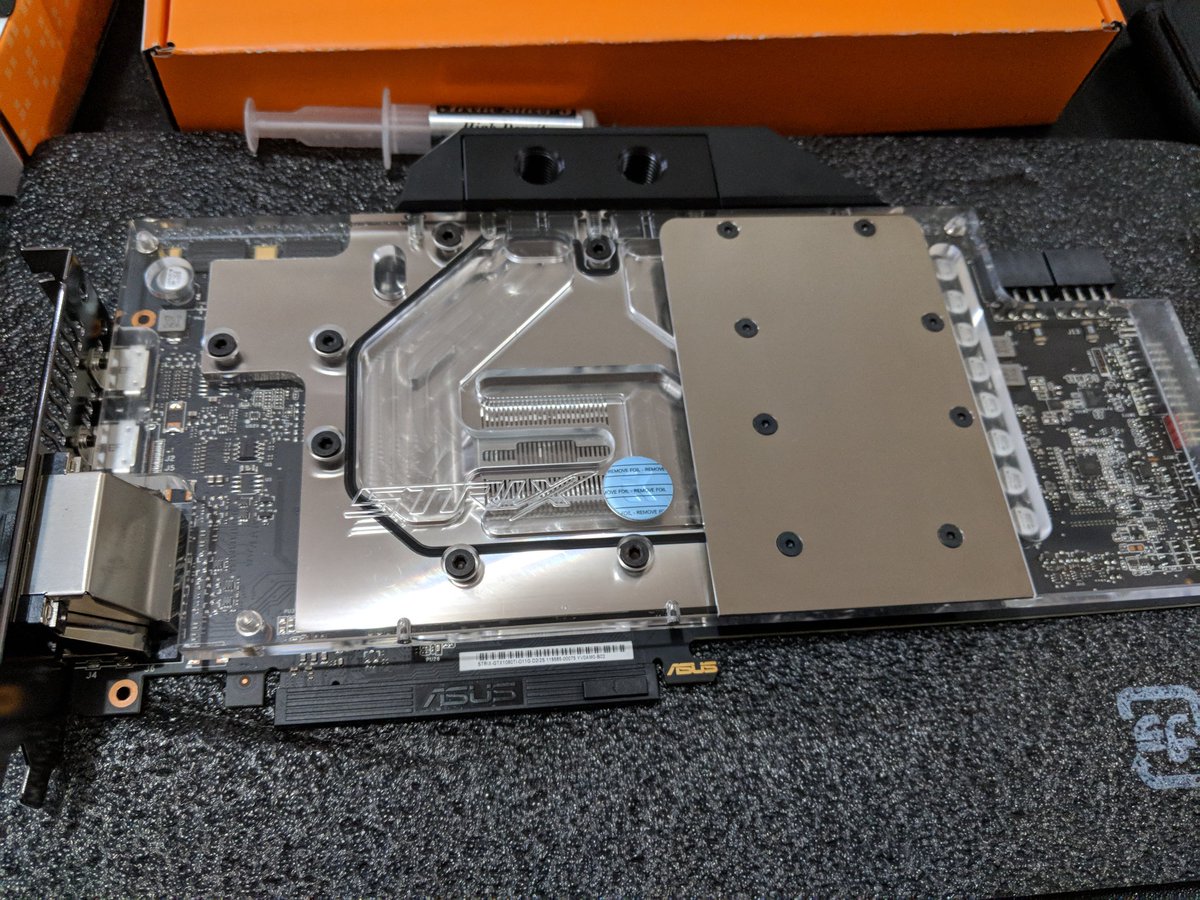
@nvidia @EKWaterBlocks @ASUS @intel @CORSAIR @Thermaltake Backplate comes separately (lame), but does offer you more customization.
The black anodized aluminum looks way tougher than the stock black plastic.
The black anodized aluminum looks way tougher than the stock black plastic.
@nvidia @EKWaterBlocks @ASUS @intel @CORSAIR @Thermaltake While I wait for the alcohol to dry on the second card, a word about the new @nvidia Titan V.
It wouldn't be a real PC build unless something better came out in the middle of it - the GPU was the component suffered by #mylastpc.
It wouldn't be a real PC build unless something better came out in the middle of it - the GPU was the component suffered by #mylastpc.
@nvidia @EKWaterBlocks @ASUS @intel @CORSAIR @Thermaltake The primary workload for #mylastpc will be model training, so the Titan V seems purpose fit and worth returning the now somewhat aged 1080tis for.
@nvidia @EKWaterBlocks @ASUS @intel @CORSAIR @Thermaltake First concern is Linux compatibility. I've learn through suffering a brand new Nvidia card on Linux is usually a recipe for heartache.
Additionally, the 1080tis are the cards of choice for all the Python ML folks now - diverging now is prob unwise.
Additionally, the 1080tis are the cards of choice for all the Python ML folks now - diverging now is prob unwise.
@nvidia @EKWaterBlocks @ASUS @intel @CORSAIR @Thermaltake Lastly, there is no SLI or NVLink support and no one is shipping waterblocks yet.
Single card? Air cooler?
Wouldn't be #mylastpc. Two top line souped up aftermarket 1080tis will do.
Single card? Air cooler?
Wouldn't be #mylastpc. Two top line souped up aftermarket 1080tis will do.
@nvidia @EKWaterBlocks @ASUS @intel @CORSAIR @Thermaltake For the second card, a look at the back before putting on the backplate.
@nvidia @EKWaterBlocks @ASUS @intel @CORSAIR @Thermaltake Kept on a tear on #mylastpc tonight trying to finish up component installation.
Mentioned we were putting in a 1TB SSD stripe on the M2 slots, but we're going to need way more local storage than that.
Mentioned we were putting in a 1TB SSD stripe on the M2 slots, but we're going to need way more local storage than that.
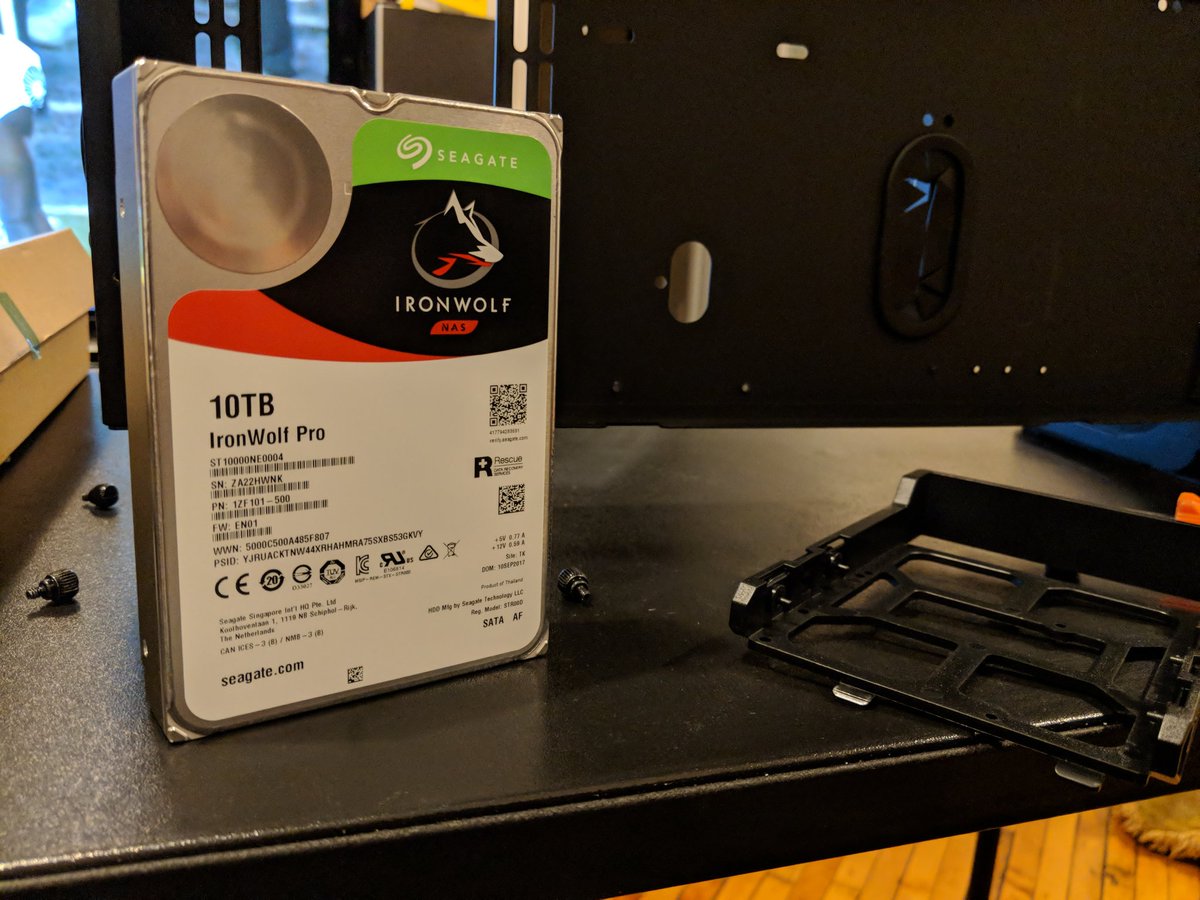
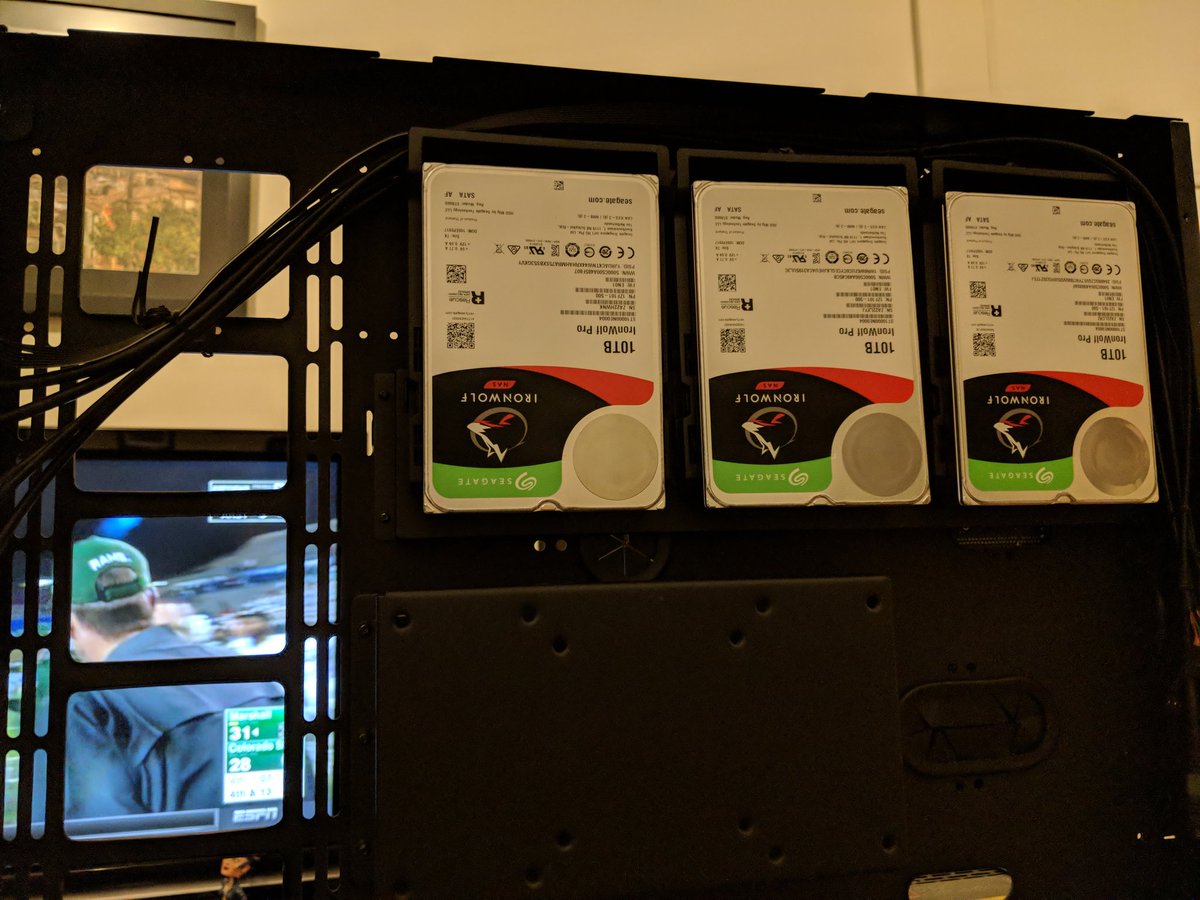
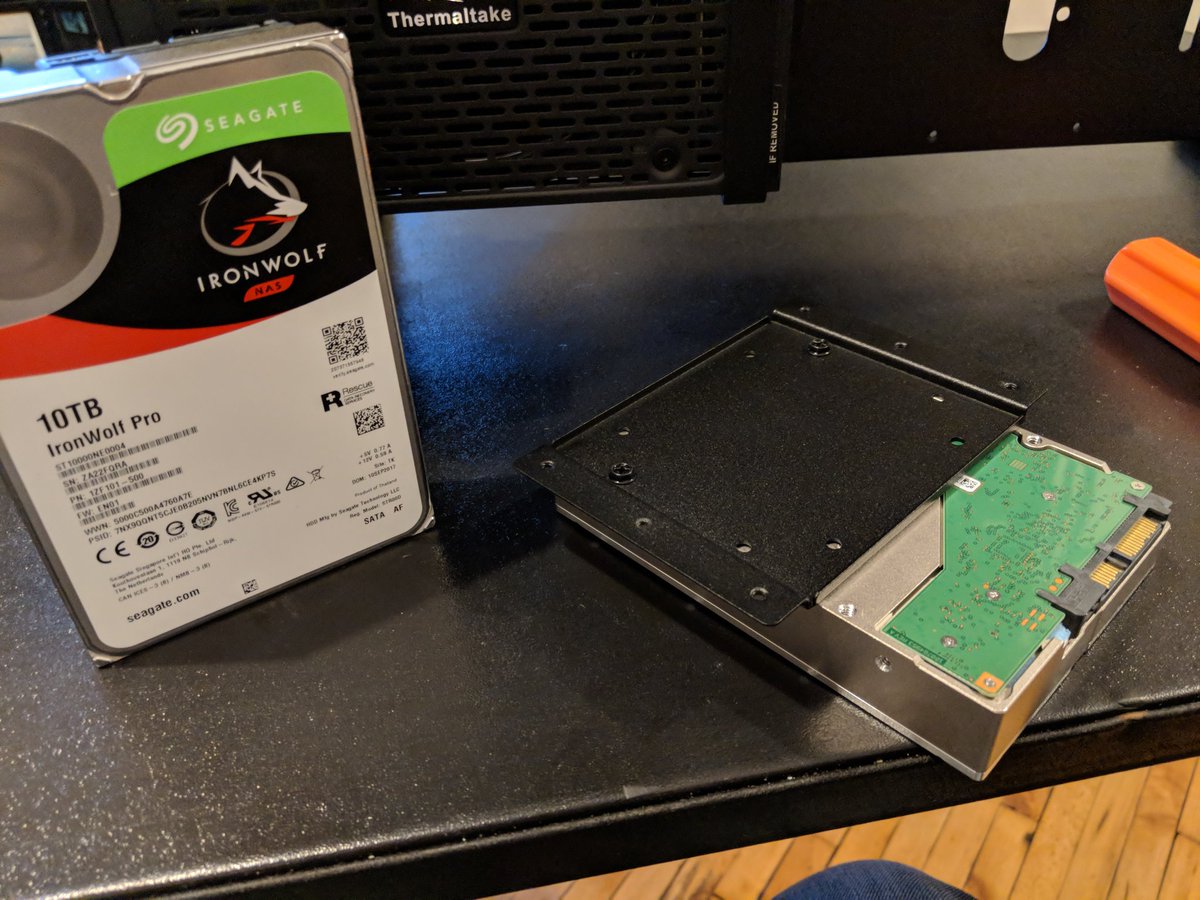
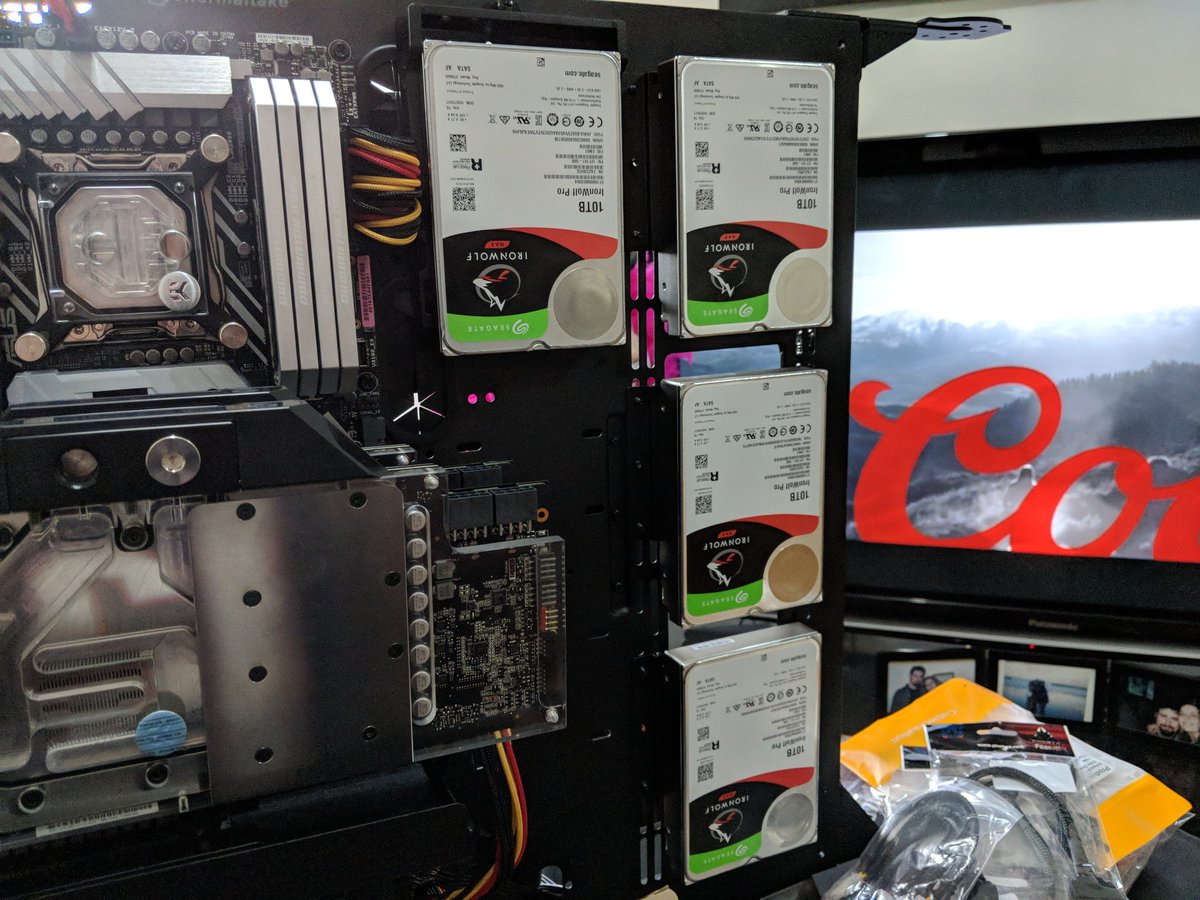
@nvidia @EKWaterBlocks @ASUS @intel @CORSAIR @Thermaltake To achieve such, we're going to put in a RAID 5 array maxing out the SATA ports on this board.
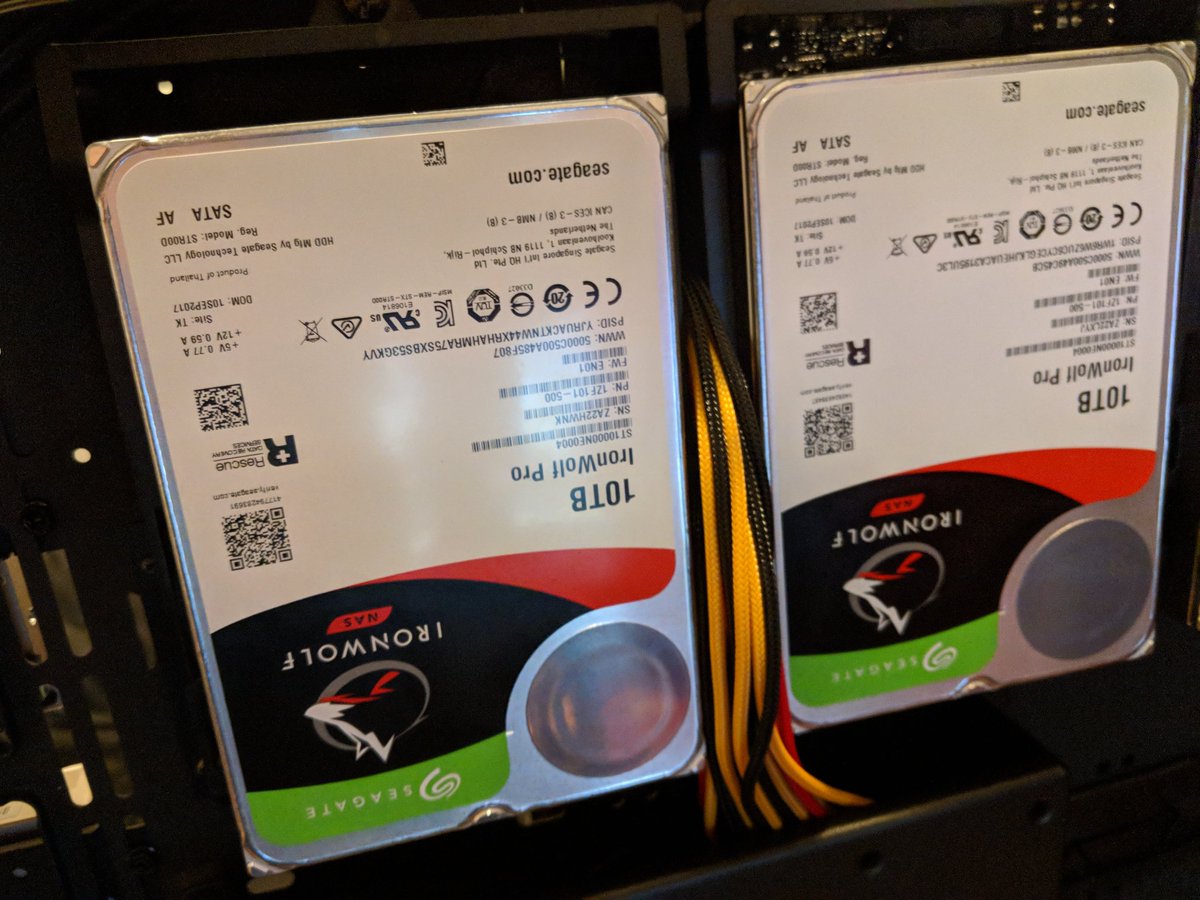
That'll be six of these 10 TB Ironwolf Pros from @Seagate.
That'll be six of these 10 TB Ironwolf Pros from @Seagate.
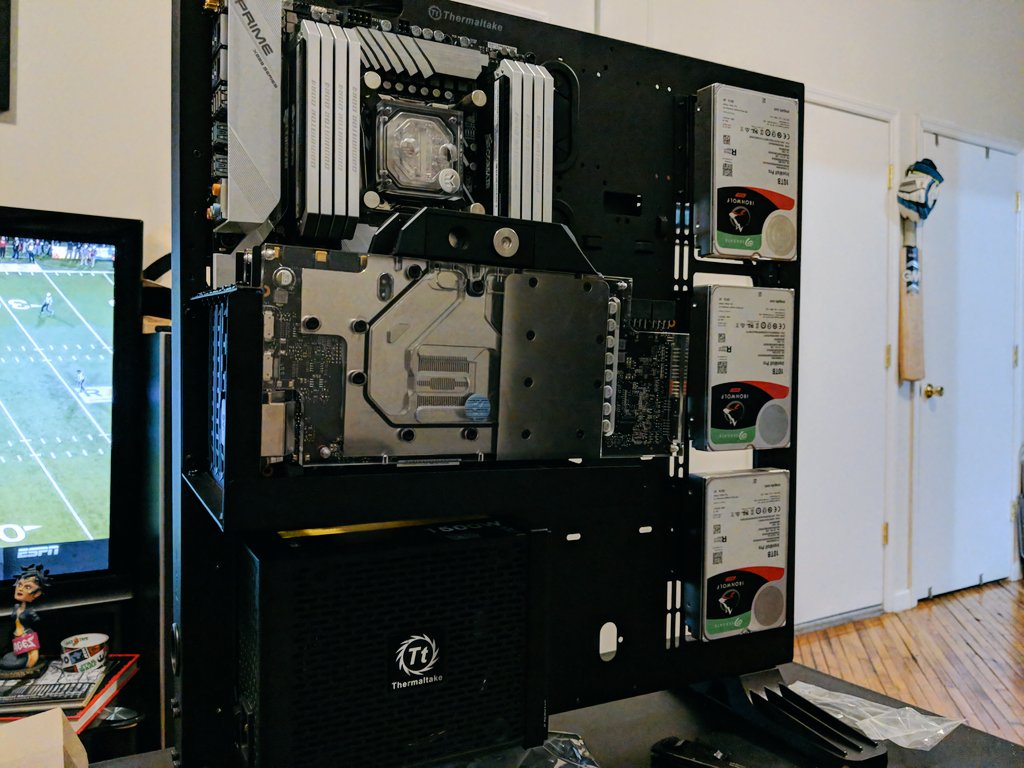
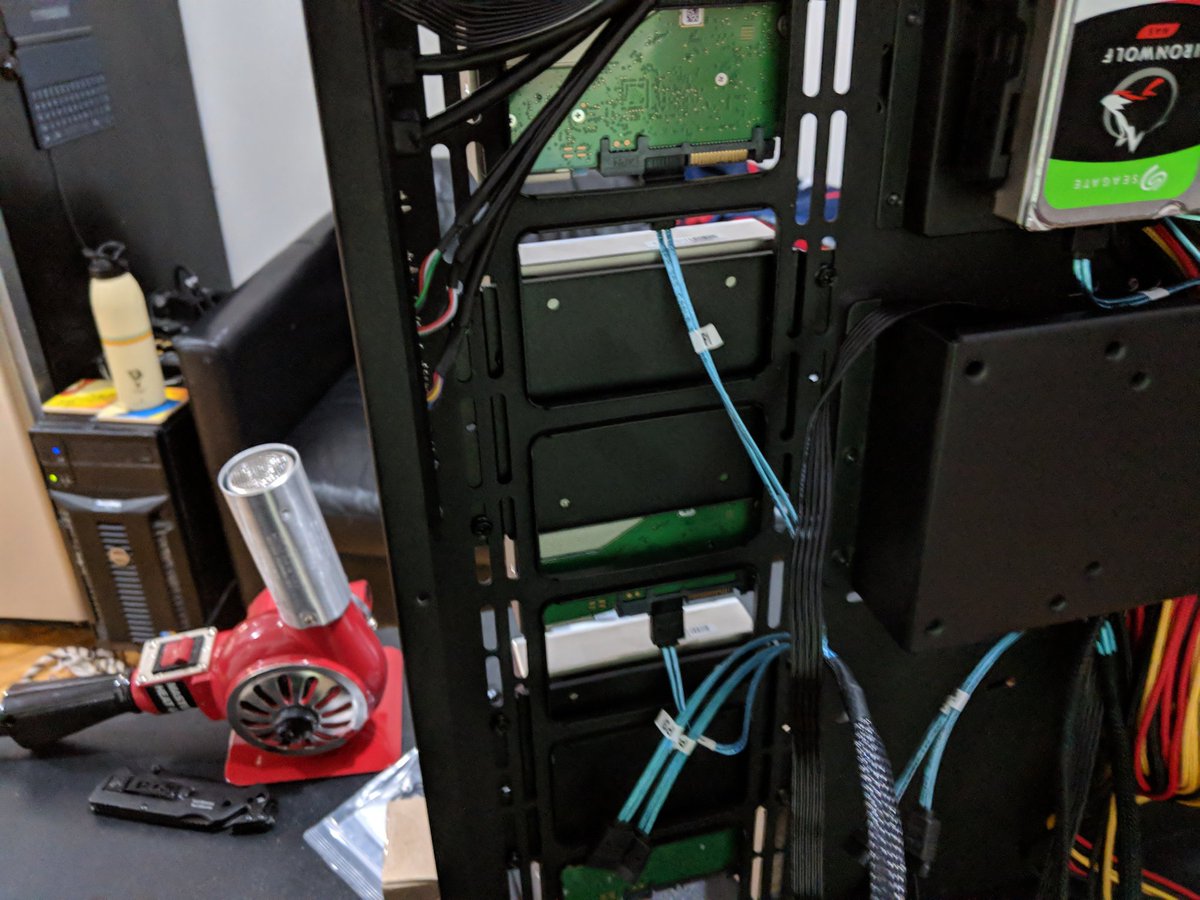
@nvidia @EKWaterBlocks @ASUS @intel @CORSAIR @Thermaltake @Seagate Our @Thermaltake P7 case affords some pretty unorthodox drive placement.
We're going to pop the back of the main panel to see three "quick" slots.
We're going to pop the back of the main panel to see three "quick" slots.
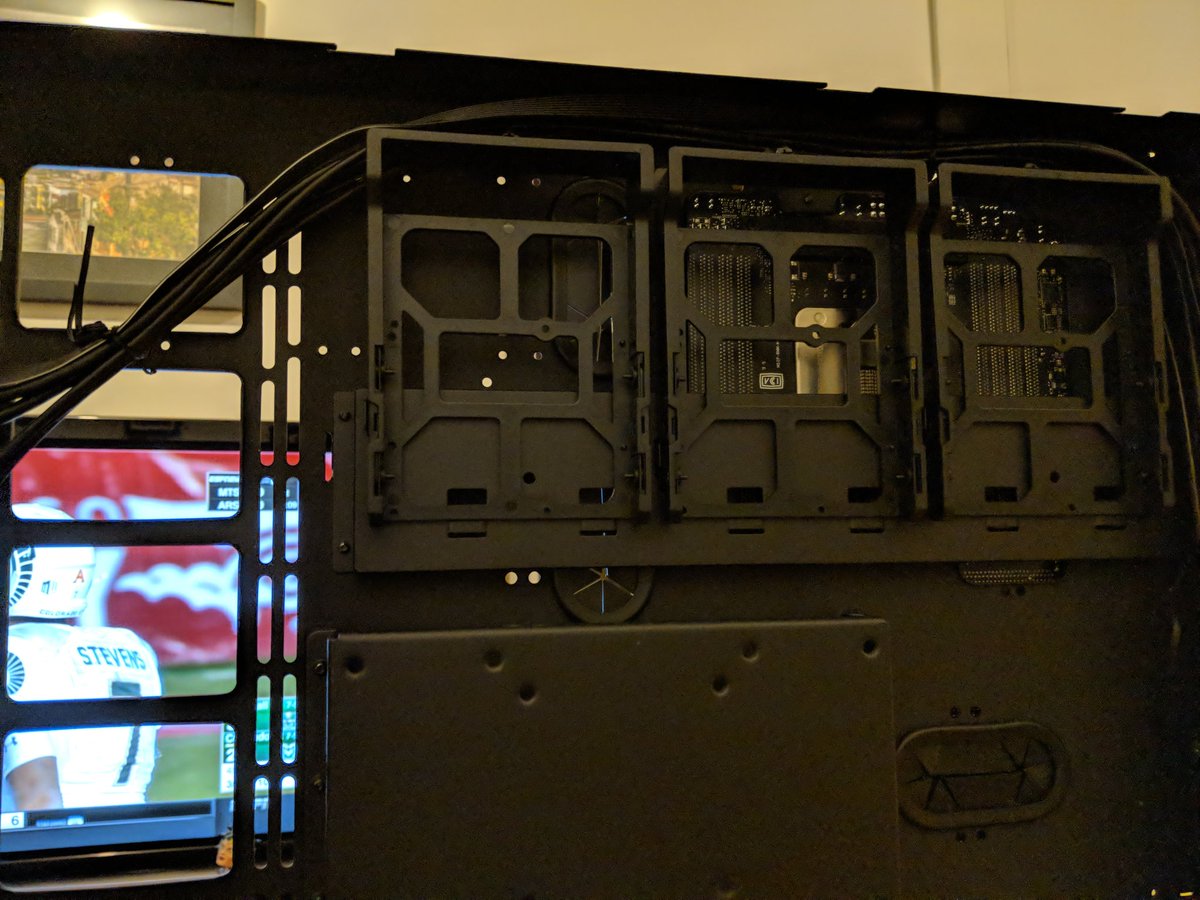
@nvidia @EKWaterBlocks @ASUS @intel @CORSAIR @Thermaltake @Seagate One thumb screw for each tray with four screws for each drive as the built in retainers wouldn't fit the Ironwolf's dense form factor.
This took a while. Swapping these out will be zero fun.
This took a while. Swapping these out will be zero fun.
@nvidia @EKWaterBlocks @ASUS @intel @CORSAIR @Thermaltake @Seagate The other three we'll mount on the front of the main panel for the world to see.
The P7 comes with mounting plates to pop on the fan rack.
The P7 comes with mounting plates to pop on the fan rack.
@nvidia @EKWaterBlocks @ASUS @intel @CORSAIR @Thermaltake @Seagate Leveling and positioning these was a real bear. Can't say I'm crazy about the look either.
Need to figure out some sort of covering for these bare drives - would welcome recommendations.
Need to figure out some sort of covering for these bare drives - would welcome recommendations.
@nvidia @EKWaterBlocks @ASUS @intel @CORSAIR @Thermaltake @Seagate To finish up the night after doing some research, decided to go with a 90 degree install on the GPUs.
The EK waterblocks are really stunning - would be a shame to hide them in this wall mount unit.
The EK waterblocks are really stunning - would be a shame to hide them in this wall mount unit.
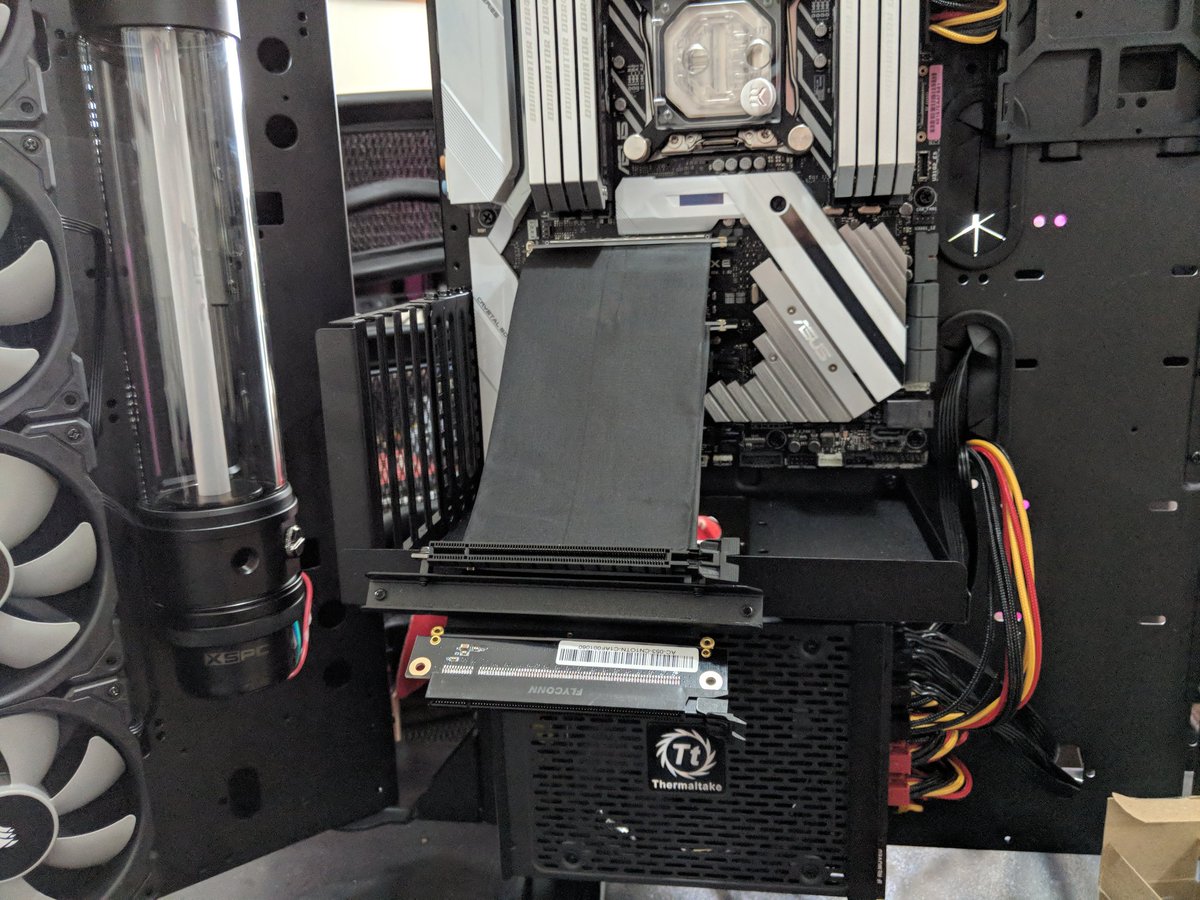
@nvidia @EKWaterBlocks @ASUS @intel @CORSAIR @Thermaltake @Seagate The P7 did come with one riser cable, so one card is in final position. Will need to order another for the second card.
Won't be able to finish tomorrow for a water test before Christmas, but we'll see how far we can get on wiring.
Won't be able to finish tomorrow for a water test before Christmas, but we'll see how far we can get on wiring.
@nvidia @EKWaterBlocks @ASUS @intel @CORSAIR @Thermaltake @Seagate Weight is starting to add up here.
Not sure by the time we're done with water that I'll be able to pick this thing up on my own.
Not sure by the time we're done with water that I'll be able to pick this thing up on my own.
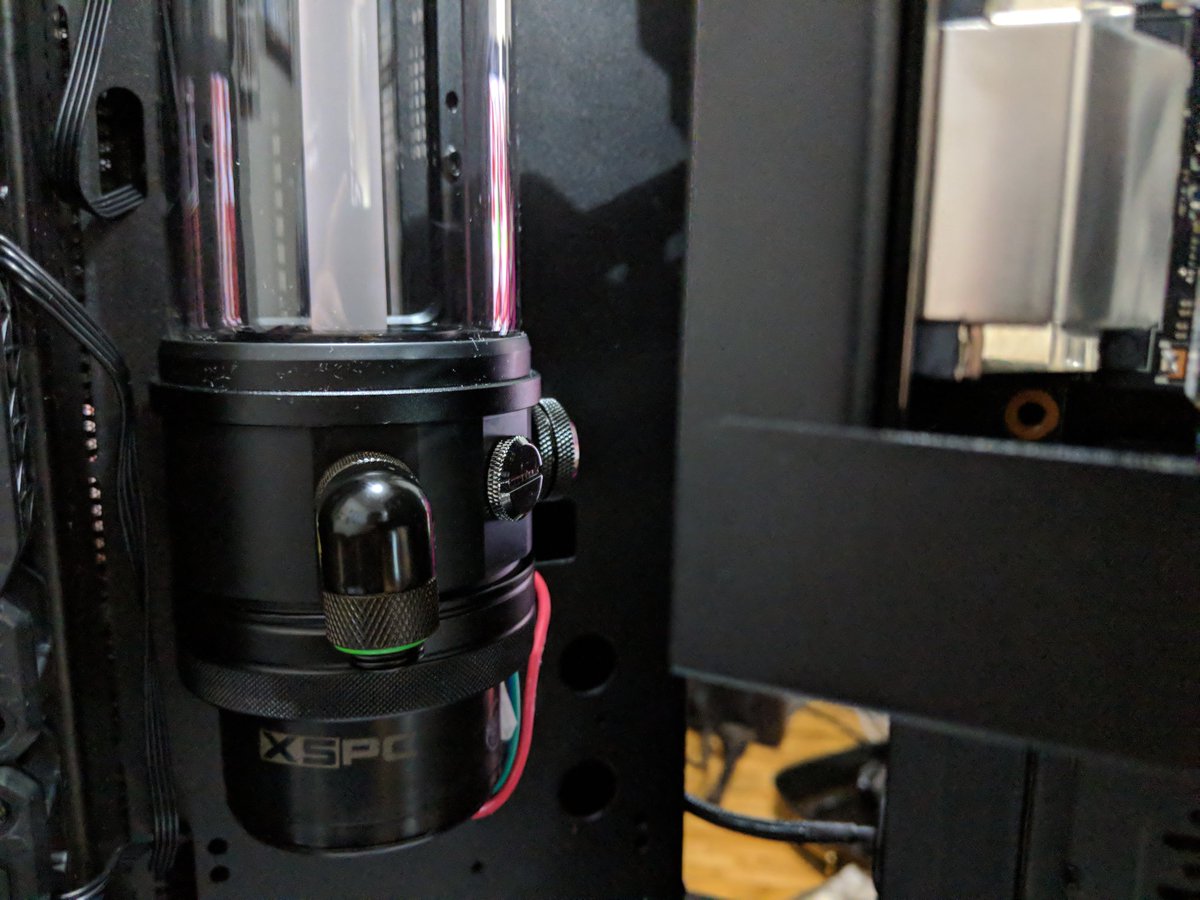
@nvidia @EKWaterBlocks @ASUS @intel @CORSAIR @Thermaltake @Seagate So far, the @Thermaltake P7 has anticipated every need on #mylastpc, except for mounting the reservoir and pump.
This afternoon we'll need to do what is prob the only real "modding" to facilitate our cooling rig.
This afternoon we'll need to do what is prob the only real "modding" to facilitate our cooling rig.
@nvidia @EKWaterBlocks @ASUS @intel @CORSAIR @Thermaltake @Seagate We'll need to drill and tap three holes on each of the cooling wings to mount the two @XS_PC Photon 270s.
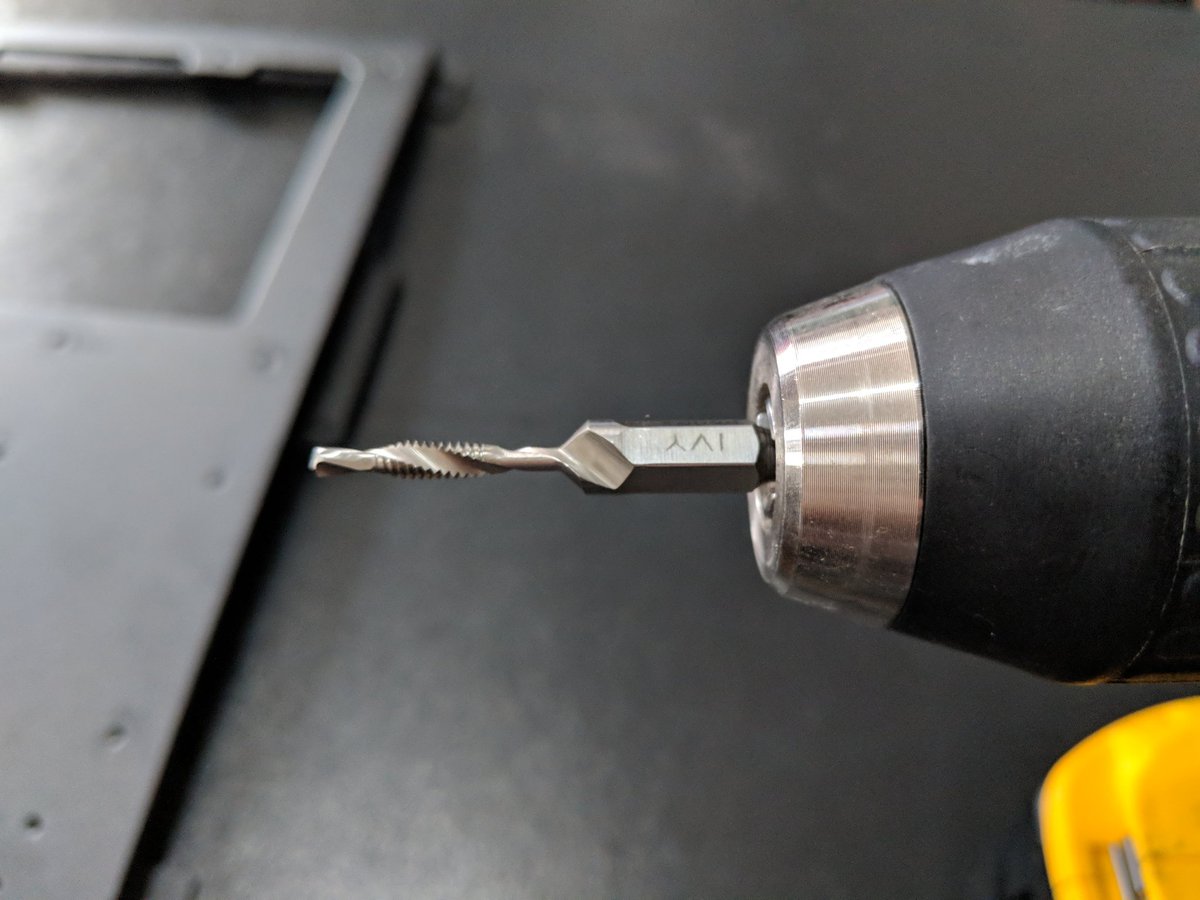
@nvidia @EKWaterBlocks @ASUS @intel @CORSAIR @Thermaltake @Seagate @XS_PC Pretty easy job - most difficult part was finding a shop in the neighborhood with a 6/32 bit with a tap that would get through the anodized aluminum.
@nvidia @EKWaterBlocks @ASUS @intel @CORSAIR @Thermaltake @Seagate @XS_PC Finished look is pretty good, though had to eyeball the balance as my Brooklyn apartment is horribly unlevel.
@nvidia @EKWaterBlocks @ASUS @intel @CORSAIR @Thermaltake @Seagate @XS_PC We're pretty close to completion on component installation.
#mylastpc is a goddamn dreadnought.
#mylastpc is a goddamn dreadnought.

@nvidia @EKWaterBlocks @ASUS @intel @CORSAIR @Thermaltake @Seagate @XS_PC An eagle eyed viewer did identify room on both the chassis and mobo for one more HDD, which is ordered.
Some additional extension wiring is going to be necessary and is on the way, but think we can finish chassis assembly today and work on some of the plumbing.
Some additional extension wiring is going to be necessary and is on the way, but think we can finish chassis assembly today and work on some of the plumbing.
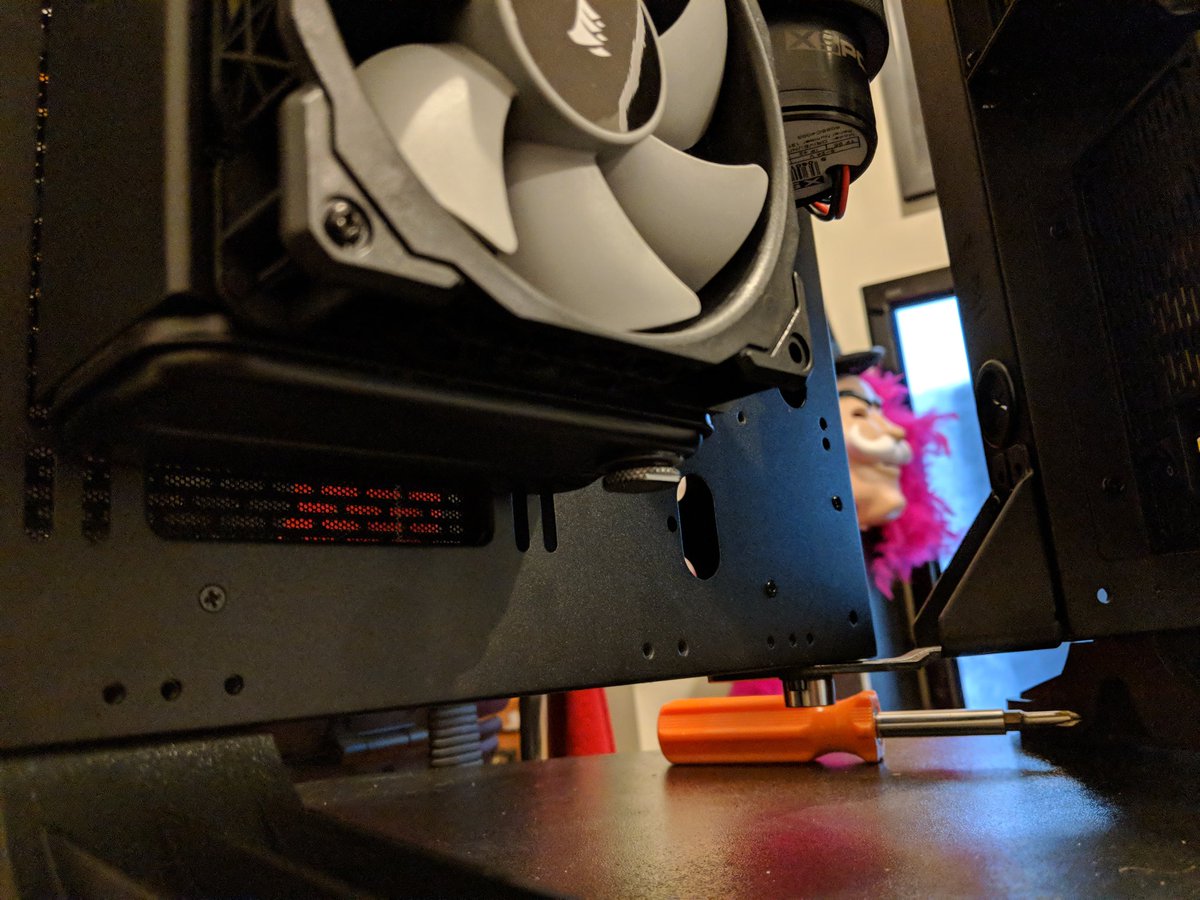
@nvidia @EKWaterBlocks @ASUS @intel @CORSAIR @Thermaltake @Seagate @XS_PC One irritating hitch - only part of the whole machine that uses hex screws is the wing assembly and I left my driver down at the rehearsal space.
@nvidia @EKWaterBlocks @ASUS @intel @CORSAIR @Thermaltake @Seagate @XS_PC After a few failed attempts including shearing a screw off, got the proper bit to mount the left wing of #mylastpc.

@nvidia @EKWaterBlocks @ASUS @intel @CORSAIR @Thermaltake @Seagate @XS_PC Really want to try to get some plumbing in before joining the family for the holiday, but need to get some wiring in first.
These are a lot easier to bend than PETG hard line.
These are a lot easier to bend than PETG hard line.
@nvidia @EKWaterBlocks @ASUS @intel @CORSAIR @Thermaltake @Seagate @XS_PC Given the open air design of the P7 case, I guess I anticipated wiring being a waltz. The main panel has three big pass through sleeves and plenty of other openings.
Hasn't ended up that way.
Hasn't ended up that way.
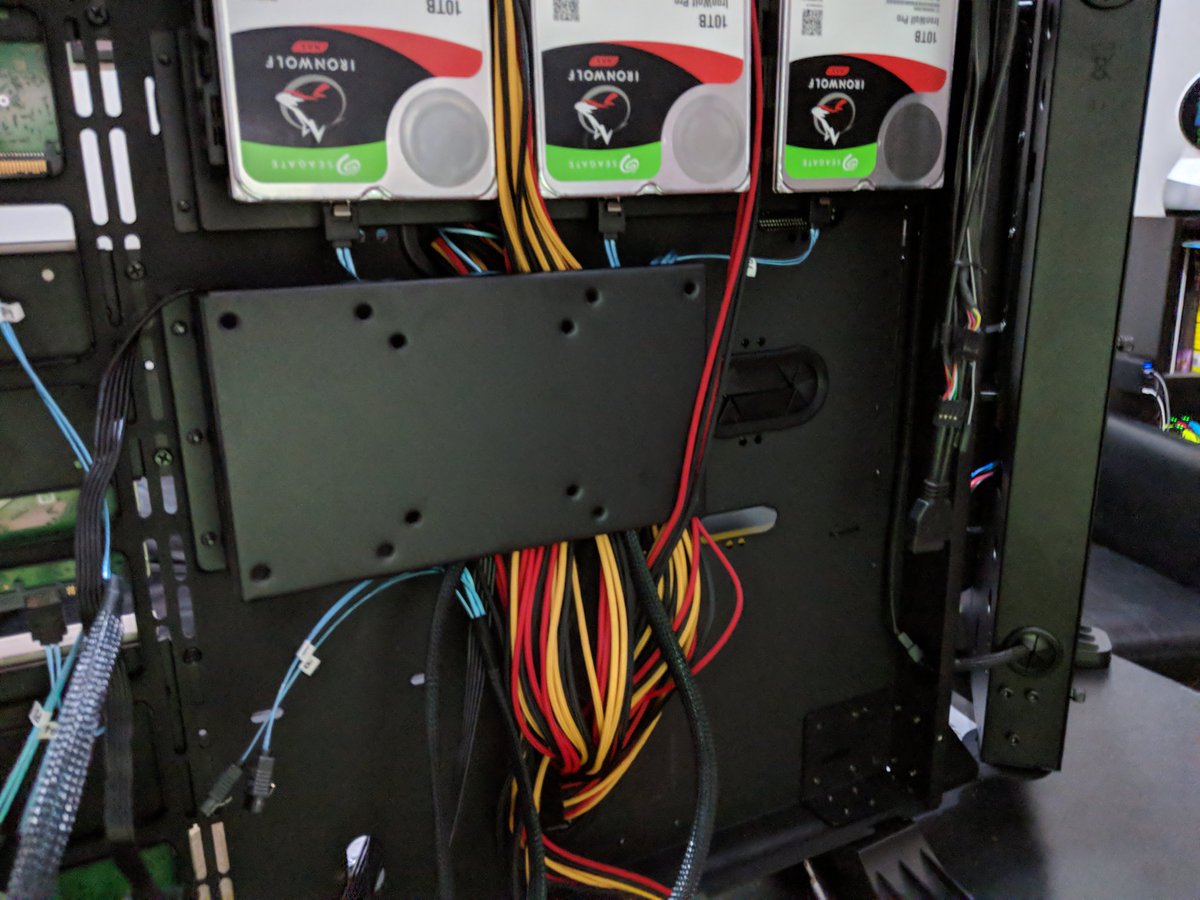
@nvidia @EKWaterBlocks @ASUS @intel @CORSAIR @Thermaltake @Seagate @XS_PC First hitch is that the 1500 watts of beef I have powering this mother slides quite a bit over the bottom passthrough sleeve, limiting what we can shove through.
Best I could get through is the main 24 pin and the four 4 pins needed by the GPUs.
Best I could get through is the main 24 pin and the four 4 pins needed by the GPUs.
@nvidia @EKWaterBlocks @ASUS @intel @CORSAIR @Thermaltake @Seagate @XS_PC Unfortunately, mobo still needs another ten pins just to POST which we snake in on the closest passthrough to the north.
For the 8 fans, 7 drives, and 2 pumps we have to make an unsightly reach to the right.
For the 8 fans, 7 drives, and 2 pumps we have to make an unsightly reach to the right.
@nvidia @EKWaterBlocks @ASUS @intel @CORSAIR @Thermaltake @Seagate @XS_PC Getting from the PSU to the mobo is a bigger mess on the back.
The three back mounted drives are positioned right behind the mobo, which really jams up our show.
The three back mounted drives are positioned right behind the mobo, which really jams up our show.
@nvidia @EKWaterBlocks @ASUS @intel @CORSAIR @Thermaltake @Seagate @XS_PC Given the cooling system we're installing, we're going to be pushing the Core i9-7980XE way past stock configuration.
Knowing the wattage that is going to take, the intimacy between these two drives is quarrelsome.
Knowing the wattage that is going to take, the intimacy between these two drives is quarrelsome.
@nvidia @EKWaterBlocks @ASUS @intel @CORSAIR @Thermaltake @Seagate @XS_PC The surface look of this wiring though is pretty good, though for the life of me I can't understand why @Thermaltake went with mustard and ketchup for wiring on this big of a PSU.
If this were all black, it would look boss af.
If this were all black, it would look boss af.
@nvidia @EKWaterBlocks @ASUS @intel @CORSAIR @Thermaltake @Seagate @XS_PC Alright, putting cart before the horse, but I'm dying to start working on the cooling loops.
First up, let's set some fittings for the CPU loop.
First up, let's set some fittings for the CPU loop.
@nvidia @EKWaterBlocks @ASUS @intel @CORSAIR @Thermaltake @Seagate @XS_PC We're going to make the left wing the cooling loop for CPU while the right will cool the GPUs.
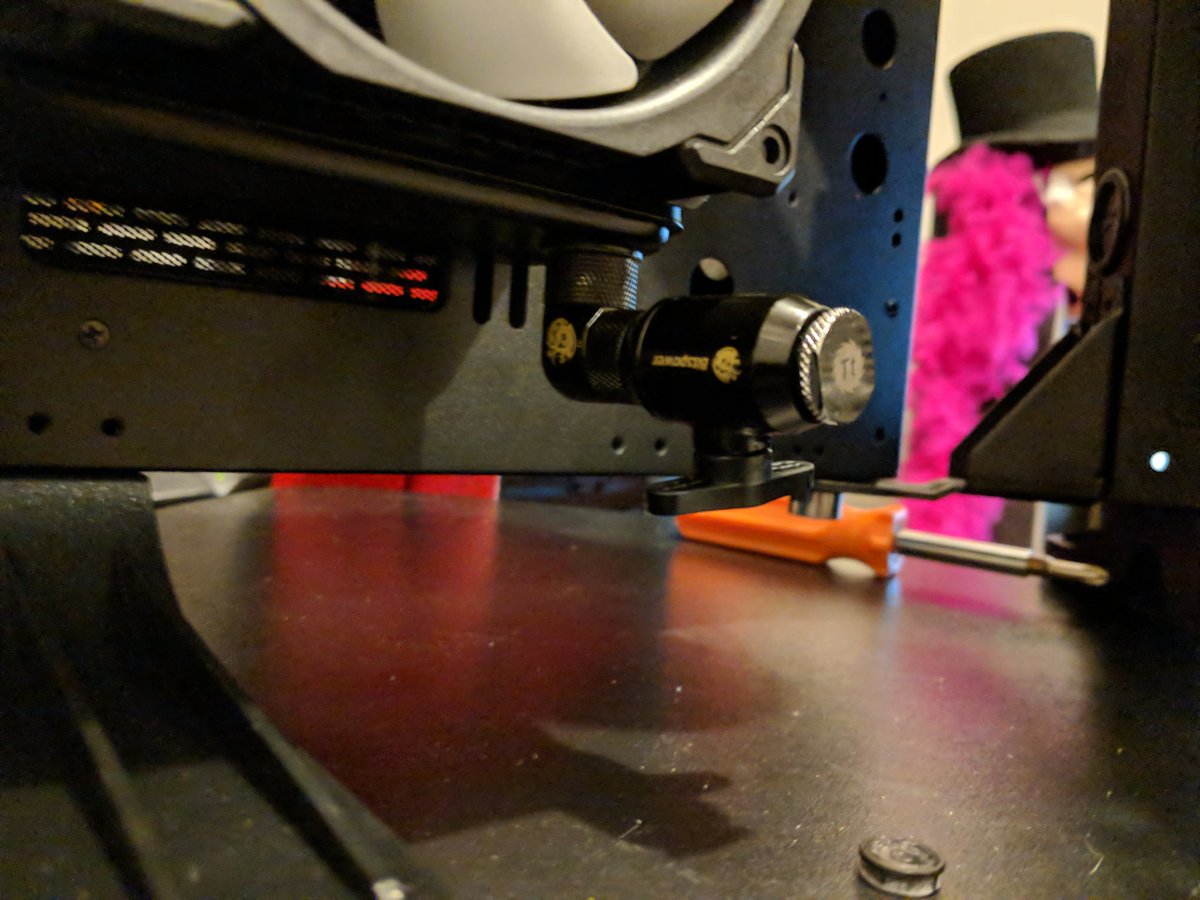
First up, we need to install the drain valve. The radiators on both loops are intentionally the lowest.
First up, we need to install the drain valve. The radiators on both loops are intentionally the lowest.
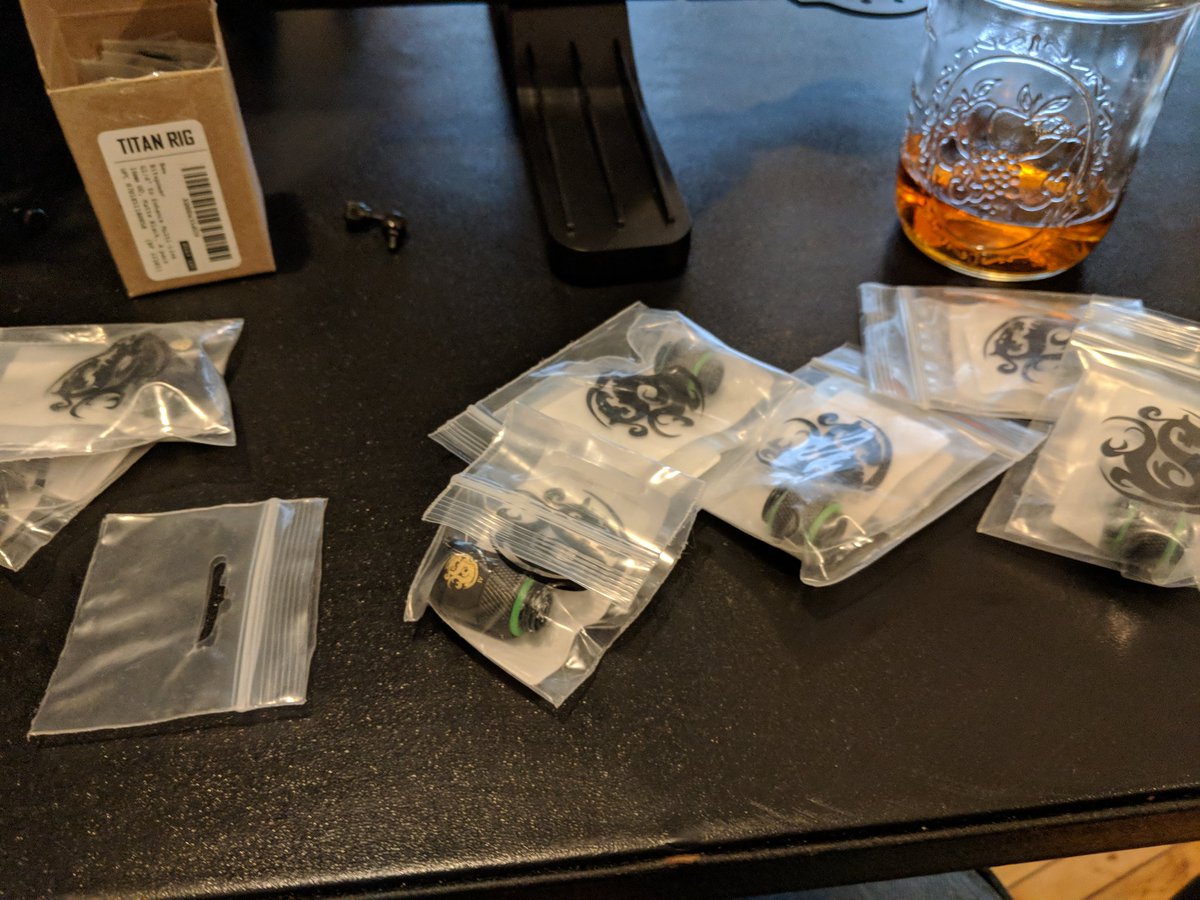
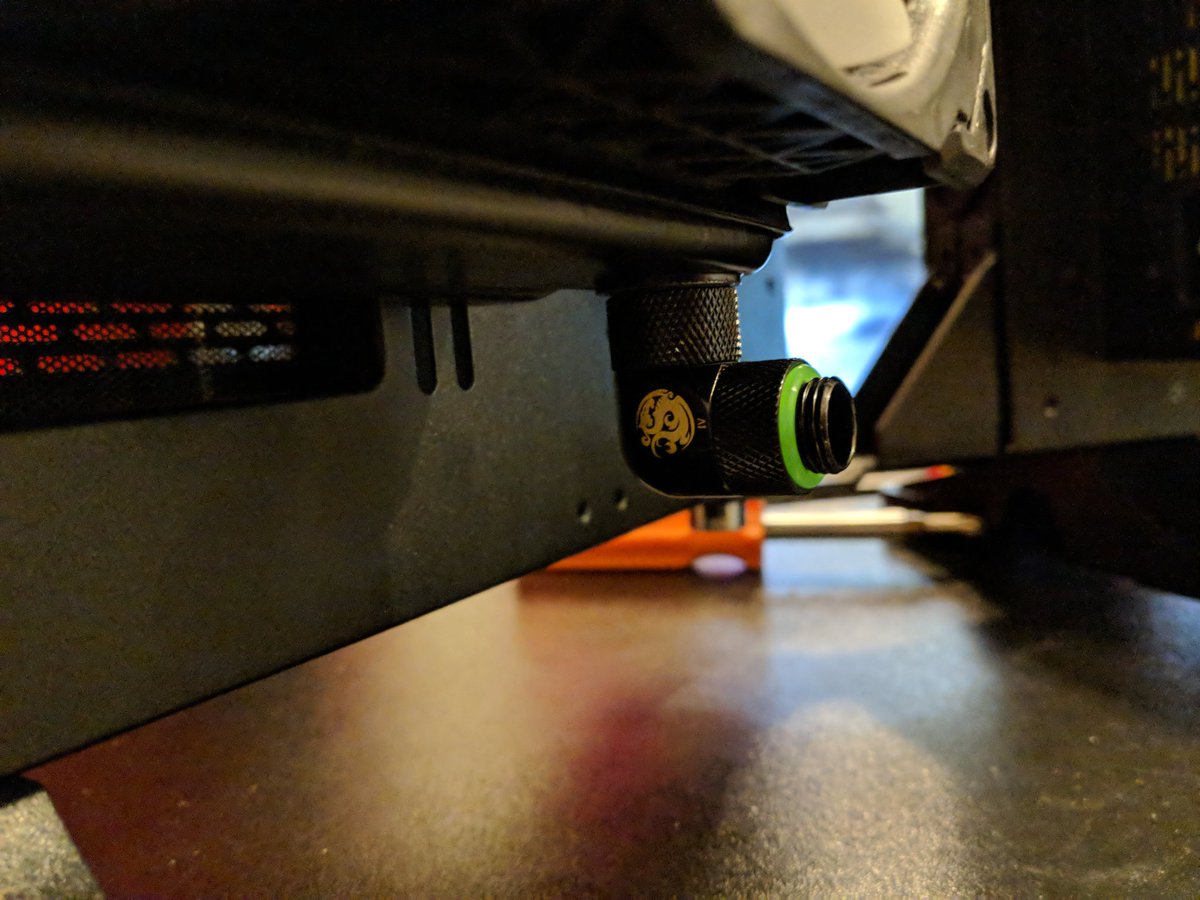
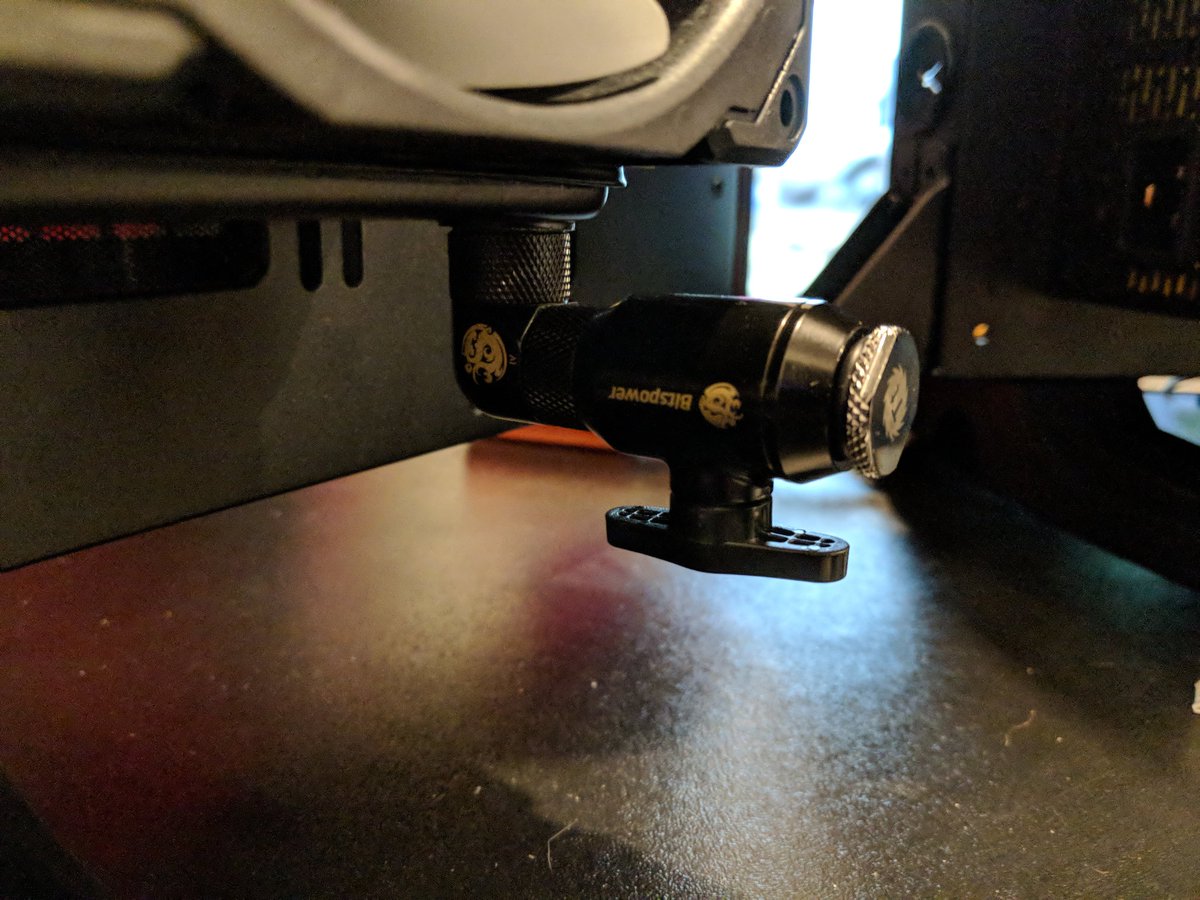
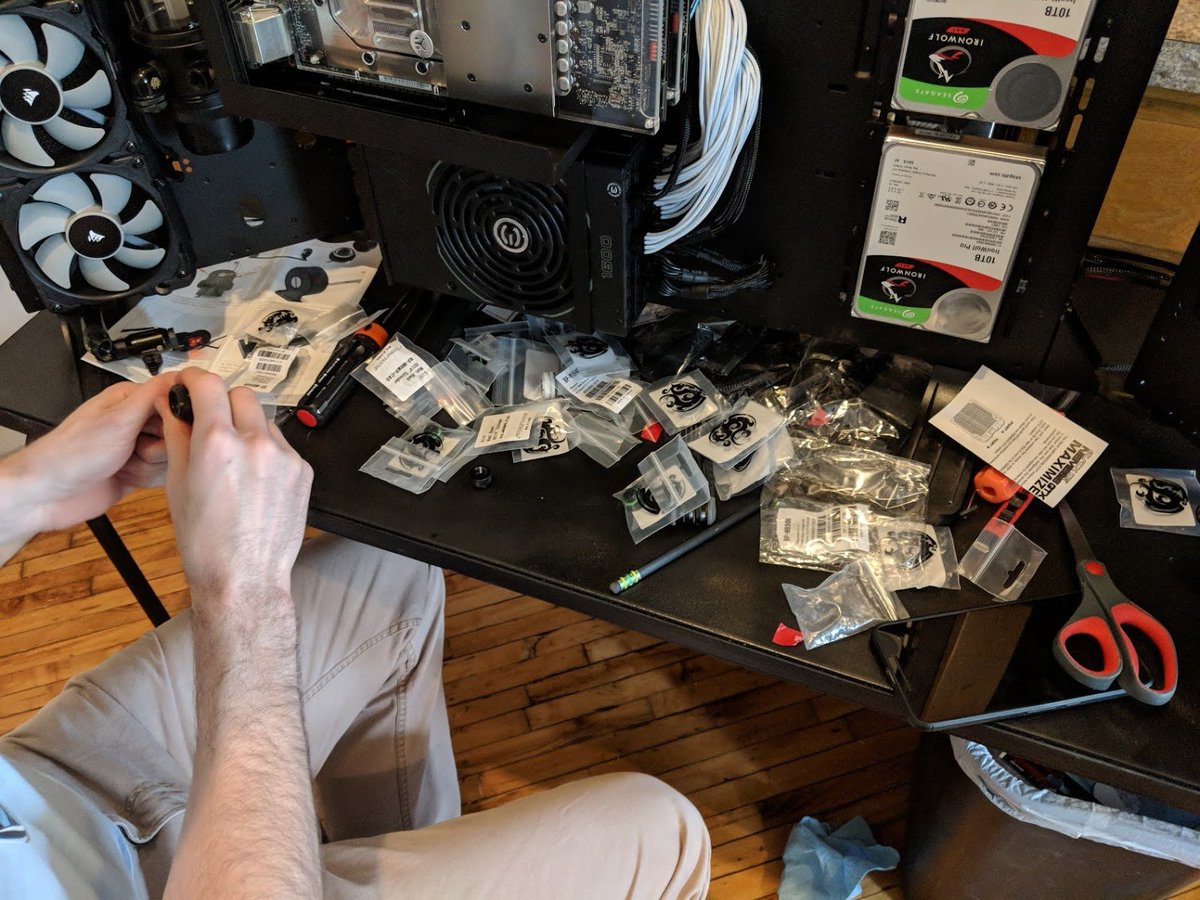
@nvidia @EKWaterBlocks @ASUS @intel @CORSAIR @Thermaltake @Seagate @XS_PC We're using @BitspowerHQ fittings on this build.
We'll put in and extension, then a 90 degree bend, then a ball valve topped with the stop fitting that came with our radiator.
We'll put in and extension, then a 90 degree bend, then a ball valve topped with the stop fitting that came with our radiator.
@nvidia @EKWaterBlocks @ASUS @intel @CORSAIR @Thermaltake @Seagate @XS_PC @BitspowerHQ Not off to a confidence inspiring start.
I just trying to turn the valve and it broke off in my hand. The valve will not close now.
I just trying to turn the valve and it broke off in my hand. The valve will not close now.
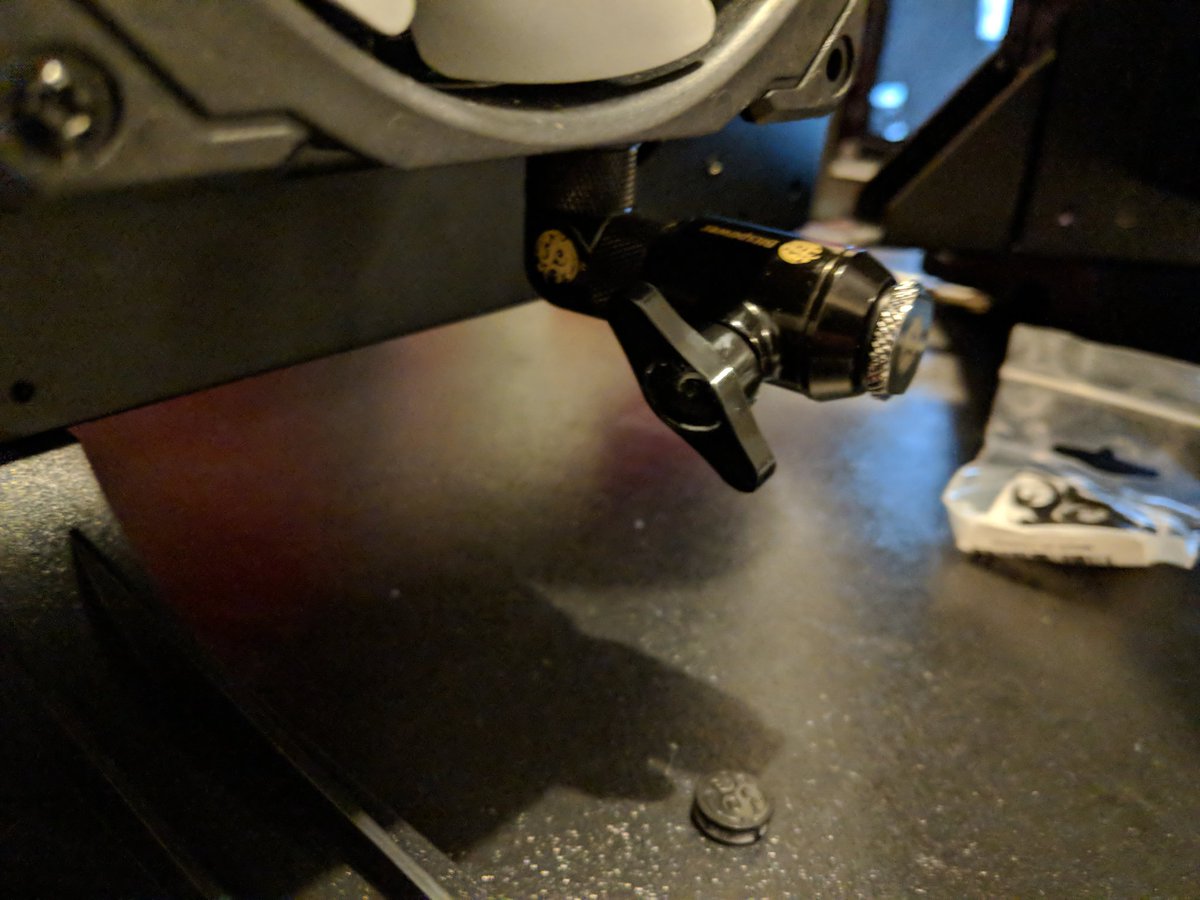
@nvidia @EKWaterBlocks @ASUS @intel @CORSAIR @Thermaltake @Seagate @XS_PC @BitspowerHQ Second one does appear to work.
Would welcome recommendations on different ball valve fittings as I have to order another one.
Would welcome recommendations on different ball valve fittings as I have to order another one.
@nvidia @EKWaterBlocks @ASUS @intel @CORSAIR @Thermaltake @Seagate @XS_PC @BitspowerHQ It should be said I really have no idea what I'm doing here. This is my first attempt at using something other than air cooling.
But, it is far from my first exposure. Good opportunity for a quick story from building PCs in the 90's.
But, it is far from my first exposure. Good opportunity for a quick story from building PCs in the 90's.
@nvidia @EKWaterBlocks @ASUS @intel @CORSAIR @Thermaltake @Seagate @XS_PC @BitspowerHQ When I was 15, my best friend @traffas made the score of our adolescence.
His old man had a buddy who was running a PC component wholesaler in Wichita, the closest city of any consequence near where we grew up.
His old man had a buddy who was running a PC component wholesaler in Wichita, the closest city of any consequence near where we grew up.
@nvidia @EKWaterBlocks @ASUS @intel @CORSAIR @Thermaltake @Seagate @XS_PC @BitspowerHQ @traffas It opened up a whole world of possibility to us. With an hour and 45 minutes drive one way (only begrudgingly permitted by both our mothers), we had direct access to a pipeline of parts - and more importantly - expertise without relying on a catalog.
@nvidia @EKWaterBlocks @ASUS @intel @CORSAIR @Thermaltake @Seagate @XS_PC @BitspowerHQ @traffas This was way before Amazon and NewEgg made it easy to buy parts and way before Tom's Hardware and Slashdot helped you make a lick of sense about it.
Not that we even had Internet access in those days, living as we did in agrarian nowhere.
Not that we even had Internet access in those days, living as we did in agrarian nowhere.
@nvidia @EKWaterBlocks @ASUS @intel @CORSAIR @Thermaltake @Seagate @XS_PC @BitspowerHQ @traffas This made us idolize the folks behind the counter at the wholesaler. They were making a living building the machines we dreamed about making.
By virtue of that vocation, they always knew more than we did, always had the answers, and always had something new for us to marvel.
By virtue of that vocation, they always knew more than we did, always had the answers, and always had something new for us to marvel.
@nvidia @EKWaterBlocks @ASUS @intel @CORSAIR @Thermaltake @Seagate @XS_PC @BitspowerHQ @traffas One Saturday we roll in and approach the counter. It was raised over the floor, already establishing the sense of countenance.
One of the guys we particularly respected asked us, "You want to see the coolest thing in computing?"
One of the guys we particularly respected asked us, "You want to see the coolest thing in computing?"
@nvidia @EKWaterBlocks @ASUS @intel @CORSAIR @Thermaltake @Seagate @XS_PC @BitspowerHQ @traffas "Yeah!" we enthused.
He reached over an flipped on an AT power supply and then picked up one of the tiny heatsinks of that day.
"Touch it," he smirked.
He reached over an flipped on an AT power supply and then picked up one of the tiny heatsinks of that day.
"Touch it," he smirked.
@nvidia @EKWaterBlocks @ASUS @intel @CORSAIR @Thermaltake @Seagate @XS_PC @BitspowerHQ @traffas .@traffas went first, then I. Touching our finger on the white core of the heatsink we felt a supercool touch.
The heatsink was actively cooling.
"WHOAAAAA." we exclaimed synchronously.
The heatsink was actively cooling.
"WHOAAAAA." we exclaimed synchronously.
@nvidia @EKWaterBlocks @ASUS @intel @CORSAIR @Thermaltake @Seagate @XS_PC @BitspowerHQ @traffas "H-H-How?" @traffas managed to stammer.
"Negative ions," the guy self-assuredly replied.
"Ohhhhhhh," we replied like we had a sense in the world what he was talking about.
"Negative ions," the guy self-assuredly replied.
"Ohhhhhhh," we replied like we had a sense in the world what he was talking about.
@nvidia @EKWaterBlocks @ASUS @intel @CORSAIR @Thermaltake @Seagate @XS_PC @BitspowerHQ @traffas What he showed us was one of the first Peltier coolers that shipped for PCs.
Their utility was short lived as the sweet spot of thermal density evaporated swiftly on the Pentium II line.
Their utility was short lived as the sweet spot of thermal density evaporated swiftly on the Pentium II line.
@nvidia @EKWaterBlocks @ASUS @intel @CORSAIR @Thermaltake @Seagate @XS_PC @BitspowerHQ @traffas But in that moment, a couple teenagers got their minds blown completely on what could be put into the boxes they were building.
The thought that we would ever *need* anything like that seemed so far fetched.
The thought that we would ever *need* anything like that seemed so far fetched.
@nvidia @EKWaterBlocks @ASUS @intel @CORSAIR @Thermaltake @Seagate @XS_PC @BitspowerHQ @traffas Now, 20 years later, I'm learning basic plumbing to keep my top shelf Intel processor from burning itself to death.
Funny line to plot.
Funny line to plot.
@nvidia @EKWaterBlocks @ASUS @intel @CORSAIR @Thermaltake @Seagate @XS_PC @BitspowerHQ @traffas Back in Brooklyn to spend Christmas Eve working on #mylastpc. While I was out, some critical cables came including the second riser for the GPUs.
@nvidia @EKWaterBlocks @ASUS @intel @CORSAIR @Thermaltake @Seagate @XS_PC @BitspowerHQ @traffas The beef of these Asus RoG GTX 1080ti Strix cards causes the riser bracket to sag a bit.
Not sure what can be done here.
Not sure what can be done here.
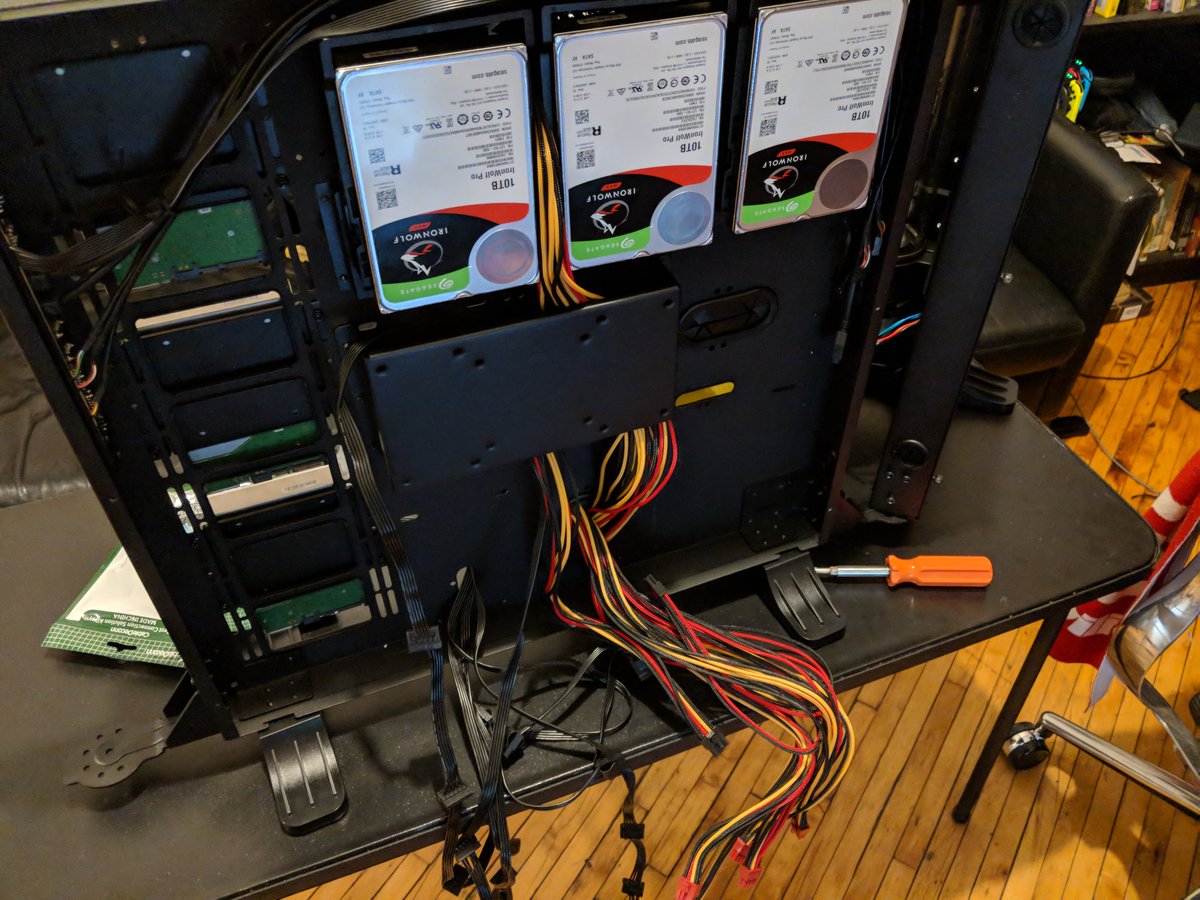
@nvidia @EKWaterBlocks @ASUS @intel @CORSAIR @Thermaltake @Seagate @XS_PC @BitspowerHQ @traffas The extra @Seagate 10 GB Ironwolf Pro came in to max out the mobo's slots.
Now at four in the front with three in the back.
Now at four in the front with three in the back.
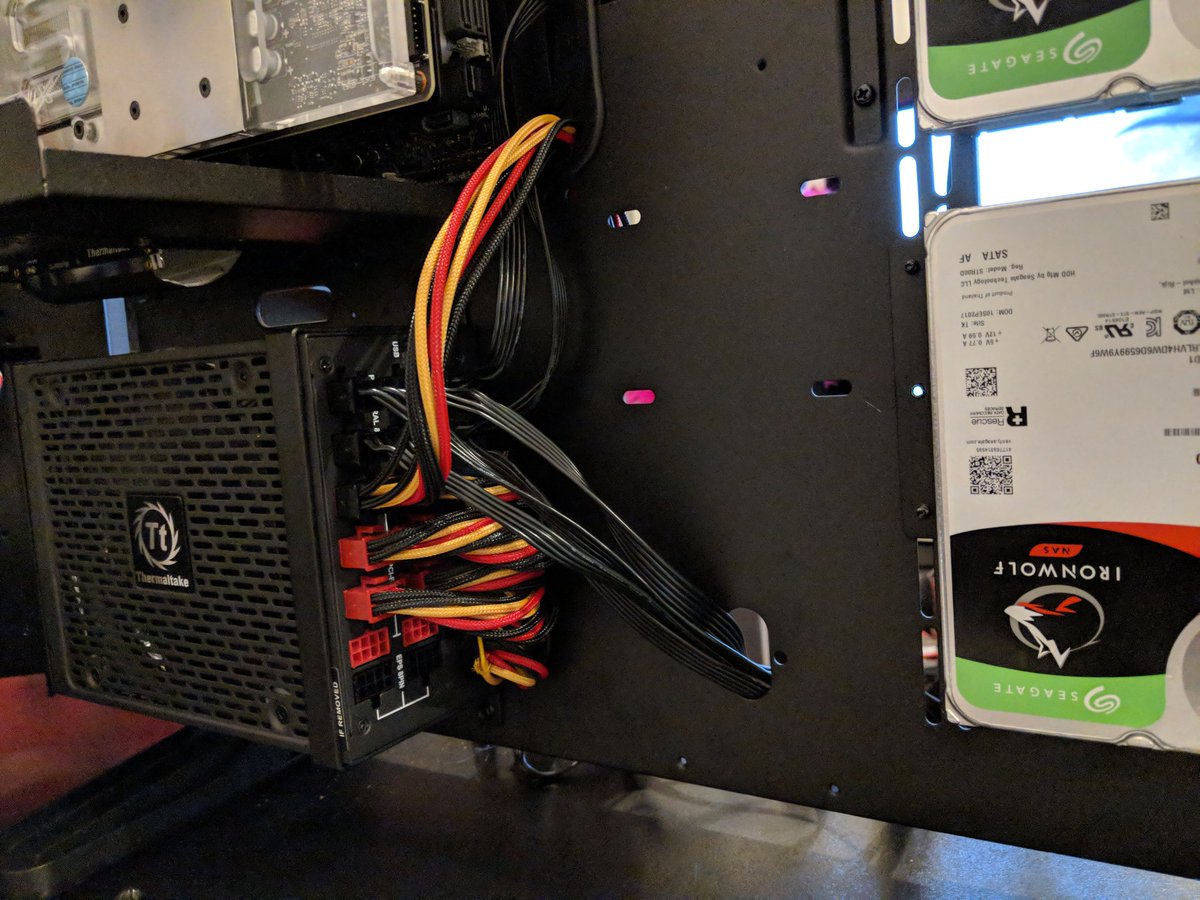
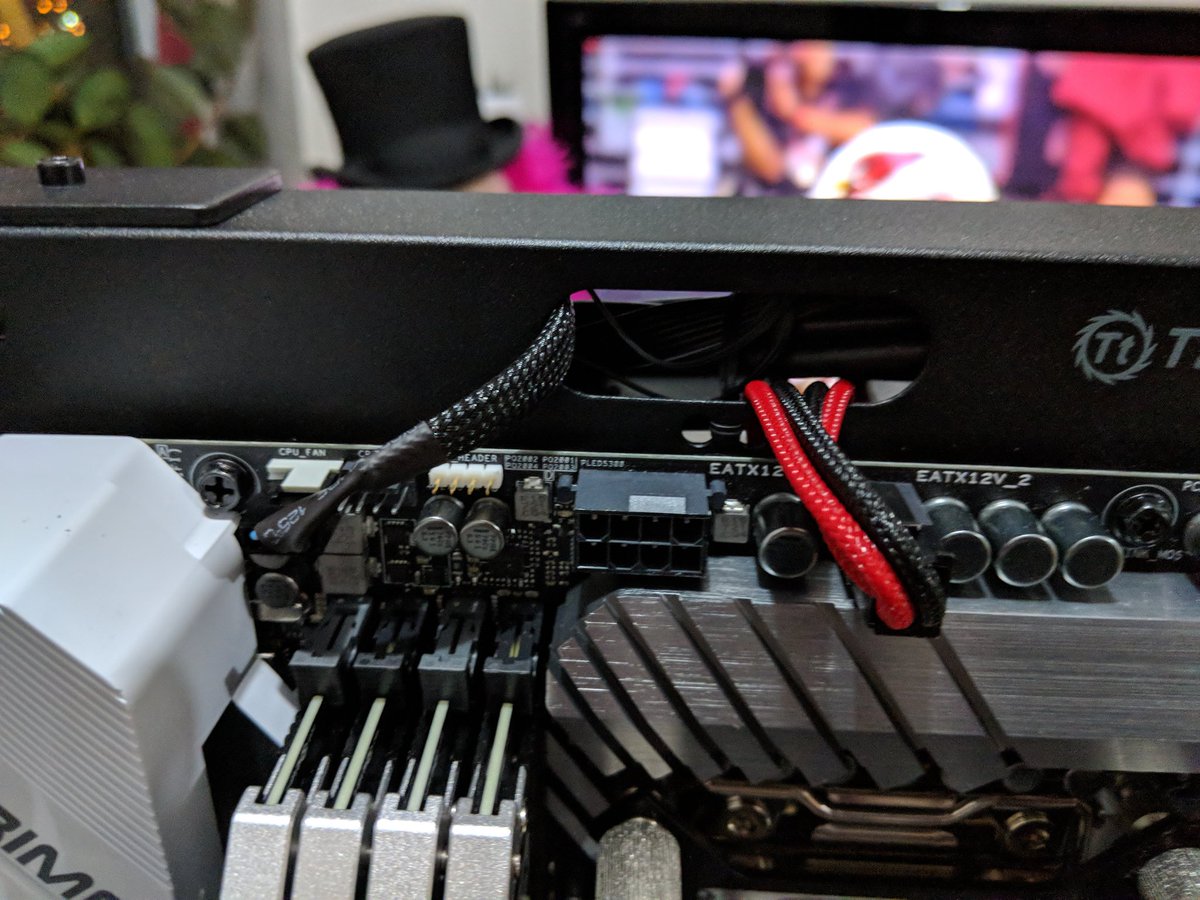
@nvidia @EKWaterBlocks @ASUS @intel @CORSAIR @Thermaltake @Seagate @XS_PC @BitspowerHQ @traffas To finish up the wiring, will start with the extra EPS power for this beefy mobo.
Going to have to order an 8 pin extension cord to fill this out.
Going to have to order an 8 pin extension cord to fill this out.
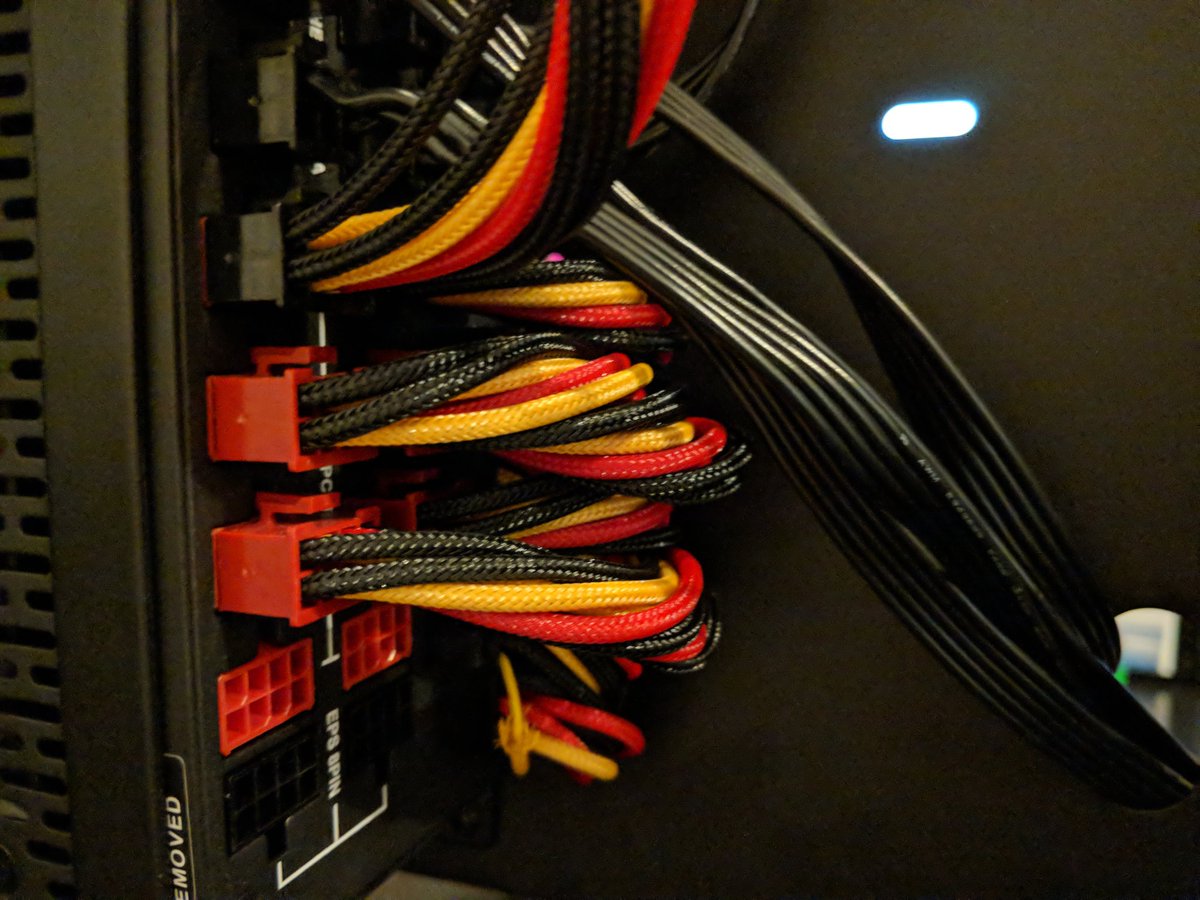
@nvidia @EKWaterBlocks @ASUS @intel @CORSAIR @Thermaltake @Seagate @XS_PC @BitspowerHQ @traffas Next will work on the peripherals. The SATA cables up first in the back.
Not wild about these blue ribbons, but dig the single sleeve for four drives.
Not wild about these blue ribbons, but dig the single sleeve for four drives.
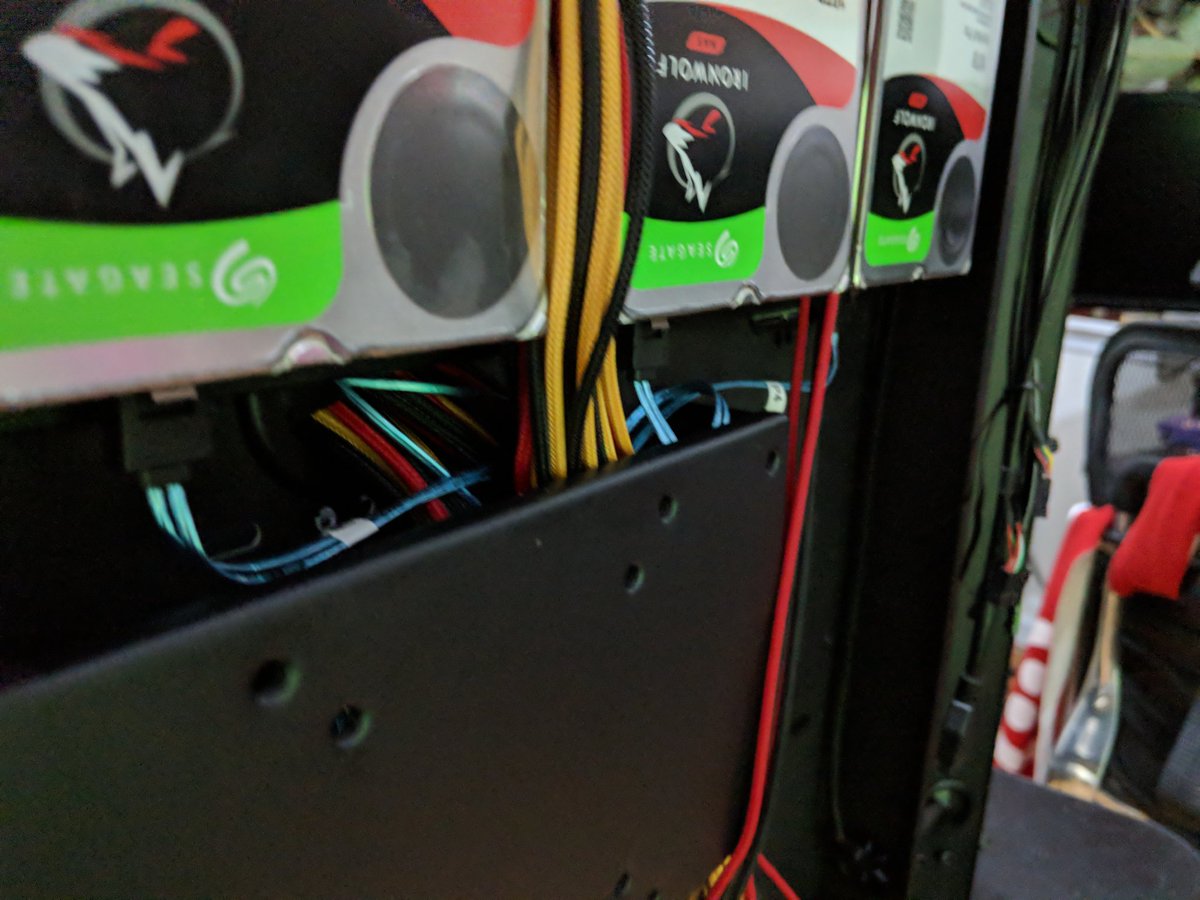
@nvidia @EKWaterBlocks @ASUS @intel @CORSAIR @Thermaltake @Seagate @XS_PC @BitspowerHQ @traffas Dropping in the connectivity for the front mounted drives yields another cable to order - need a looooong SATA cable for the one on the bottom.
@nvidia @EKWaterBlocks @ASUS @intel @CORSAIR @Thermaltake @Seagate @XS_PC @BitspowerHQ @traffas Getting crowded behind the main panel.
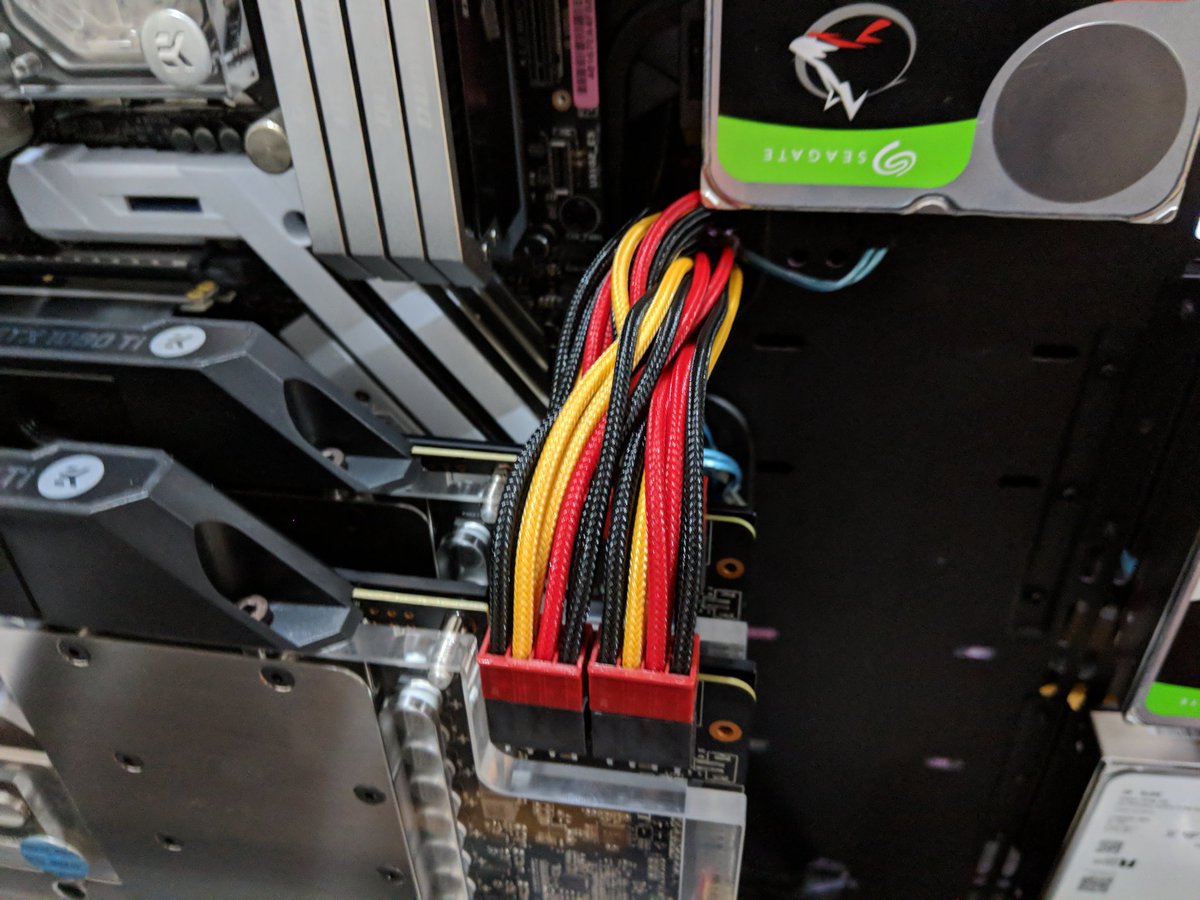
@nvidia @EKWaterBlocks @ASUS @intel @CORSAIR @Thermaltake @Seagate @XS_PC @BitspowerHQ @traffas Next up is the extra power for the GPUs.
Four - count 'em - four 8-pin EPS cords will be needed to power the 2-way Strix rig.
At the overclock we're targeting for these cards, they'll be pulling down 328.5 watts a piece.
Holy biscuits.
Four - count 'em - four 8-pin EPS cords will be needed to power the 2-way Strix rig.
At the overclock we're targeting for these cards, they'll be pulling down 328.5 watts a piece.
Holy biscuits.
@nvidia @EKWaterBlocks @ASUS @intel @CORSAIR @Thermaltake @Seagate @XS_PC @BitspowerHQ @traffas That should be good enough for the plumbing at this stage.
Can start on fitting out the left loop.
Given the cable layout, feels like the left loop should cool the GPUs while the right loop will serve the proc.
Start with fitting out the radiator with two 90° bends.
Can start on fitting out the left loop.
Given the cable layout, feels like the left loop should cool the GPUs while the right loop will serve the proc.
Start with fitting out the radiator with two 90° bends.
@nvidia @EKWaterBlocks @ASUS @intel @CORSAIR @Thermaltake @Seagate @XS_PC @BitspowerHQ @traffas Pump gets a 90° bend on the out take and straight compression fitting on the intake.
@nvidia @EKWaterBlocks @ASUS @intel @CORSAIR @Thermaltake @Seagate @XS_PC @BitspowerHQ @traffas We'll drop straight in on the proc with two compression fittings.
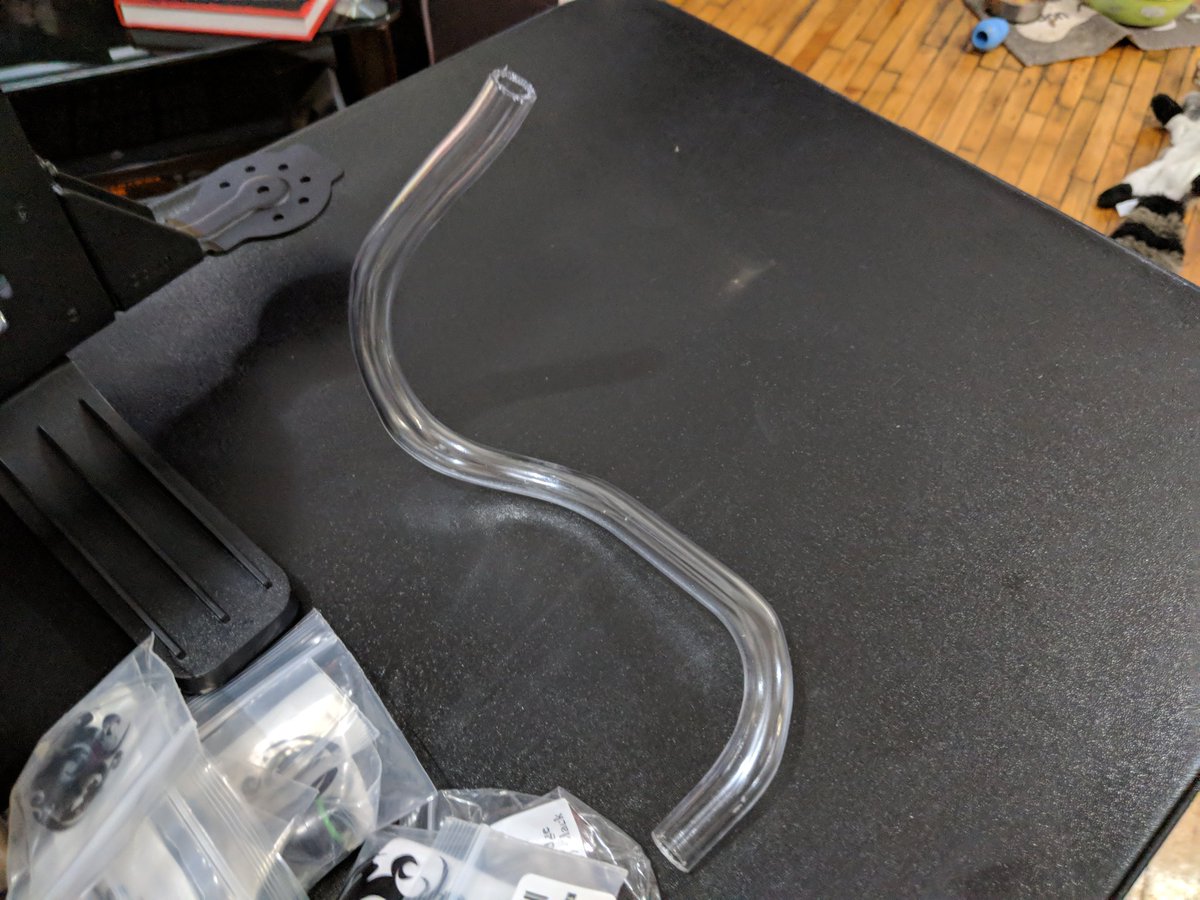
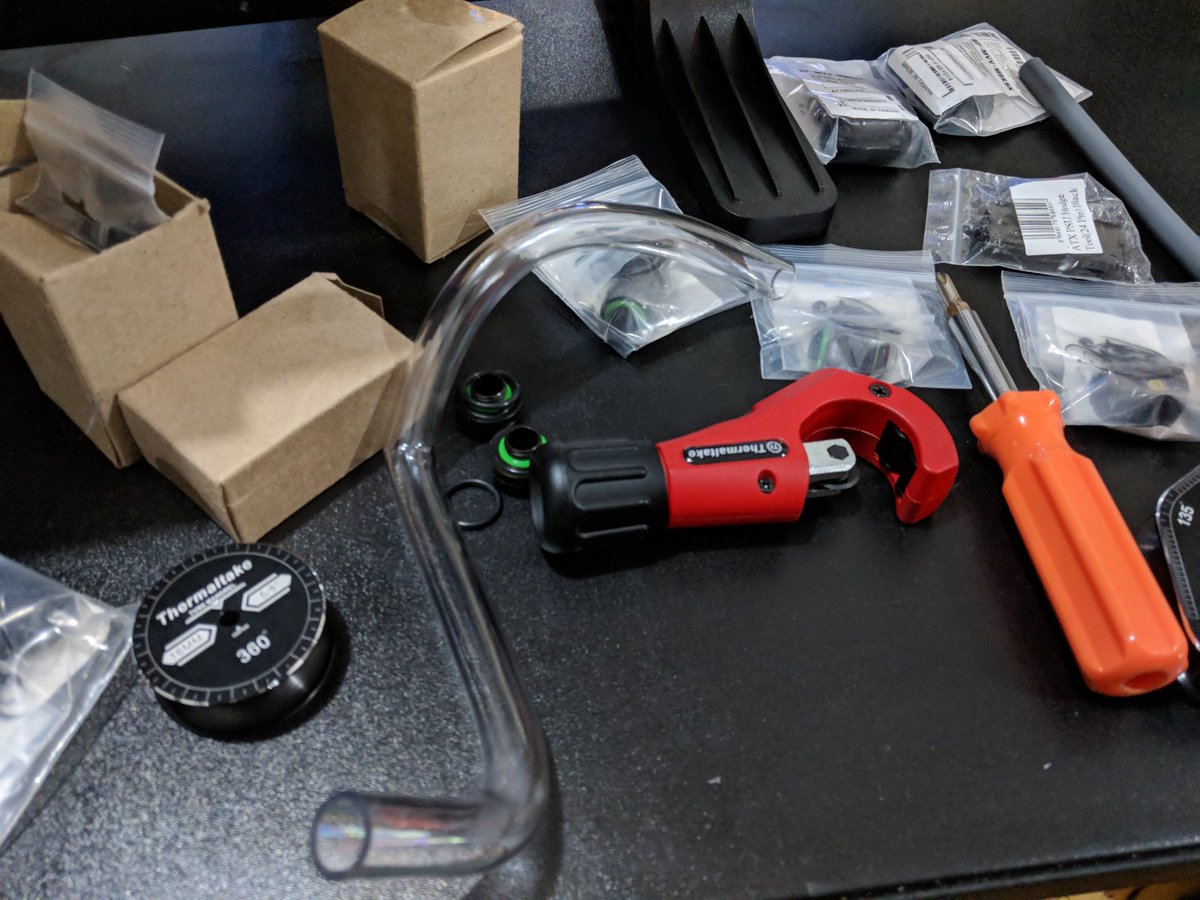
@nvidia @EKWaterBlocks @ASUS @intel @CORSAIR @Thermaltake @Seagate @XS_PC @BitspowerHQ @traffas Got to order some more parts for the GPUs. Thought I could cut some hard line to bridge the two, but looks like I'll need a proper length fitted pipe.
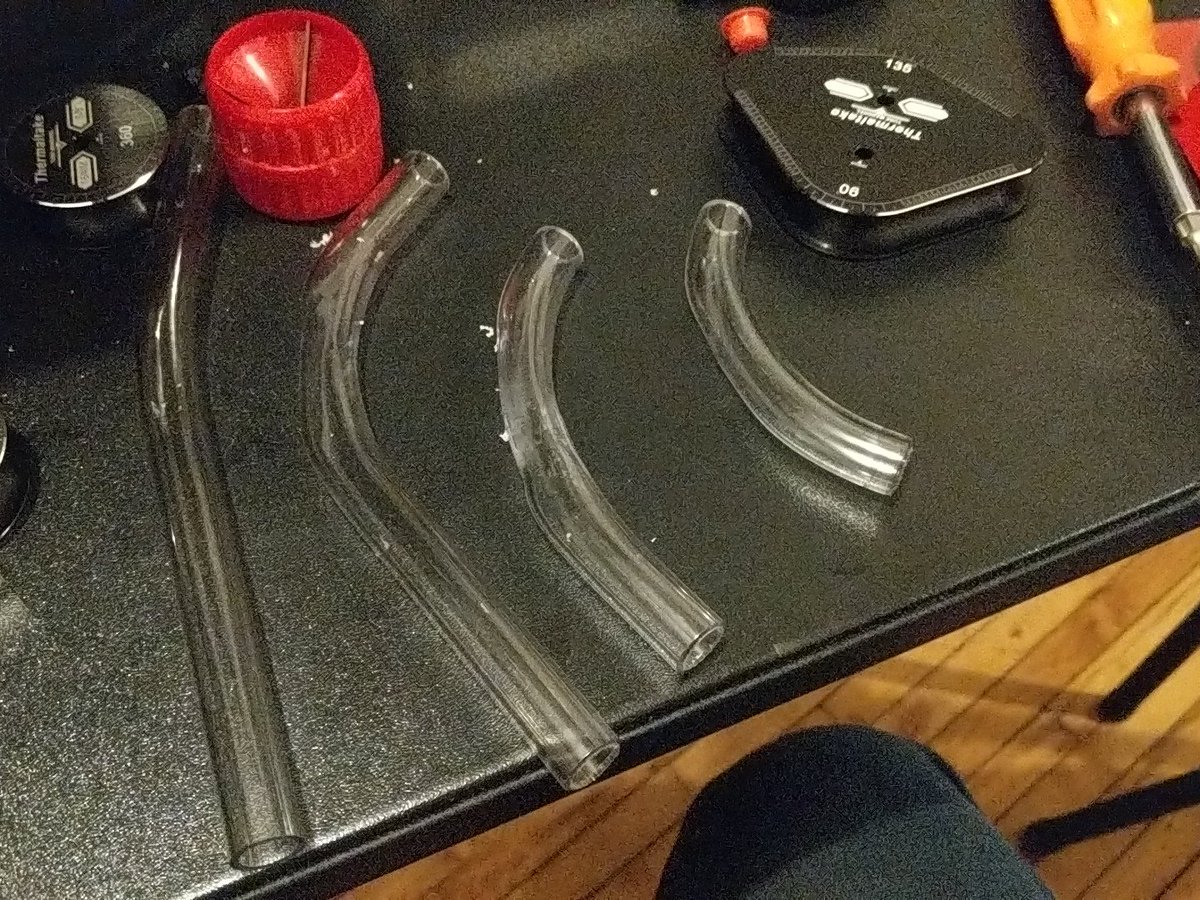
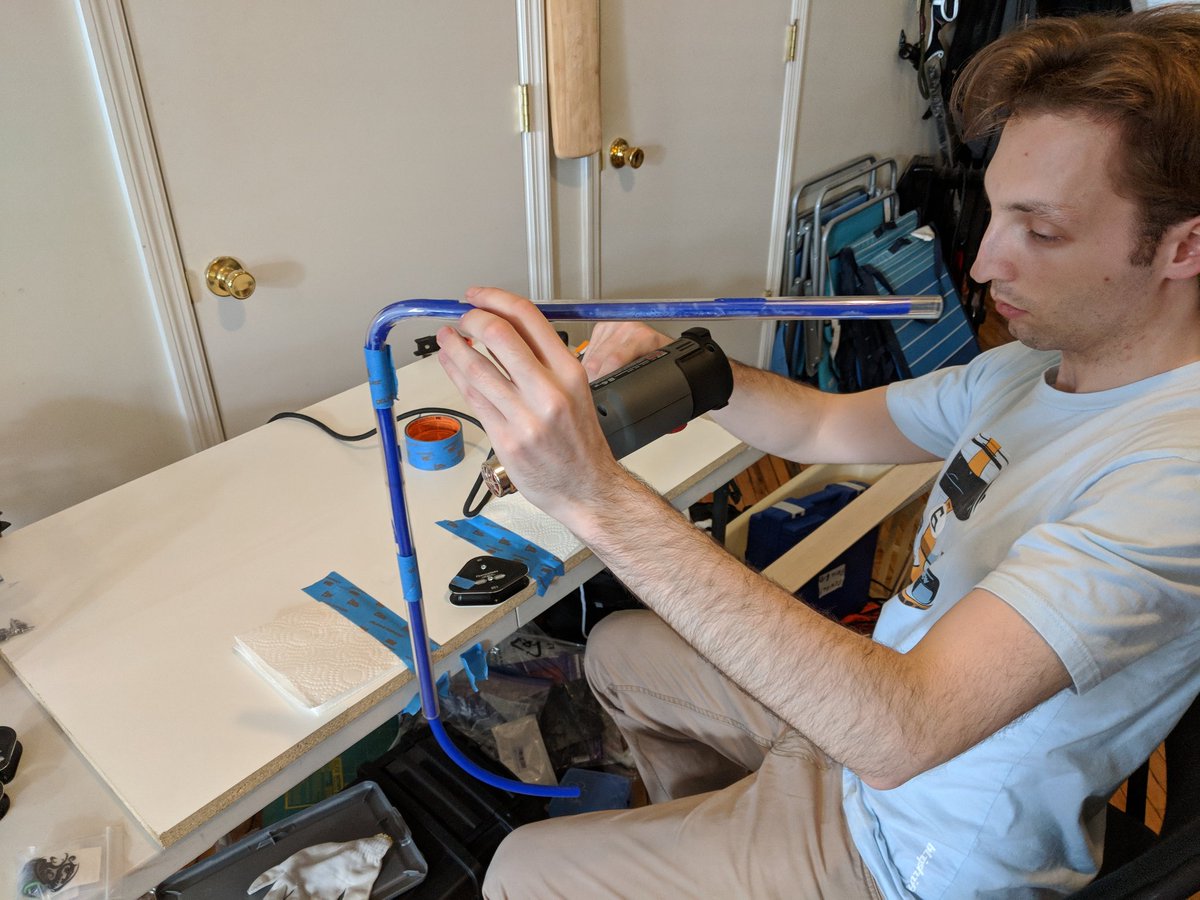
@nvidia @EKWaterBlocks @ASUS @intel @CORSAIR @Thermaltake @Seagate @XS_PC @BitspowerHQ @traffas Arright - now we're blowing past the edge of my expertise. Going to fire up the heat gun and start plumbing the GPU loop.
Last time I bent tube was high school chemistry.
I wasn't good then and don't expect I've improved.
Last time I bent tube was high school chemistry.
I wasn't good then and don't expect I've improved.
@nvidia @EKWaterBlocks @ASUS @intel @CORSAIR @Thermaltake @Seagate @XS_PC @BitspowerHQ @traffas Attempts 1-4 from left to right.
@nvidia @EKWaterBlocks @ASUS @intel @CORSAIR @Thermaltake @Seagate @XS_PC @BitspowerHQ @traffas Livestreaming this carnage here - watch my arm hair singe and my pupper look at me in disgust.
twitch.tv/brooklynhacker
twitch.tv/brooklynhacker
@nvidia @EKWaterBlocks @ASUS @intel @CORSAIR @Thermaltake @Seagate @XS_PC @BitspowerHQ @traffas First line installed. Took a couple hours to make and doesn't look amazing, I have to say.
This stage of #mylastpc is going to be a long walk.
This stage of #mylastpc is going to be a long walk.
@nvidia @EKWaterBlocks @ASUS @intel @CORSAIR @Thermaltake @Seagate @XS_PC @BitspowerHQ @traffas Got some more bits and bobs in for #mylastpc. First, we get the aqua pipe fitted to bridge the two GPUs.
@nvidia @EKWaterBlocks @ASUS @intel @CORSAIR @Thermaltake @Seagate @XS_PC @BitspowerHQ @traffas Here we have the product of the last bending session.
Not happy with the result - going to Ctrl+N this one.
Not happy with the result - going to Ctrl+N this one.
@nvidia @EKWaterBlocks @ASUS @intel @CORSAIR @Thermaltake @Seagate @XS_PC @BitspowerHQ @traffas Got some really helpful guidance in real time from viewers last time - putting up a stream for this evening's plumbing session:
twitch.tv/brooklynhacker
twitch.tv/brooklynhacker
@nvidia @EKWaterBlocks @ASUS @intel @CORSAIR @Thermaltake @Seagate @XS_PC @BitspowerHQ @traffas Aw biscuits - tripped a breaker.
@nvidia @EKWaterBlocks @ASUS @intel @CORSAIR @Thermaltake @Seagate @XS_PC @BitspowerHQ @traffas Arright - cooking some PETG again. Good night to be cozied up to a heat gun in New York.
twitch.tv/brooklynhacker
twitch.tv/brooklynhacker
@nvidia @EKWaterBlocks @ASUS @intel @CORSAIR @Thermaltake @Seagate @XS_PC @BitspowerHQ @traffas Marked improvement. 6th try.
@nvidia @EKWaterBlocks @ASUS @intel @CORSAIR @Thermaltake @Seagate @XS_PC @BitspowerHQ @traffas Still not looking awesome mounted.
@nvidia @EKWaterBlocks @ASUS @intel @CORSAIR @Thermaltake @Seagate @XS_PC @BitspowerHQ @traffas Need to figure out how to flatten that line.
@nvidia @EKWaterBlocks @ASUS @intel @CORSAIR @Thermaltake @Seagate @XS_PC @BitspowerHQ @traffas 7th try. Think this will have to do.
@nvidia @EKWaterBlocks @ASUS @intel @CORSAIR @Thermaltake @Seagate @XS_PC @BitspowerHQ @traffas This is absolutely the worst part of #mylastpc. There's a reason so few people do hard line water cooling.
Felt good about the bends on the out take from the pump, but moving the silicone insert is proving difficult.
Managed to get a chopstick stuck here.
Felt good about the bends on the out take from the pump, but moving the silicone insert is proving difficult.
Managed to get a chopstick stuck here.
@nvidia @EKWaterBlocks @ASUS @intel @CORSAIR @Thermaltake @Seagate @XS_PC @BitspowerHQ @traffas Calling it a night.
Need to find a better solution for extracting the insert on these long pipes.
Also will need to figure why my current desktop doesn't recognize my OS drive after the breaker trip. :/
Need to find a better solution for extracting the insert on these long pipes.
Also will need to figure why my current desktop doesn't recognize my OS drive after the breaker trip. :/
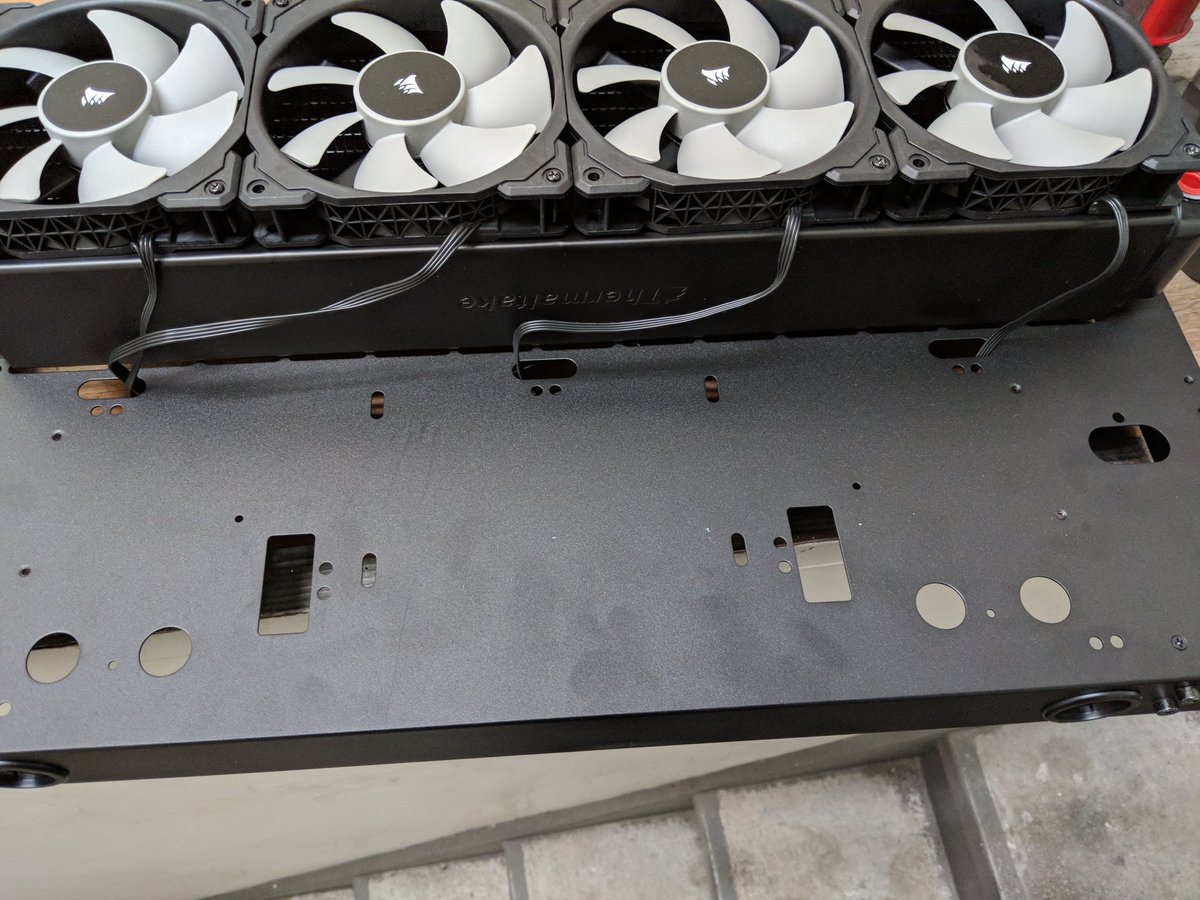
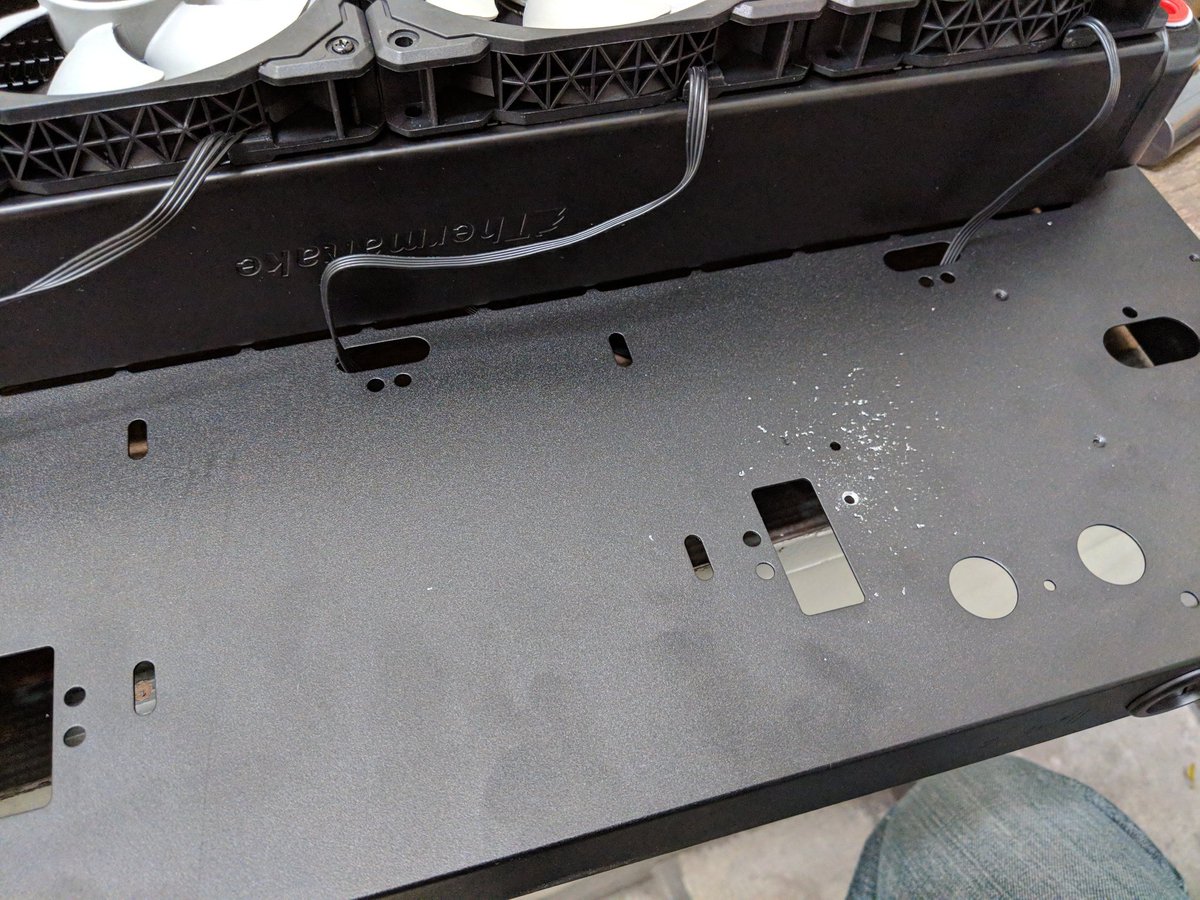
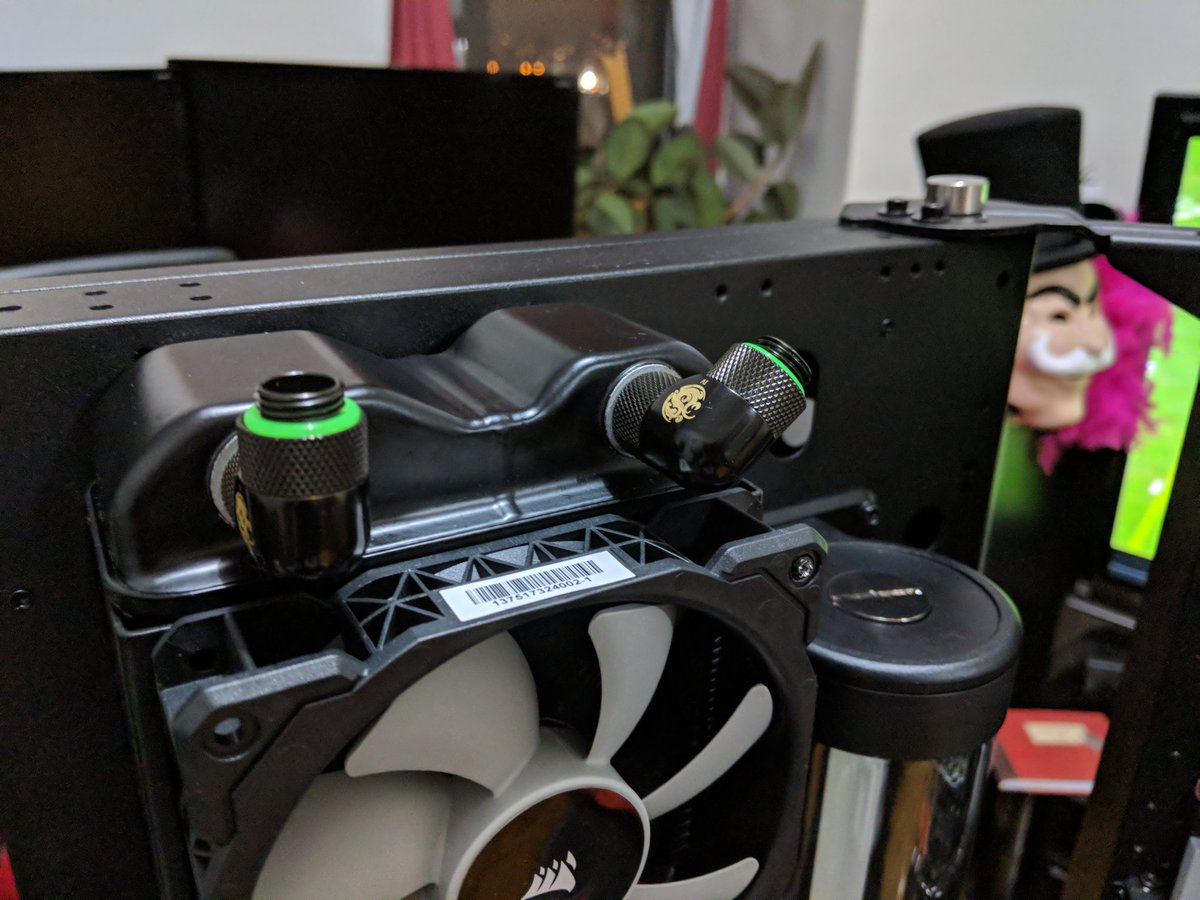
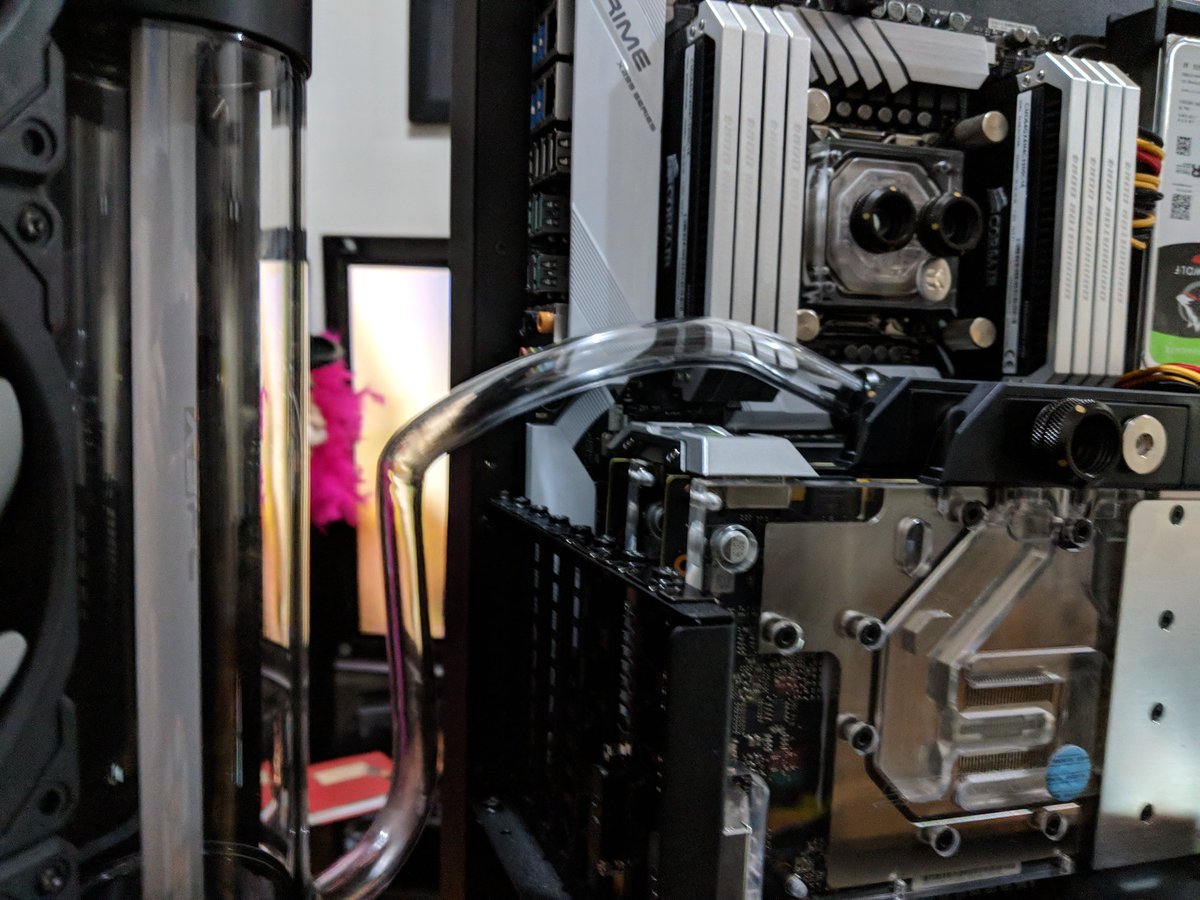
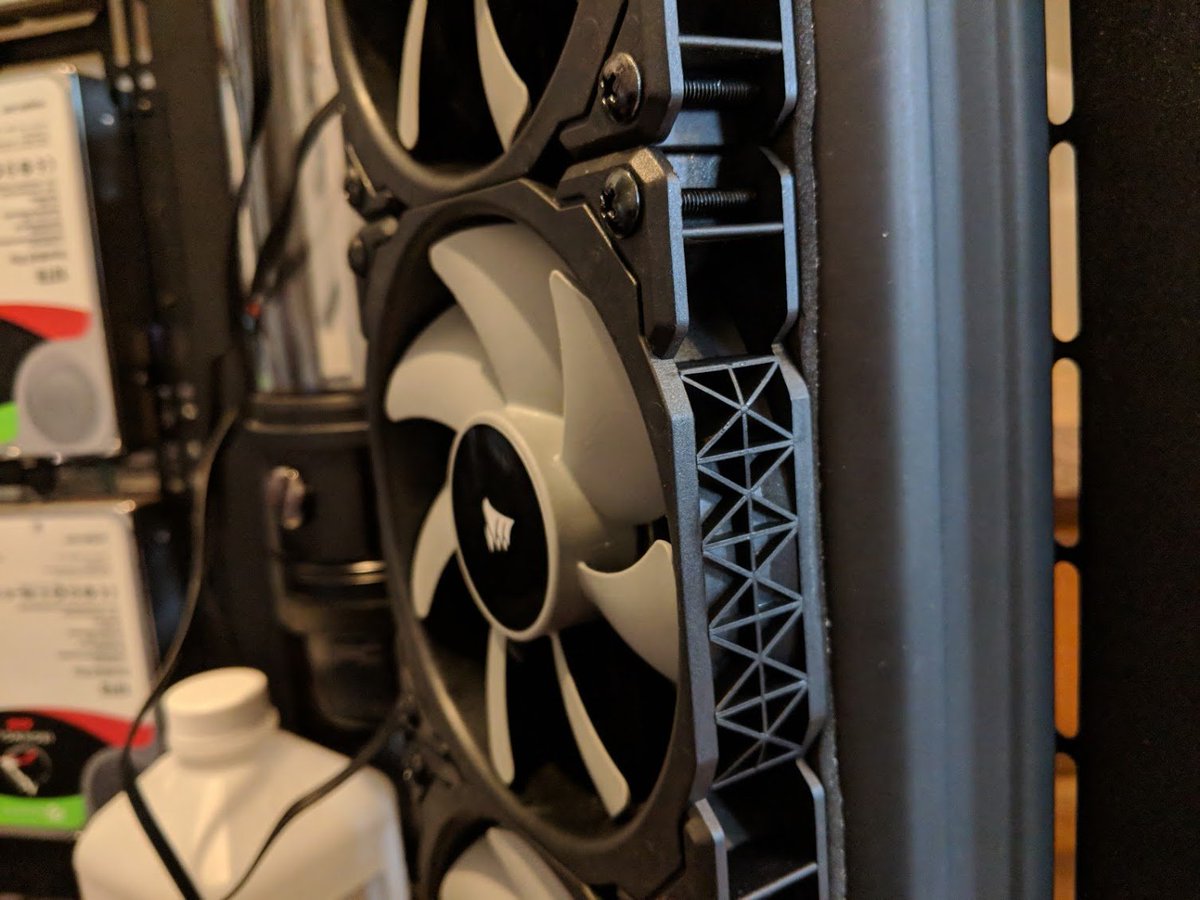
First big change is new radiators. @AMP_US found the old Thermaltake rads were aluminum while the blocks were all copper. Galvanic corrosion would have chewed apart the loops in a month.
He recommended these Black Ice Nemesis radiators which look hard as nails.
He recommended these Black Ice Nemesis radiators which look hard as nails.
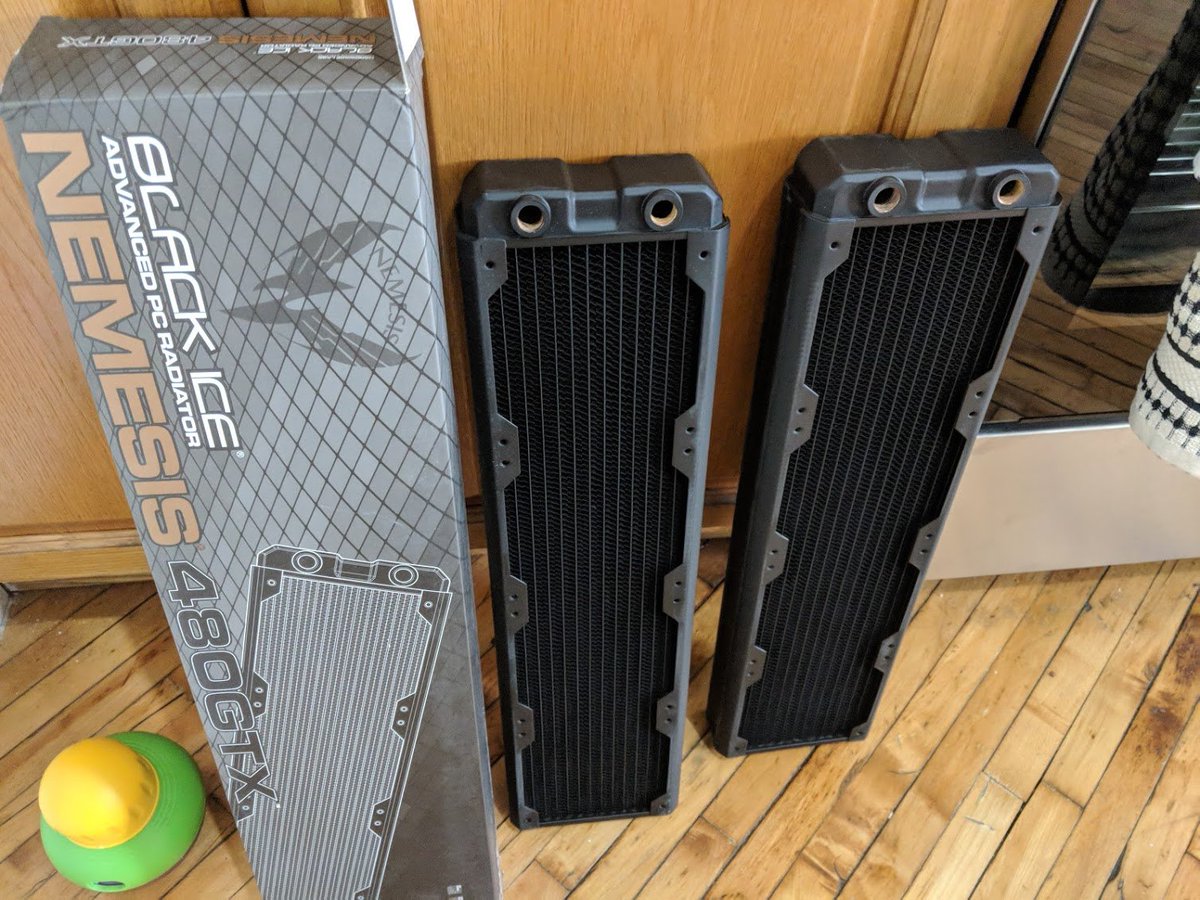
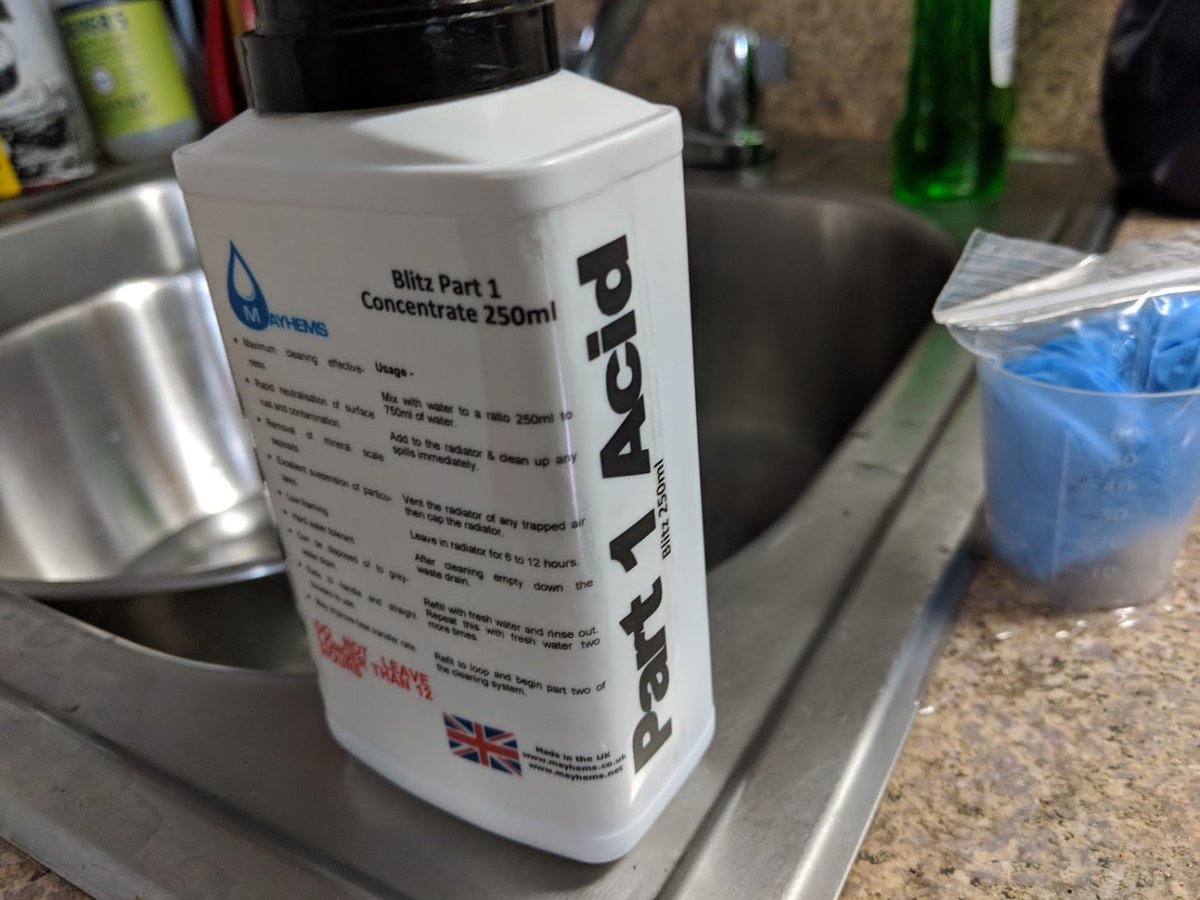
Next we acid bathe the radiators with @MayhemsSolution Blitz. Part one is a 0.1% phosphoric acid left to soak in the rads for half a day.
Much obliged for the included gloves and goggles - I totally would have cowboyed this science without them.
Much obliged for the included gloves and goggles - I totally would have cowboyed this science without them.
As the radiators sit in the wash, @AMP_US works on the second addition to the build, replacing the previous @EKWaterBlocks CPU block with a full monoblock for the @ASUS X299 Prime Deluxe board.
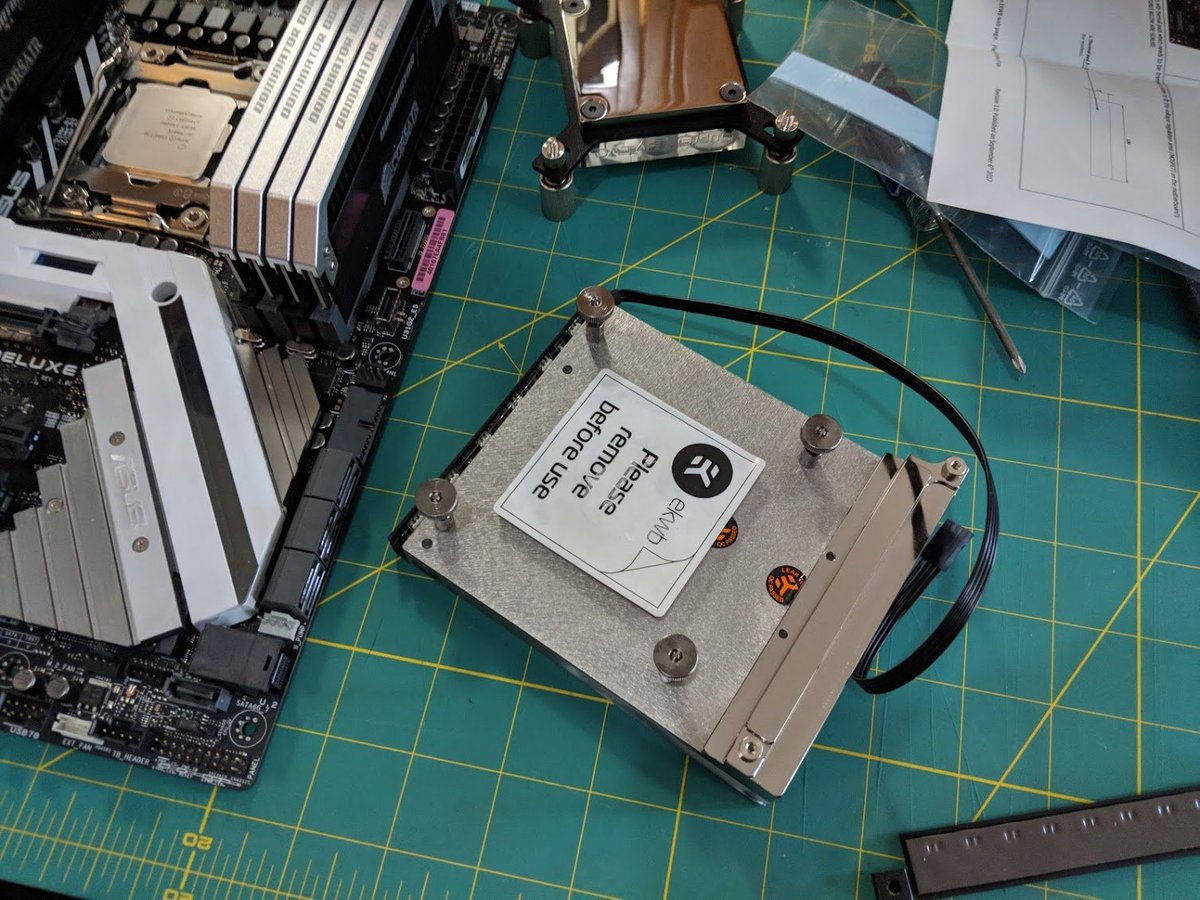
The monoblock now cools both our hotter-than-hell Intel 7980XE and the voltage regulator modules that feed them. @AMP_US found some folks with serious problems.
160 watts going through the VRMs causes the CPU to throttle after only minutes of use.
160 watts going through the VRMs causes the CPU to throttle after only minutes of use.
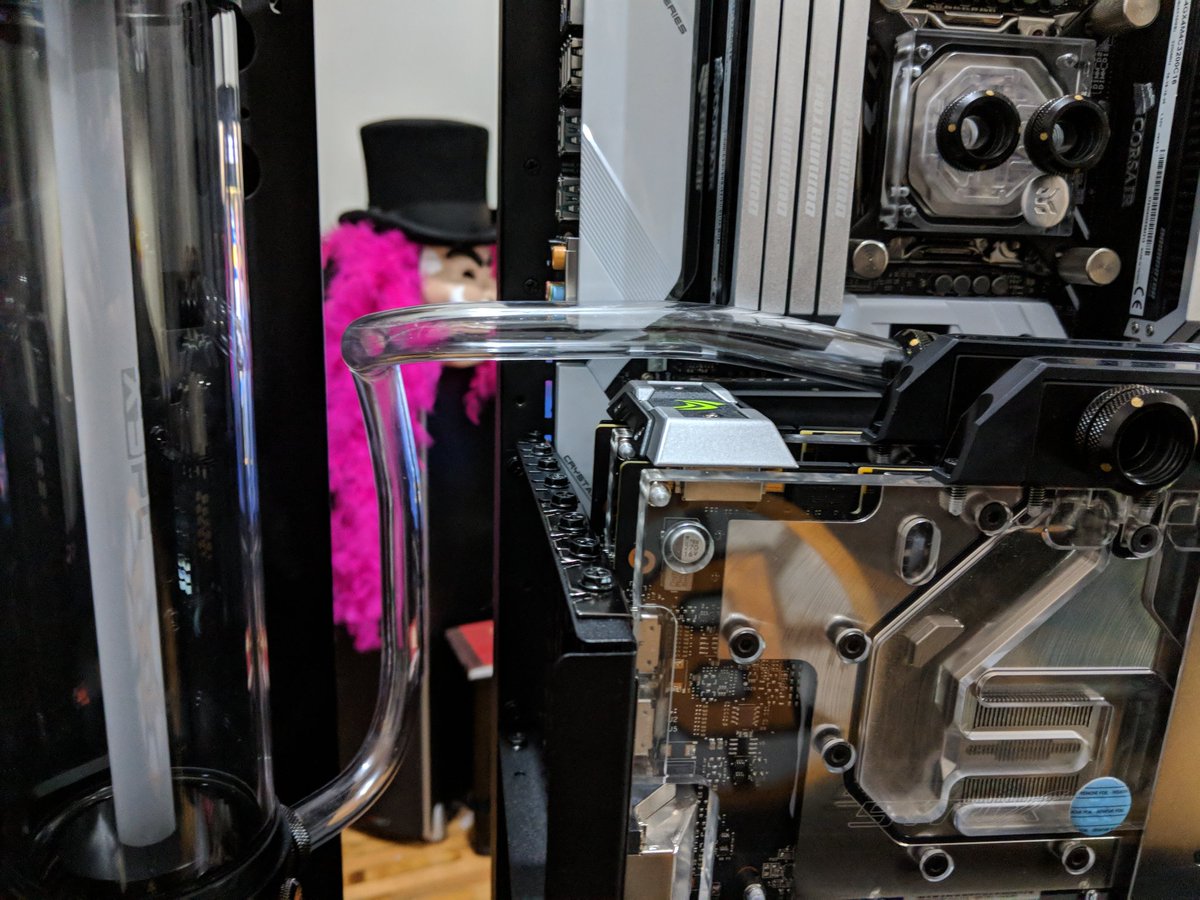
The @EKWaterBlocks monoblock covered the whole mass of the CPU and the VRMs, but @AMP_US found fitting it to the mobo pretty tight with all the RAM slots filled.

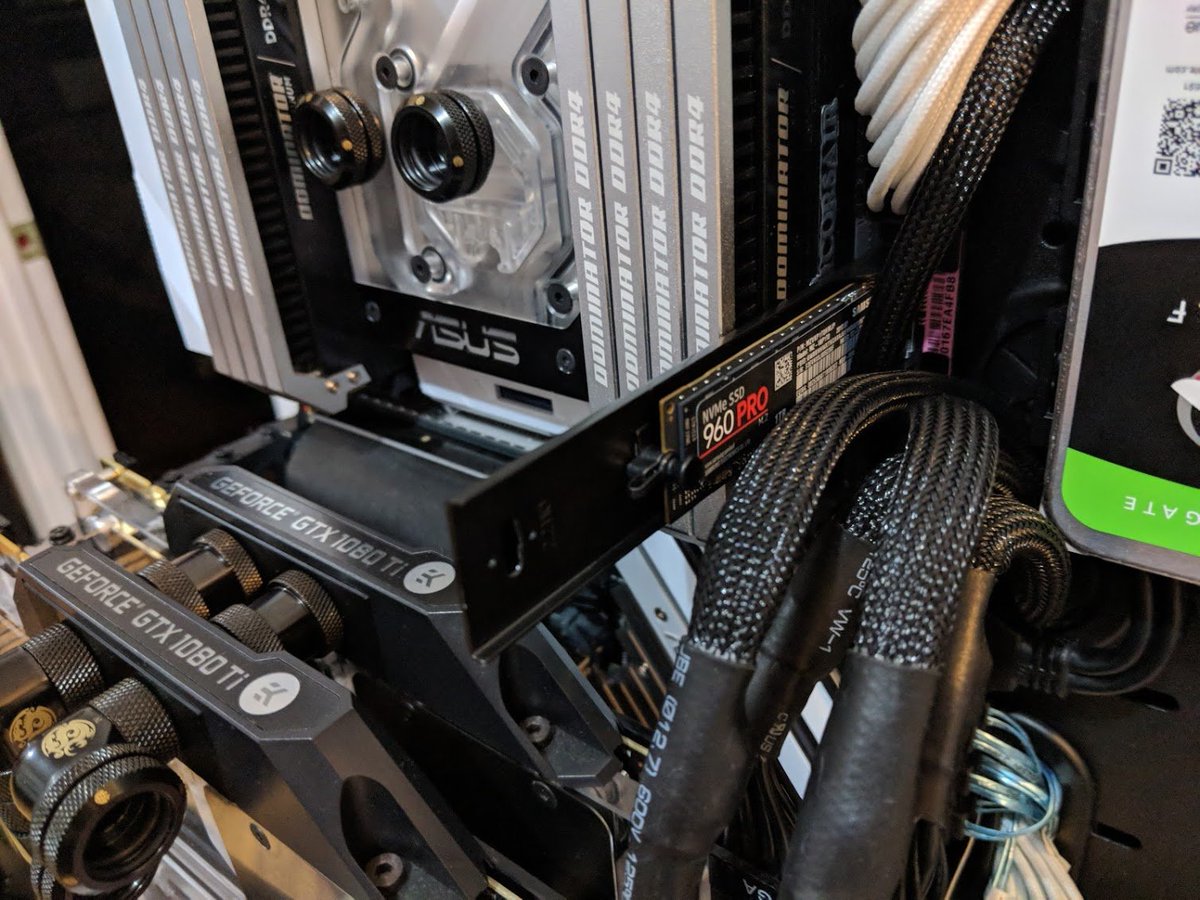
Reverse angle shows how snug the new monoblock is. Getting awfully cramped on this board now.

Good shot of the busy biscuits going on with #mylastpc: the new monoblock against the 2nd SSD and the newly parallel 1080tis.

We also swapped out the @Thermaltake Roughpower 1500W for an @TEAMEVGA 1600W T2 Supernova. Here it is crammed in below the GPUs as @AMP_US sorts through a sea of fittings.
Is this as high as PSUs go on 110-volt outlets?
Is this as high as PSUs go on 110-volt outlets?
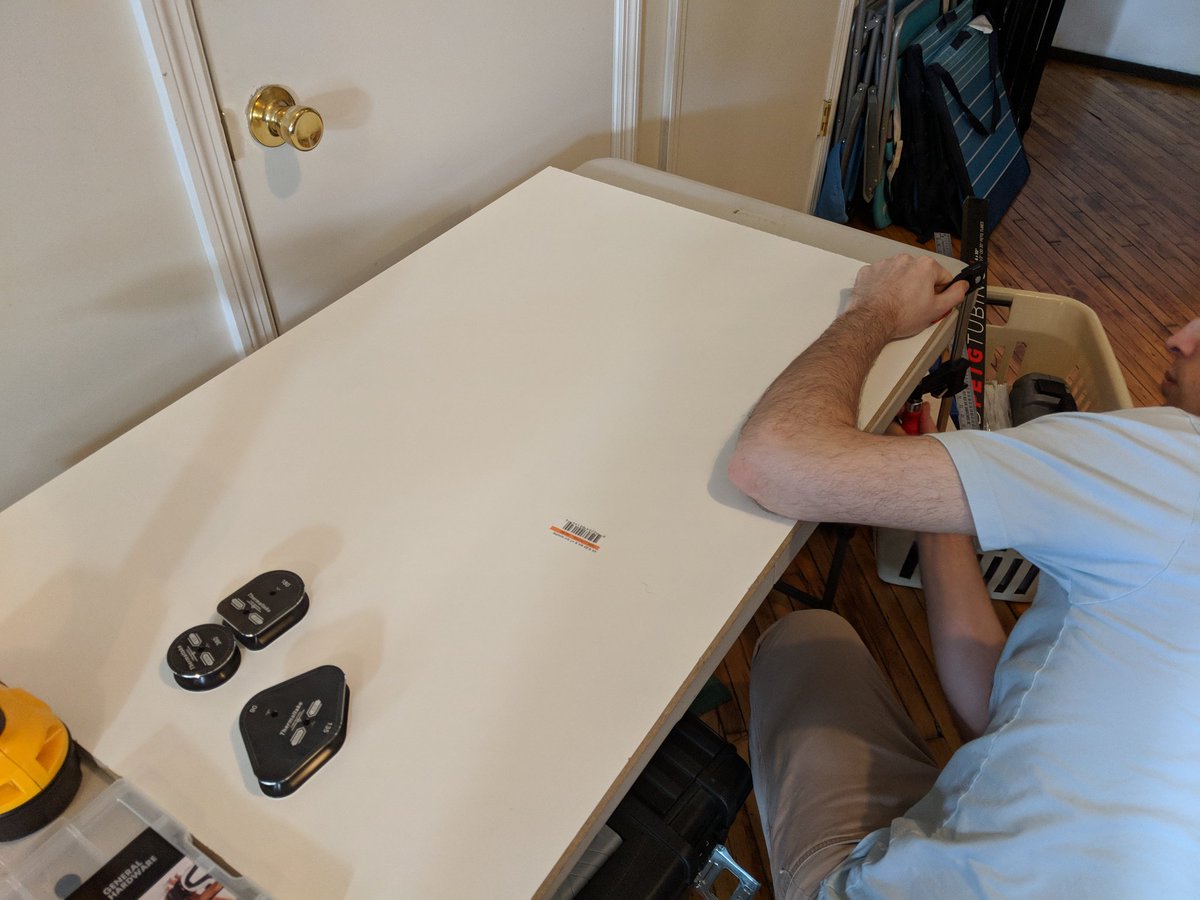
The new radiators only have two ports, causing us to go a little more gymnastic with the fittings for our drain valve.

.@AMP_US is setting up a little jig table to get our bends on.
Man, I was doing this *completely* wrong.
Man, I was doing this *completely* wrong.
Measure twice, cut once. #mylastpc
Getting toasty. #mylastpc
First run, first try. #mylastpc
My ma [after another weekend spent struggling with #mylastpc]: How's your big computer doing?
Me: Not great. Still haven't gotten anything to pass a pressure test.
Ma: Well, have you tried Googling it?
Me: Not great. Still haven't gotten anything to pass a pressure test.
Ma: Well, have you tried Googling it?
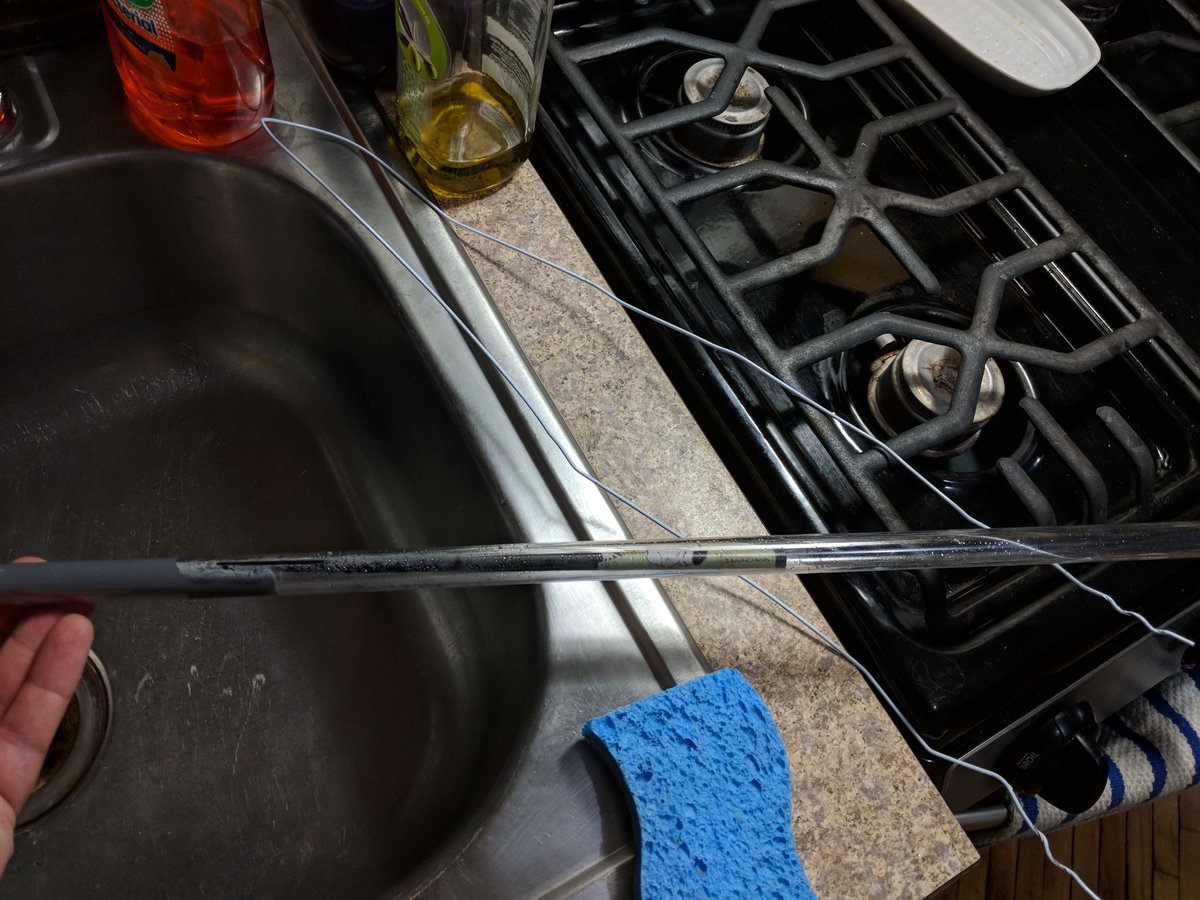
Been burning the midnight PETG on #mylastpc. Think I've now gone through 11 meters of tubing, but did finally find a plumbing measurement technique that works.
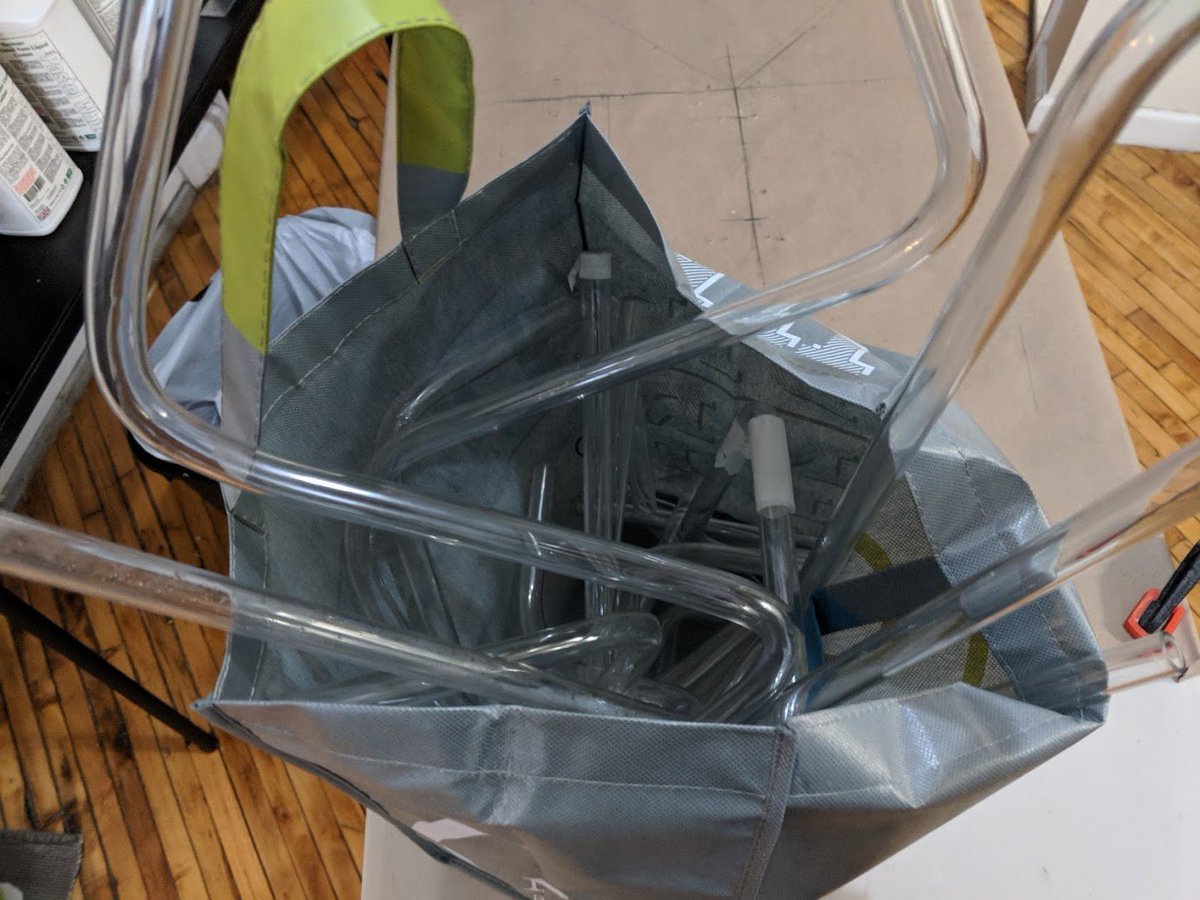
Just a sampling of some of #mylastpc attempts. I'm worried about tossing all this in public trash for fear of what the neighbors might think.
This is definitely the trough of disillusionment in my #watercooling experience.
This is definitely the trough of disillusionment in my #watercooling experience.
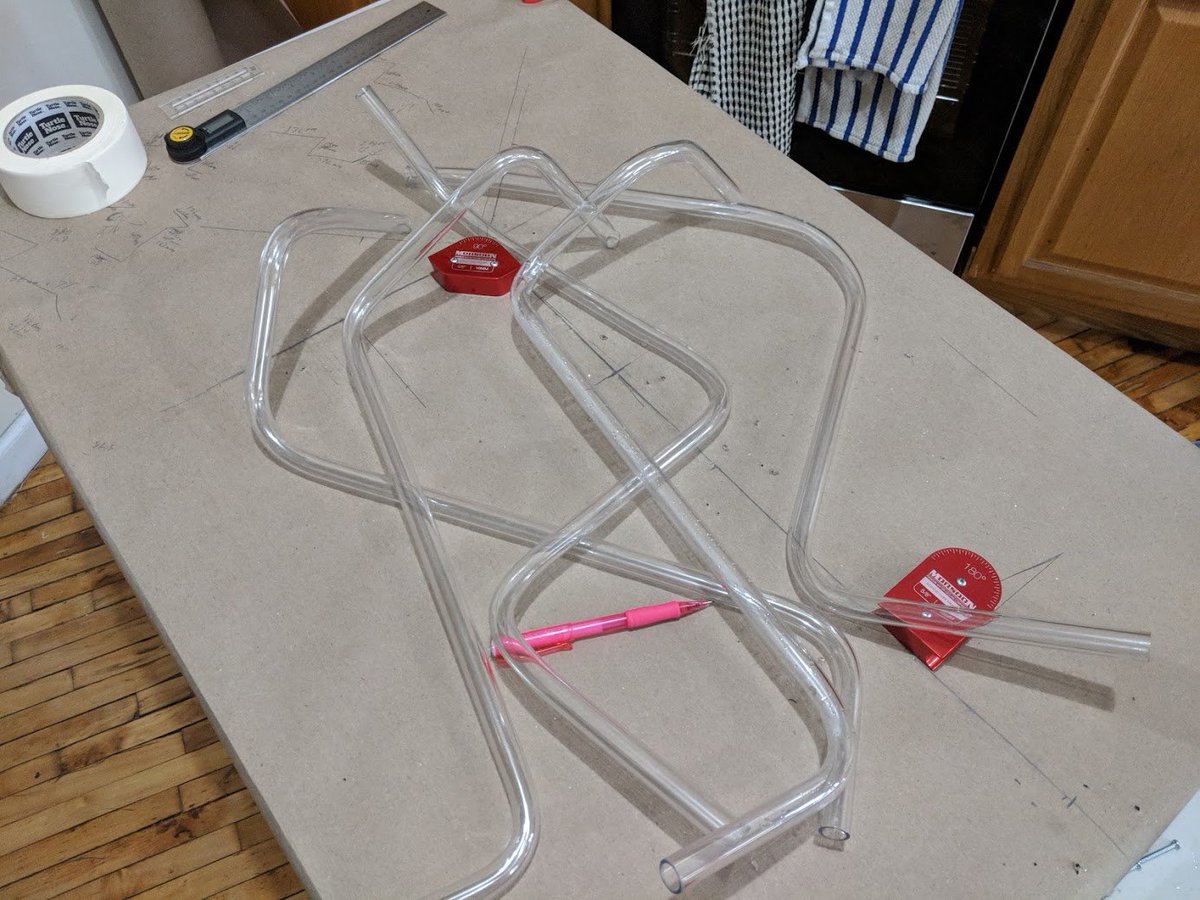
I went through an entire design using the freehand technique. The results were just embarrassing.

There were a few problems. The biggest one is that this @BitspowerHQ tubing did not work at all with the Bitspower fittings.
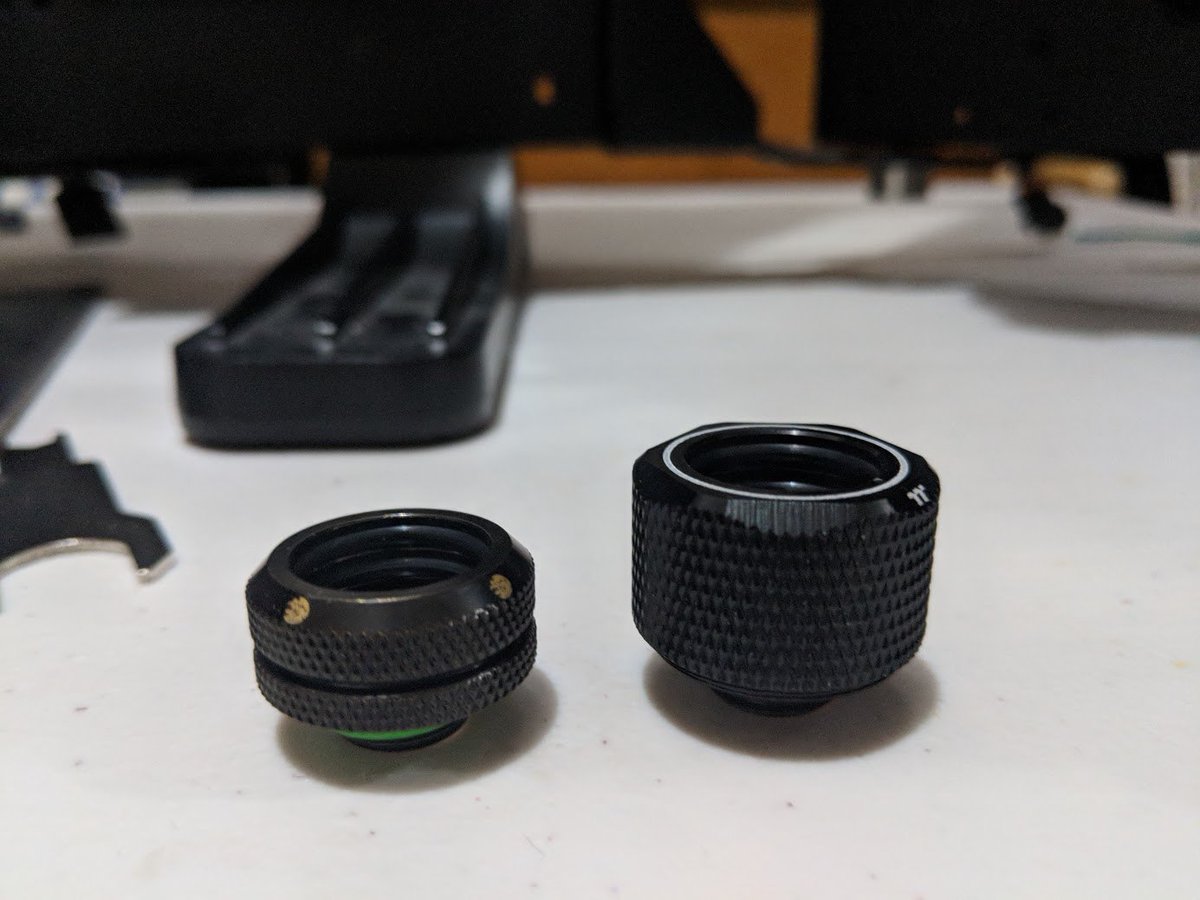
Swapped out the slim profile jackets of the Bitspower fittings (left) for thick sleeve @Thermaltake fittings (right). Love the look.
Swapped out the slim profile jackets of the Bitspower fittings (left) for thick sleeve @Thermaltake fittings (right). Love the look.
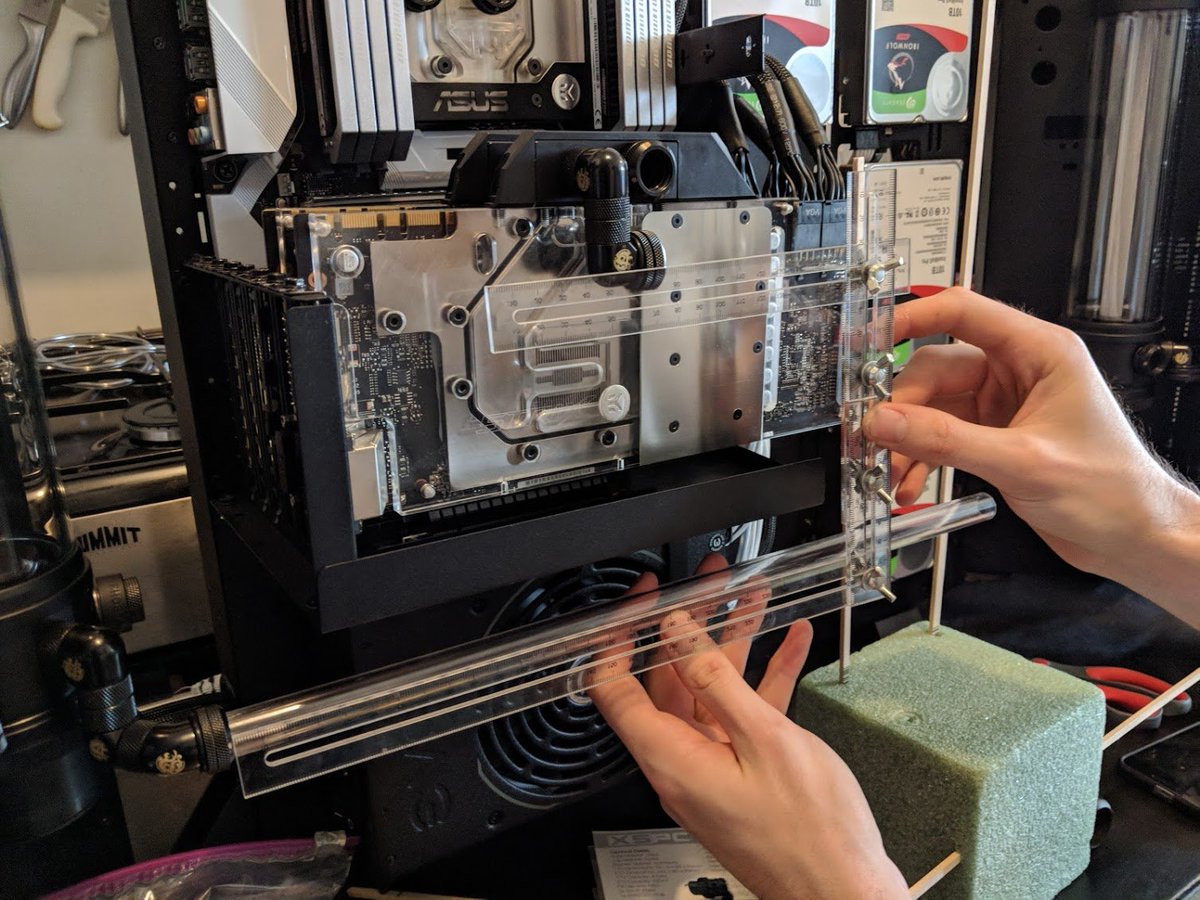
The second big problem is the runs would drive me absolutely batty looking at them all day. Monsoon Cooling made some carpenter's rulers made for watercooling that ended up working magnificently.
Finally found a way to do this without using the Force.
Finally found a way to do this without using the Force.
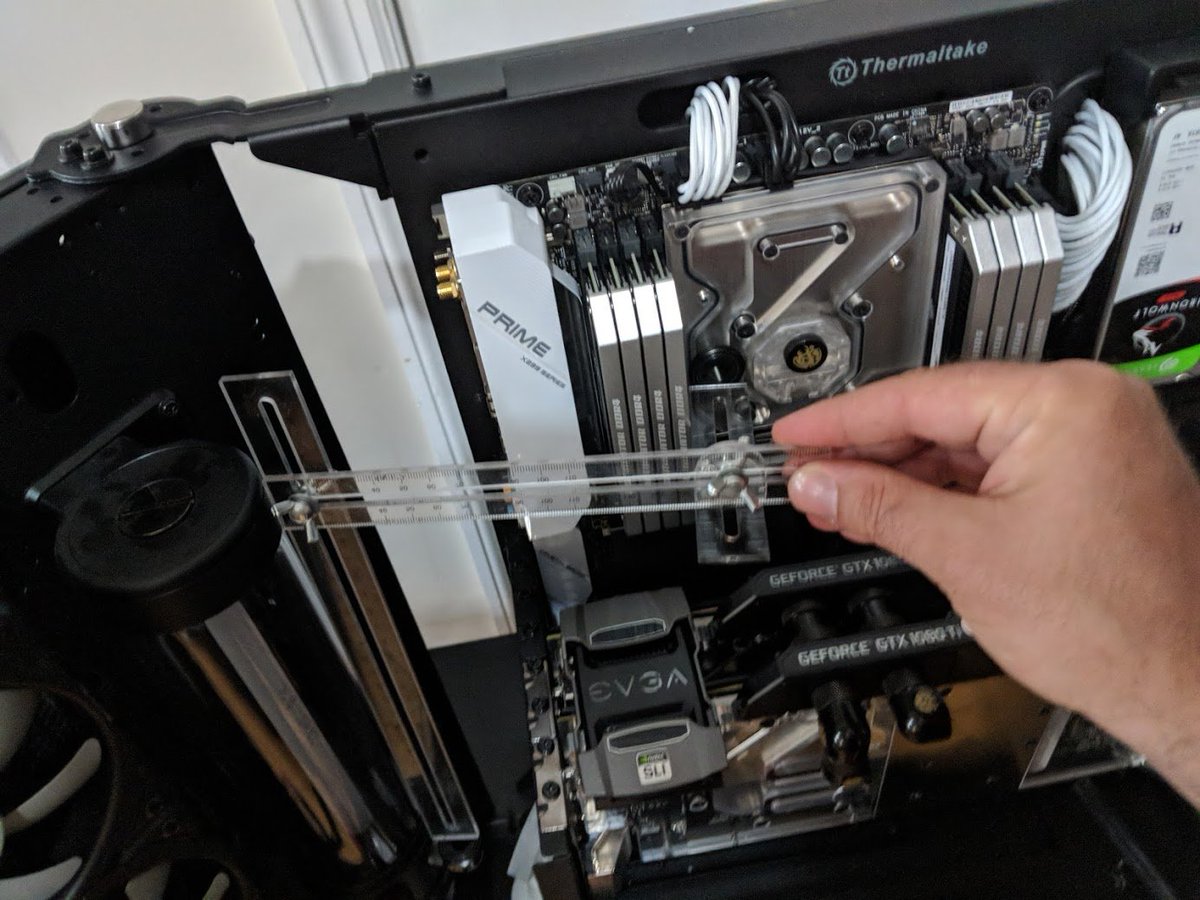
You can get the dimensions of the run with the rulers then transfer them to plastic tubing with some mandrels custom made to make the center lines align with the rulers.
Dramatic improvement in both time and quality - got a lot of runs first try.
Dramatic improvement in both time and quality - got a lot of runs first try.
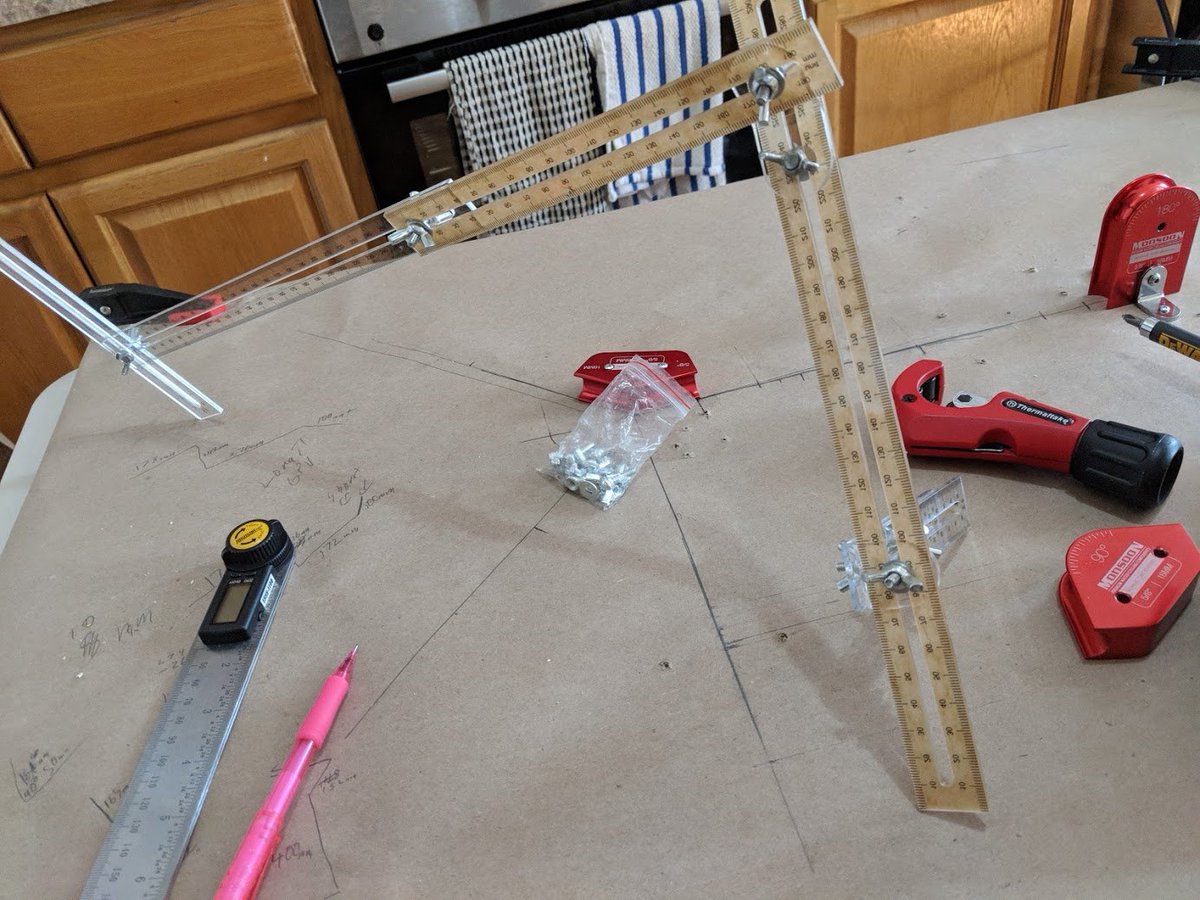
The GPU in run was particularly ugly. Monsoon's brackets for three dimensional measurements made a huge difference in quality.

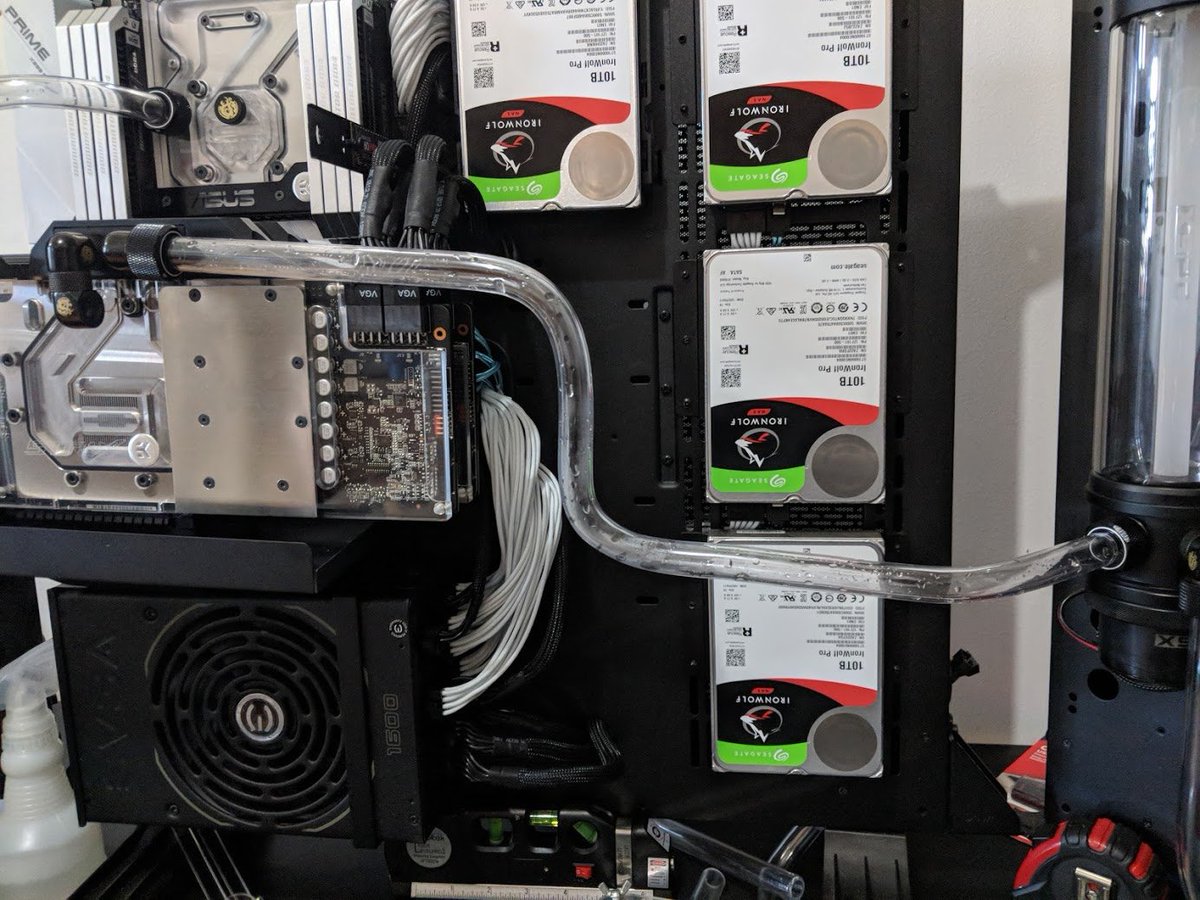
The GPU loop finally looks decent on #mylastpc.
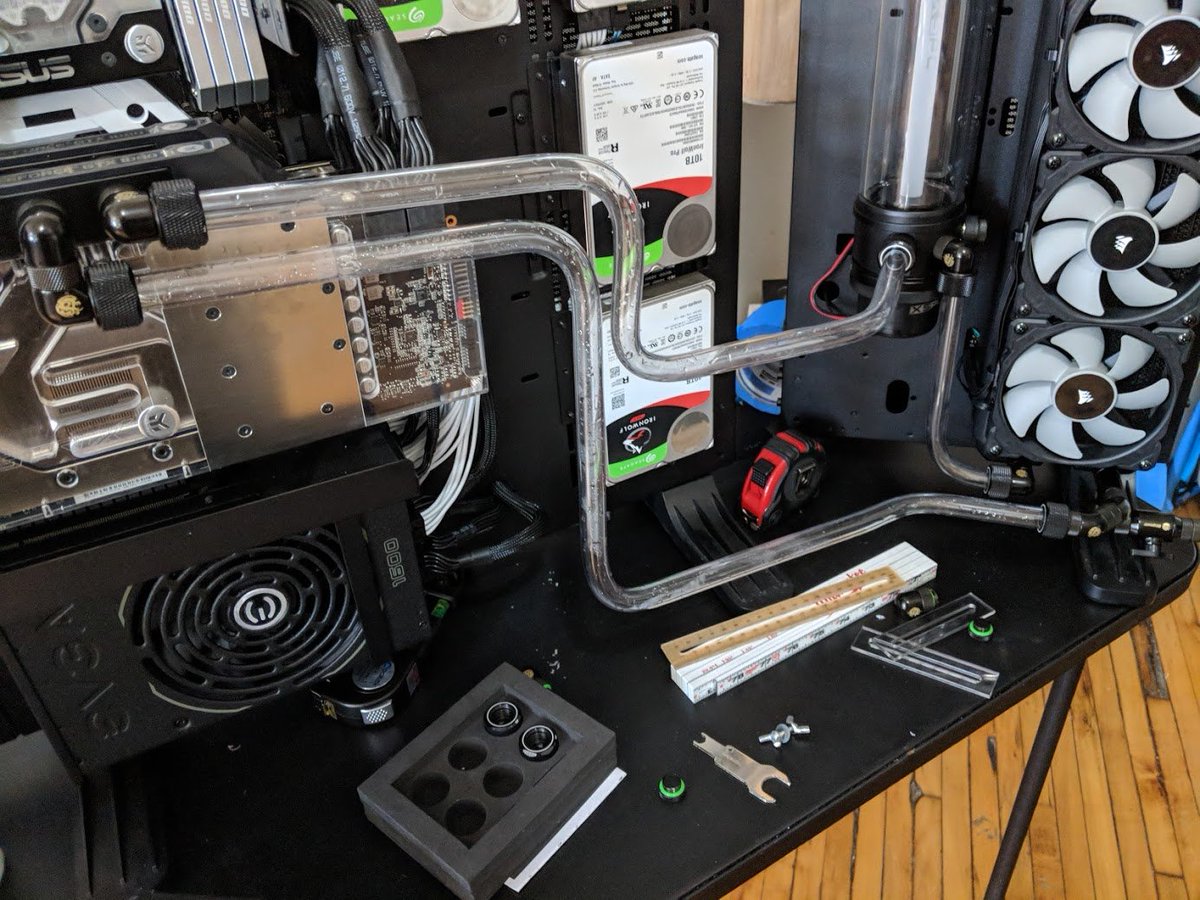
The CPU loop had the most complex run with one bend combining a 90 degree and 45 degree into the same bend on two different axes. The previous version was cringe inducing.

In addition to looking miles better than before, the loops are maintaining pressure on an air test for twice the rated pressure of the pumps.
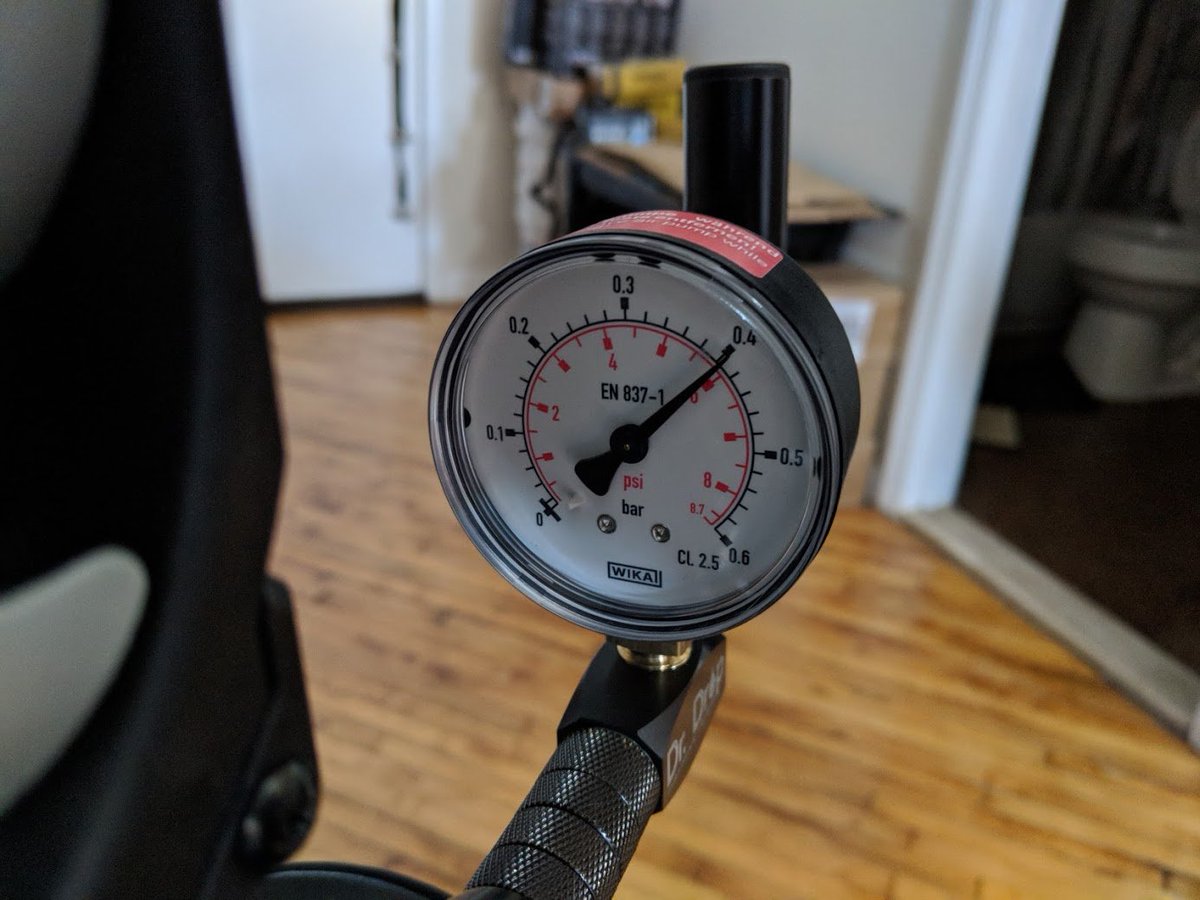
Enough fiddling. Pressure holds and the plumbing is going to be as good as it is going to get. This week I finally installed #mylastpc.
First bit was treating the both loops with part 2 of @MayhemsSolution blitz cleaner. Both systems get soaked with the cleaner and then flushed out with distilled water until pH is neutral.
Here's the first fill when everything started to feel very Breaking Bad.
Here's the first fill when everything started to feel very Breaking Bad.
After soaking for a day and passing with no leaks, flushed the loops out and followed up with @MayhemsSolution pastel white premix. Here's some dark and gratuitous slo-mo of the first fill.
An hour of very careful tilting and bleeding later, we finally have system without air bubbles.
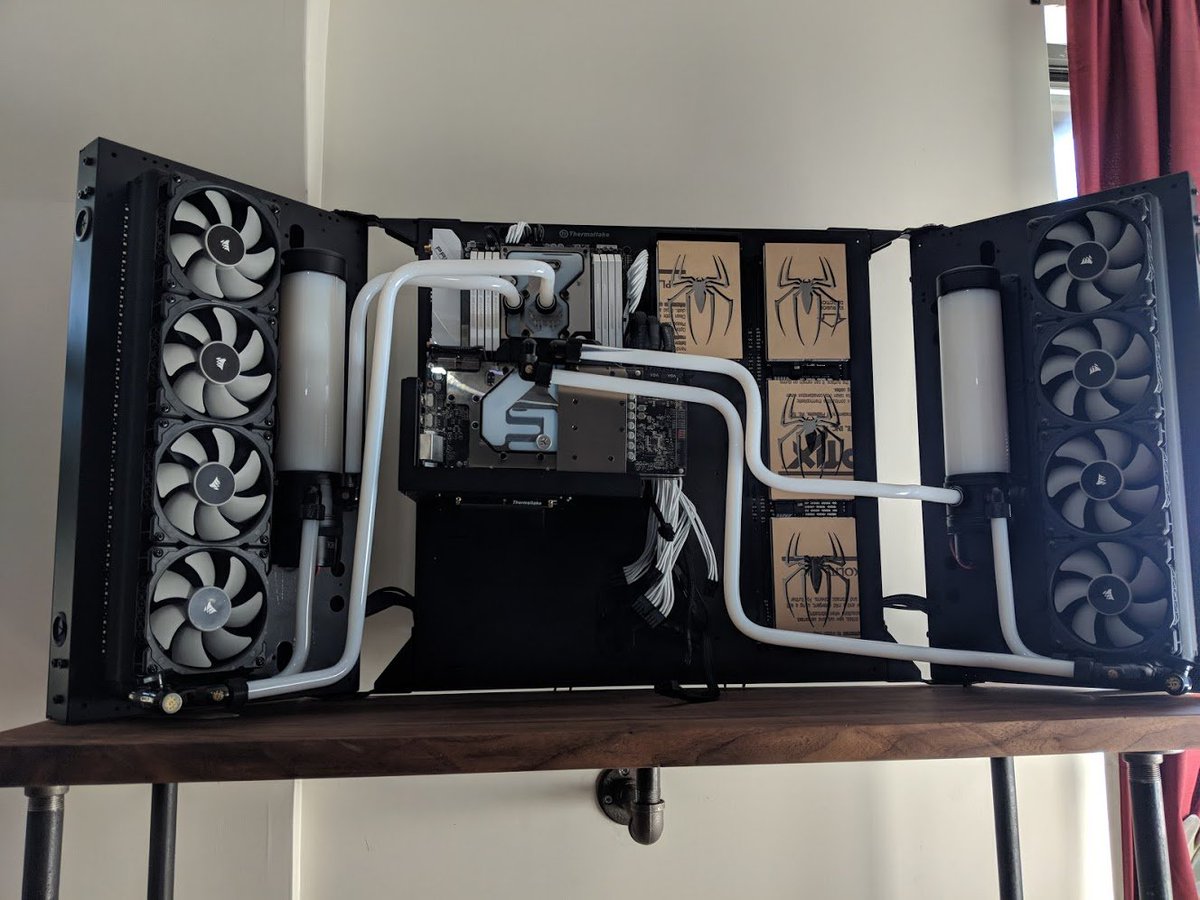
Also affixed some hard drive covers with a Spider-man logo. The applique is black with a mirror center. Paired with the white coolant, gives the machine a real Venom look.
Also affixed some hard drive covers with a Spider-man logo. The applique is black with a mirror center. Paired with the white coolant, gives the machine a real Venom look.

I did not anticipate air bubbles being as big a problem as they ended up being. Here you can see a close up with big blobs of no good parked on top of both the CPU and GPU blocks.
Color does look shit hot though.
Color does look shit hot though.

With all the components, the steel chassis and the 3 liters of coolant in the two loops, #mylastpc got heavier than my air conditioners. This complicated my plan for wall mounting this monstrosity of dorkdom.
A TV mount kit was not going to be enough.
A TV mount kit was not going to be enough.
Fortunately, there were some lunatics up in Queens who were willing to pitch in on a solution.
The result was a magnificent industrial pipe piece buttressed by industrial steel pipe. Zen Space Makers delivered huge here: zencarpentry.nyc
The result was a magnificent industrial pipe piece buttressed by industrial steel pipe. Zen Space Makers delivered huge here: zencarpentry.nyc
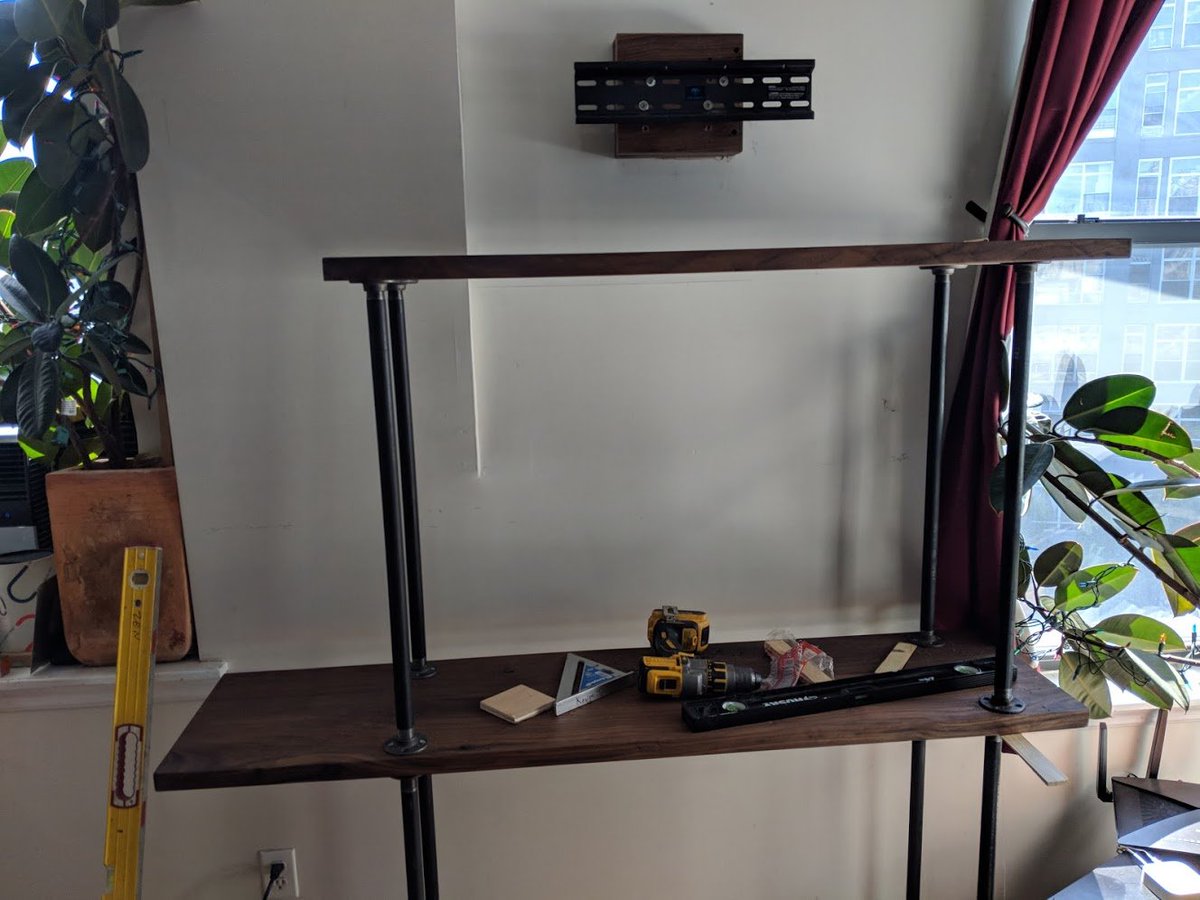
In the most harrowing ten minutes of this project, Kevin and I heave #mylastpc up on the new shelf five and a half feet off the ground.
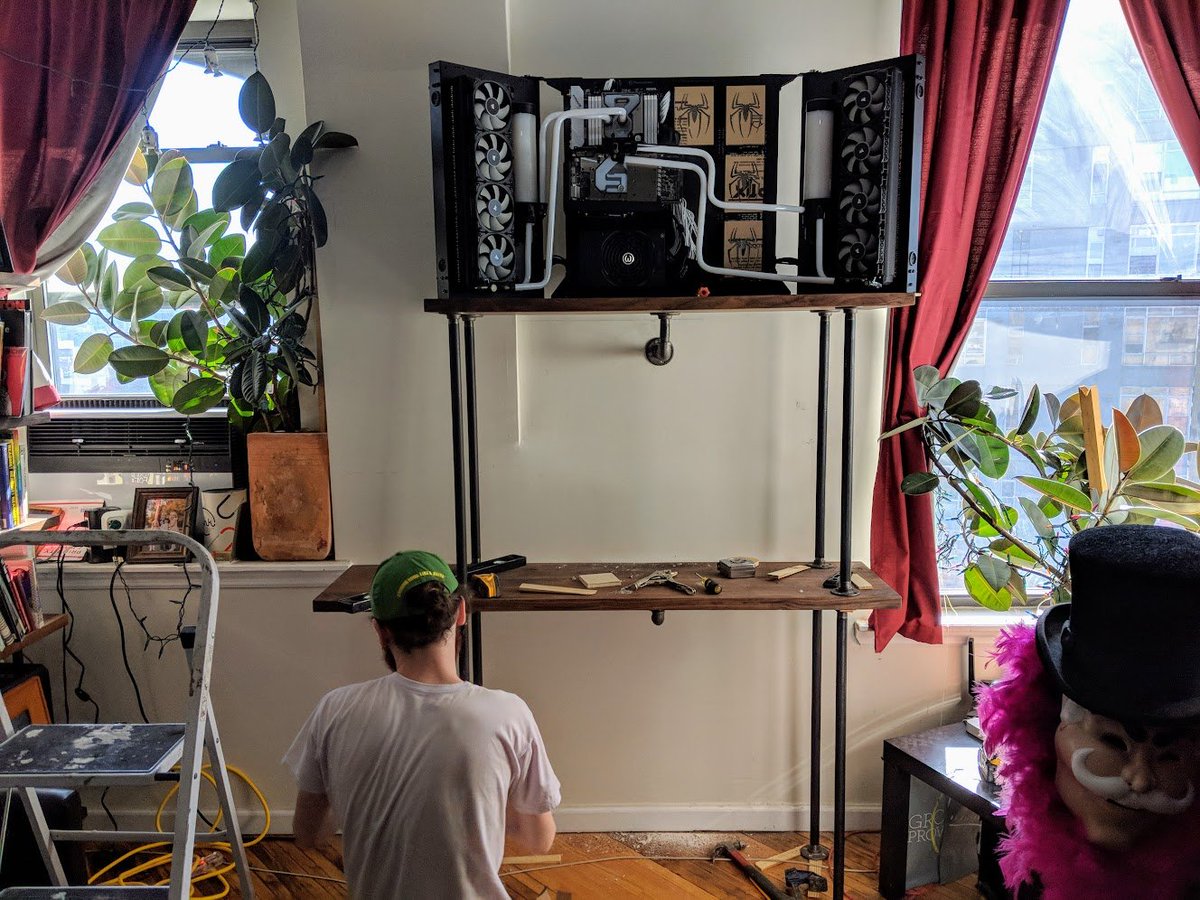
The second most harrowing ten minutes would follow directly thereafter.
After months of tinkering and a day building the mount, I mount the 1600W power supply, wire up the last of the juice and fatefully plunge the power button annnnnd...
Nothing.
After months of tinkering and a day building the mount, I mount the 1600W power supply, wire up the last of the juice and fatefully plunge the power button annnnnd...
Nothing.
No POST, no error, no beep and certainly no display.
Did I just brick five months of work?
Did I just brick five months of work?
Panic was starting to kick in right when I noticed hidden behind the spaghetti going into the PSU one dangling additional CPU cable - the X299 boards take an additional rail of power (!) that I neglected to plug in.
Get that power situated and the 8 120mm fans scream to life.
Get that power situated and the 8 120mm fans scream to life.

I took a moment then to pour myself a drink.
Configured the pumps and fans to follow the installed temperature gauges and then fired up a Windows install to dial in the overclock and get some benchmarks.
I believe it's been a decade since I've seen this screen.
I believe it's been a decade since I've seen this screen.
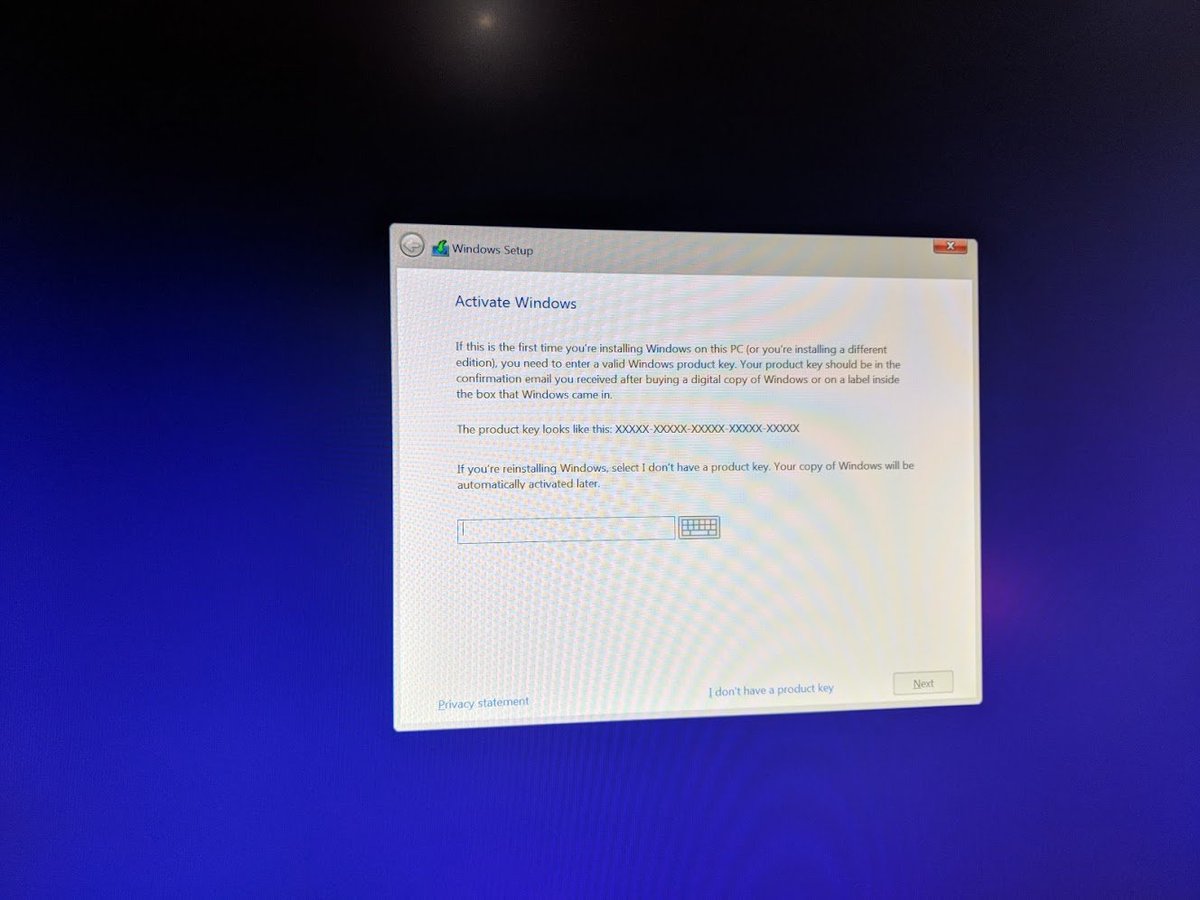
The Windows 10 install experience is just delightful when tragically compared to the last three Ubuntu releases.
Linux will always be home for me, but have to say a Cortana-guided first time use experience was undeniably awesome.
Linux will always be home for me, but have to say a Cortana-guided first time use experience was undeniably awesome.

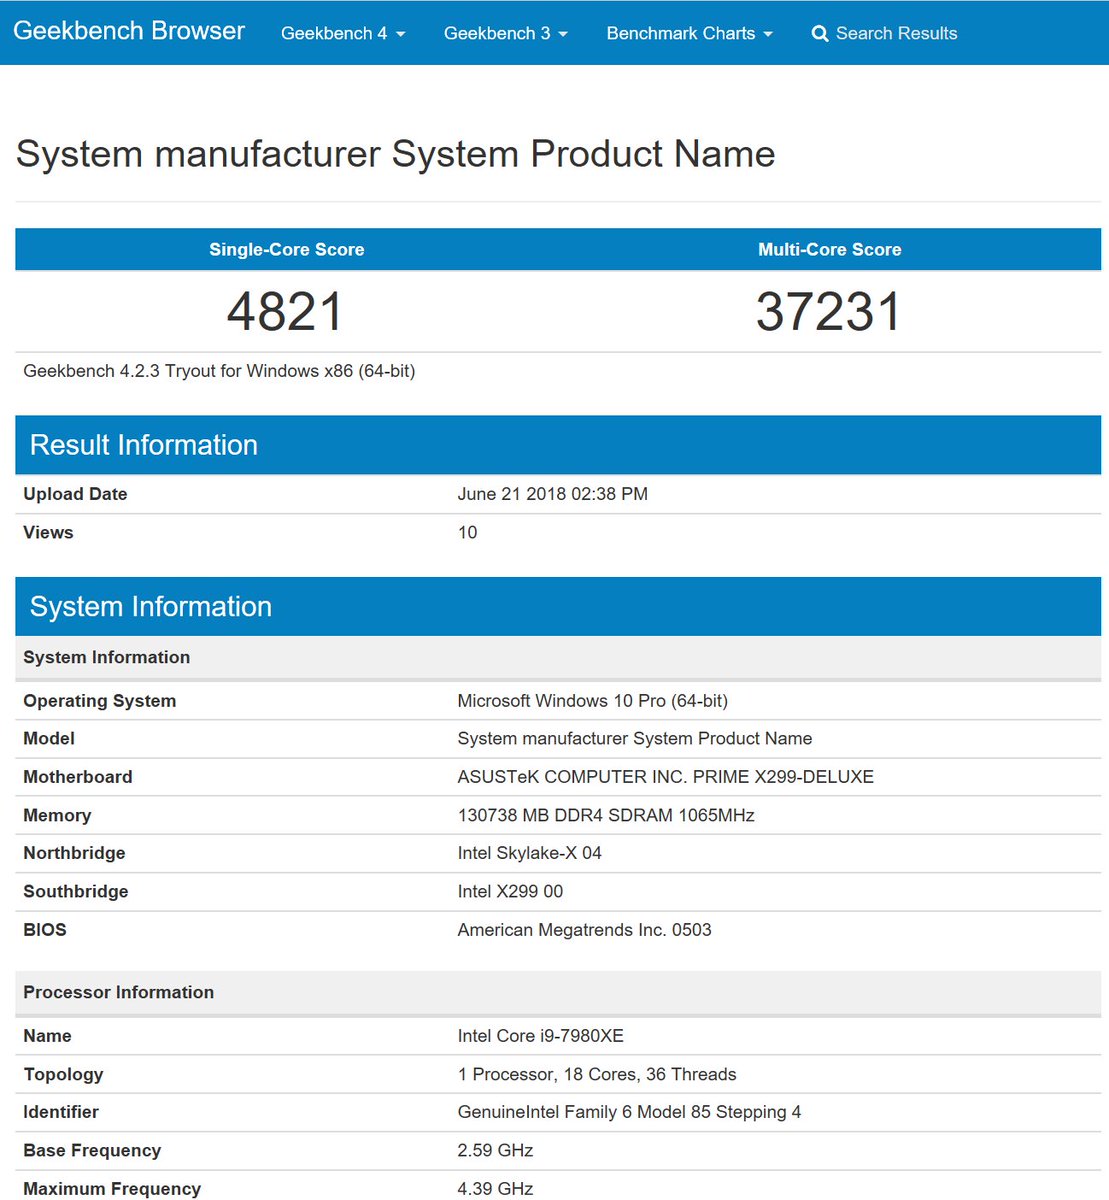
We start with factory setup. Overclock jumper is not set and all BIOS settings except for pumps in fans are on default.
Geekbench CPU is our first go - let's see what this 18 core monster can do.
browser.geekbench.com/v4/cpu/compare…
Geekbench CPU is our first go - let's see what this 18 core monster can do.
browser.geekbench.com/v4/cpu/compare…
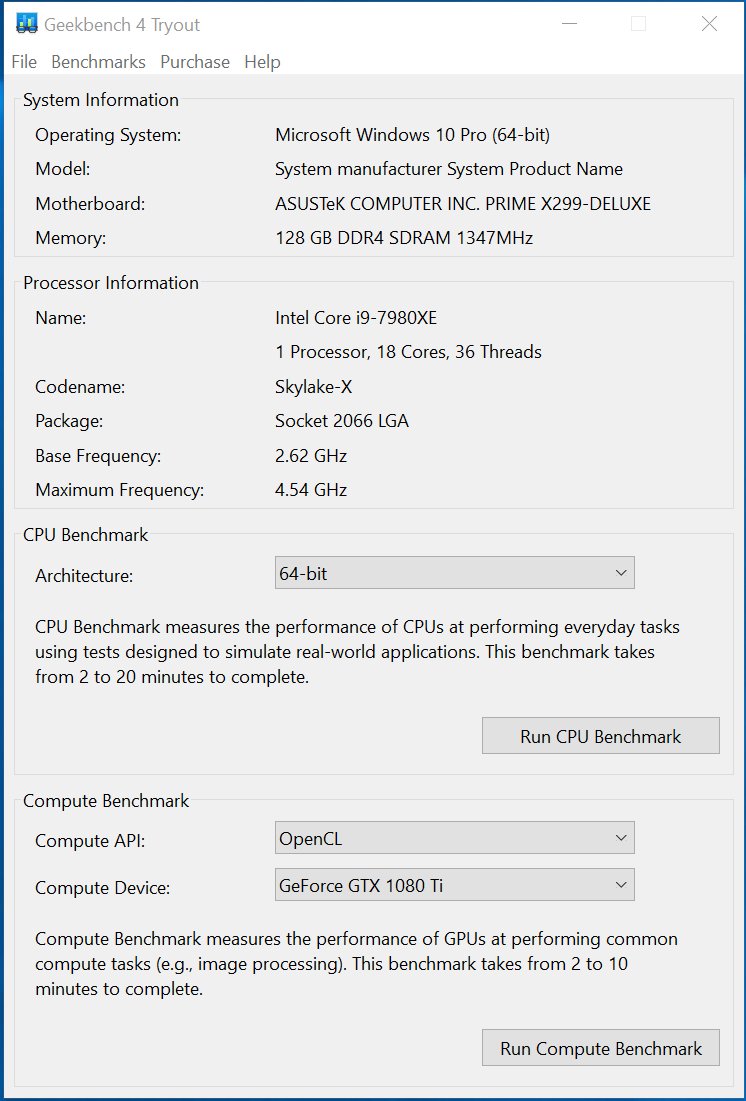
#mylastpc delivers a meh single core score of 4821 as the Core i9 7980XE has a fairly low clock, but the 32 threads turn in a 37k on @geekbench.
Beefage.
Beefage.
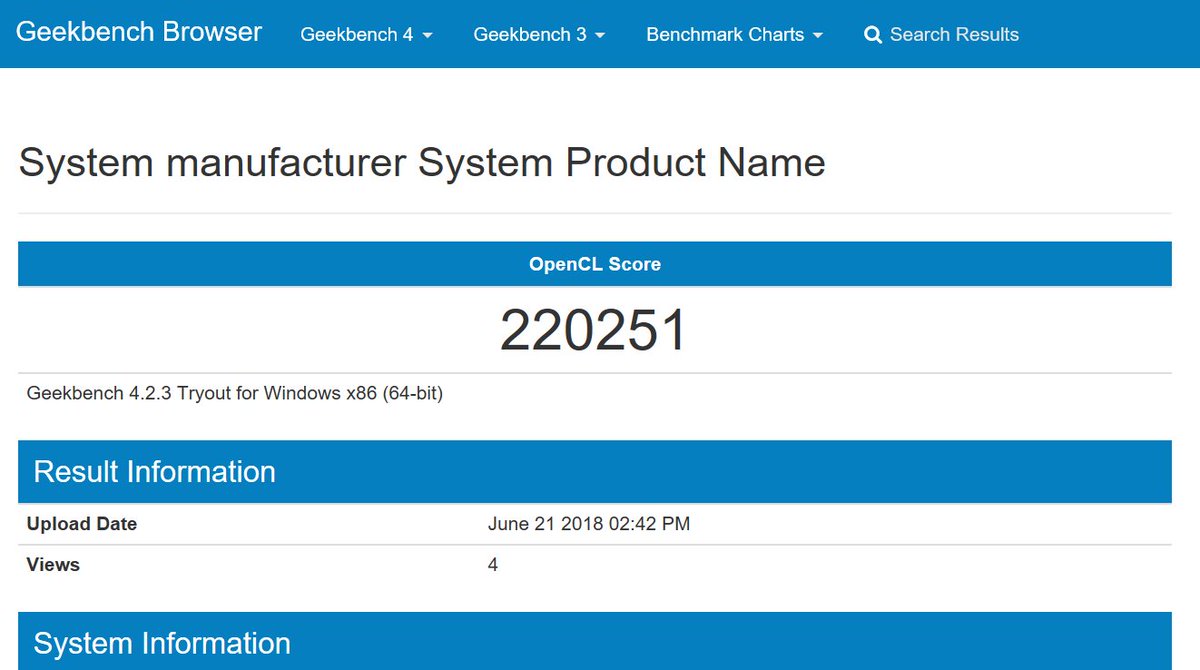
A better gauge of my primary use case is @geekbench's GPU suite, but looks like the freeware version will only test one card, not the SLI set.
220k still is respectable, I'm told.
browser.geekbench.com/v4/compute/253…
220k still is respectable, I'm told.
browser.geekbench.com/v4/compute/253…
My crew was telling me these scores were good, but I wanted a better sense of how it performed against other machines.
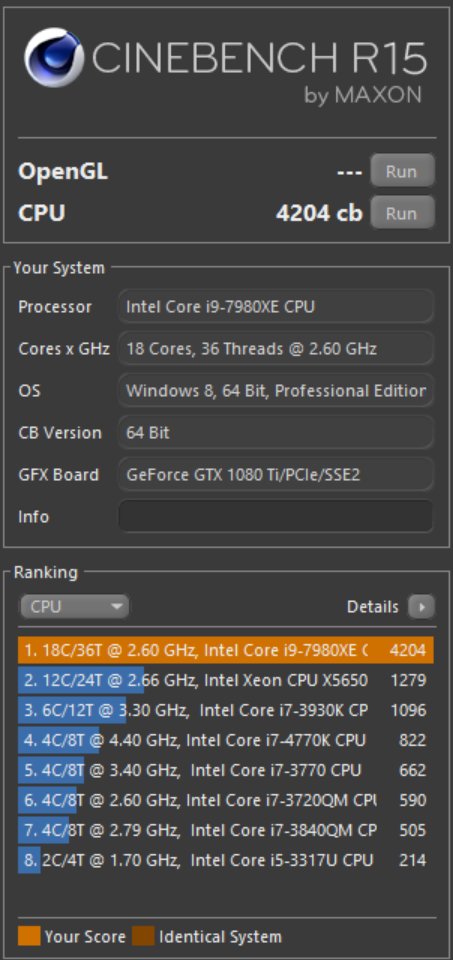
#cinebench gets cited a lot and has some comparisons that our factory setup crushed, but still not enough data to gauge #mylastpc against the field.
#cinebench gets cited a lot and has some comparisons that our factory setup crushed, but still not enough data to gauge #mylastpc against the field.
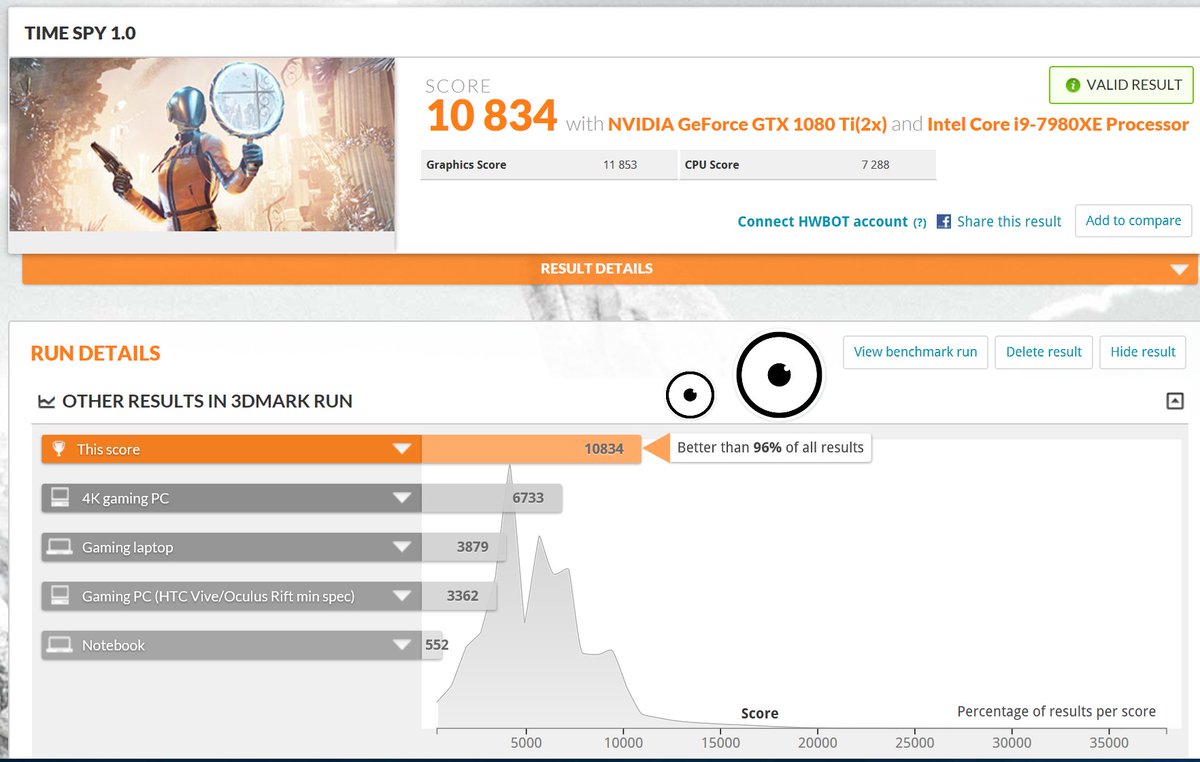
I saw Kingpin Cooling crushing world records using @futuremark's suite of tools, so I grabbed the trials of 3DMark and PCMark to get a baseline for our future. Great comparison data and their canonical Timespy run is a mindscrambler running on 3 monitors.
.@futuremark gives us the empirical confirmation.
#mylastpc is less a computer and more a tiny god.
3dmark.com/spy/3948557
#mylastpc is less a computer and more a tiny god.
3dmark.com/spy/3948557
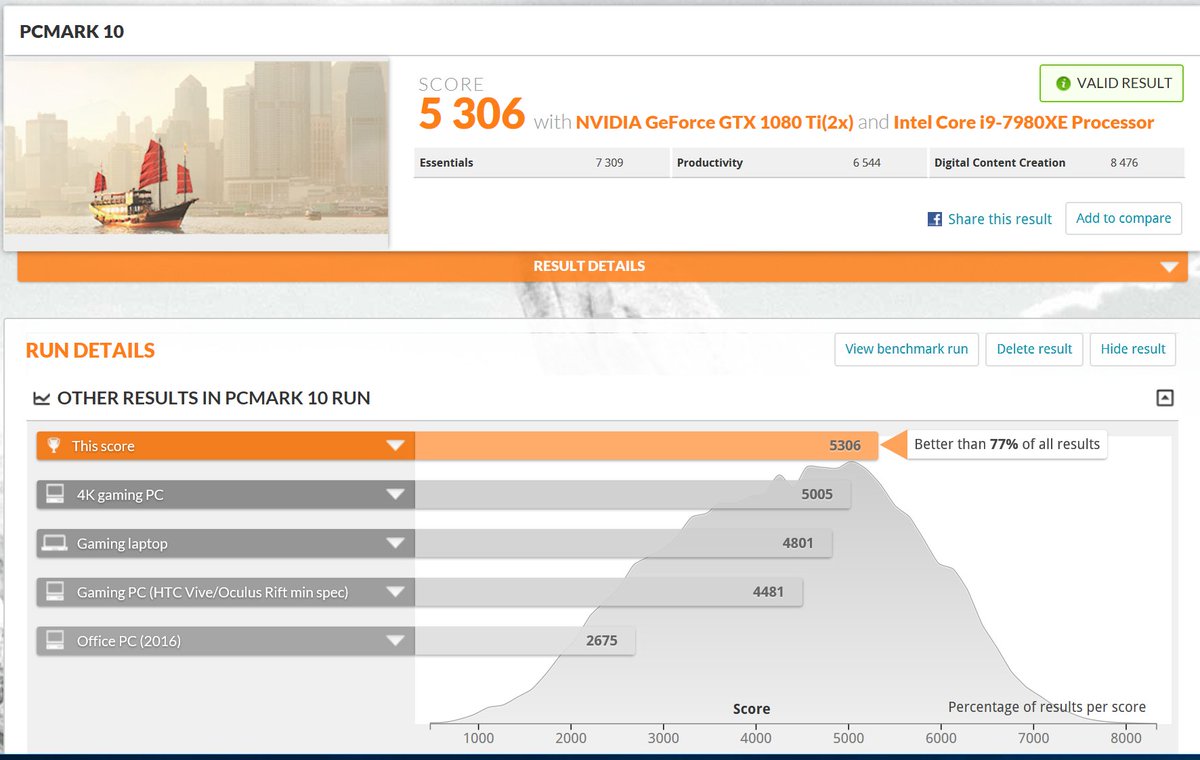
We also run PCMark to get a better sense of real world productivity performance and, what's this? #mylastpc barely makes the top quartile???
This cannot stand.
3dmark.com/pcm10b/288651
This cannot stand.
3dmark.com/pcm10b/288651
We didn't build #mylastpc to be plodding along on factory settings. Time to make some chimichangas.
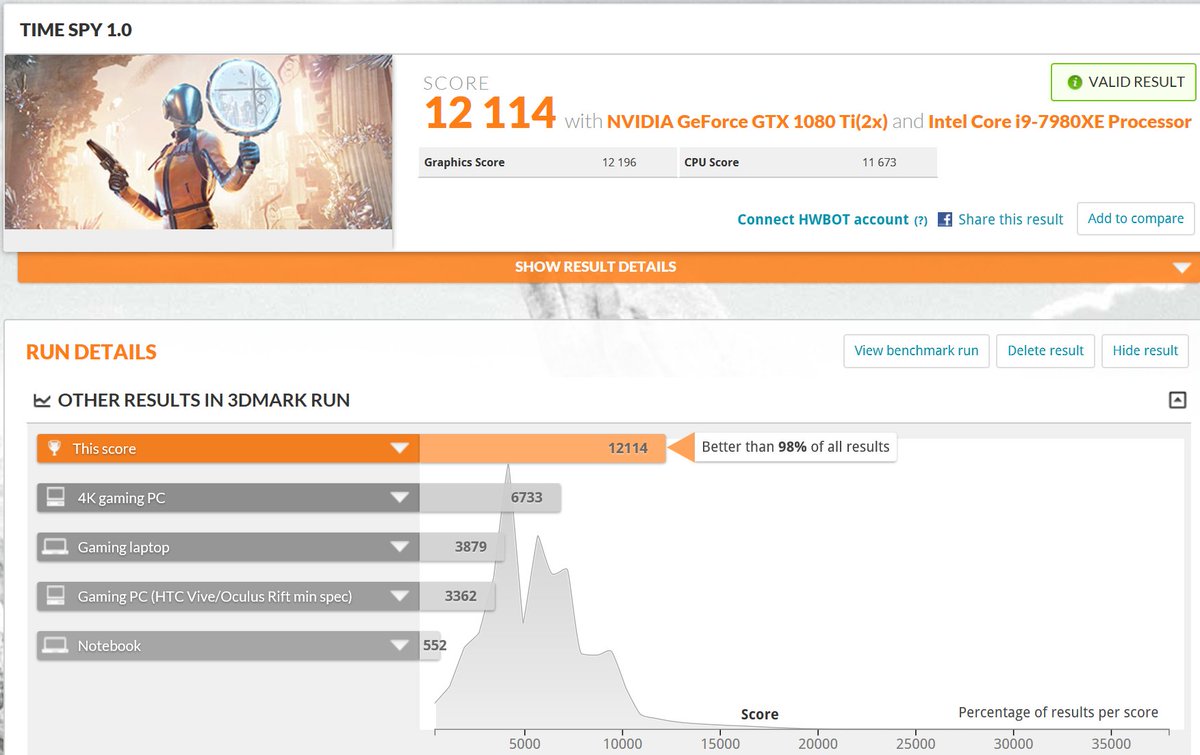
Using @ASUS's EZ tuning wizard, we're able to eke out 2k more on our Timespy score, now placing us in the 98th percentile.
3dmark.com/spy/3948875
Using @ASUS's EZ tuning wizard, we're able to eke out 2k more on our Timespy score, now placing us in the 98th percentile.
3dmark.com/spy/3948875

Trying @futuremark's PCMark on this overclock produces a hard reboot on the render stage, so looks like this is not a stable setup. Need to tinker in BIOS for a bit.
Think I got #mylastpc dialed into a stable 4.6 GHz overclock, up from the stock 2.6 GHz. New #cinebench score shows another 200 points over the wizard overclock.
#mylastpc is stable with CPU 4.6 GHz overclock - let's shoot the moon.
4.9 GHz hard reset in #cinebench while 4.8 GHz crapped out the OS on @futuremark's PCMark 10.
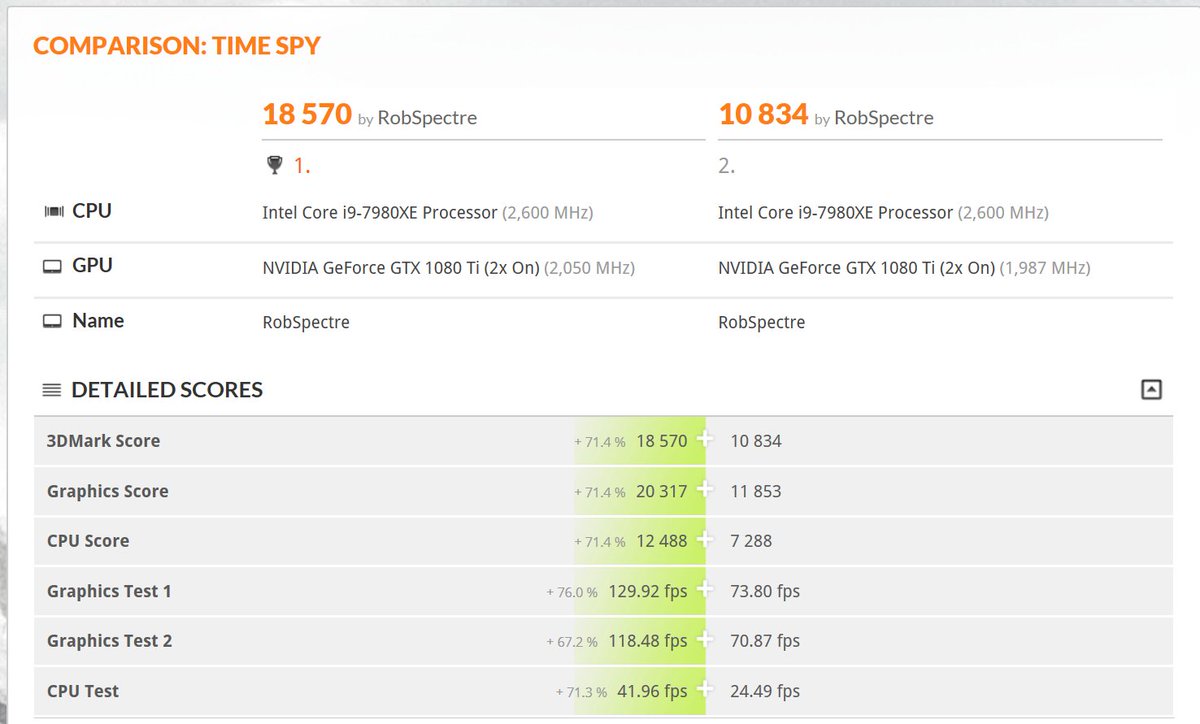
With #mylastpc at 4.7 GHz, we finally crack the 99th percentile on 3DMark Timespy with 16390. 3dmark.com/spy/3975636
With #mylastpc at 4.7 GHz, we finally crack the 99th percentile on 3DMark Timespy with 16390. 3dmark.com/spy/3975636
Looking like 4.7 GHz will be the stable overclock on #mylastpc, solidly blowing through PC Mark 10 while cracking the 99th percentile with a 7233 on this work-realistic benchmark. 3dmark.com/pcm10b/291918
Last night of overclock tweaking on #mylastpc. With all fans and pumps blasting, was able to get a 5.1 GHz run on @futuremark's Timespy bench scoring a 18570. #mylastpc is in the top 500 in the world.
3dmark.com/spy/3985999
3dmark.com/spy/3985999
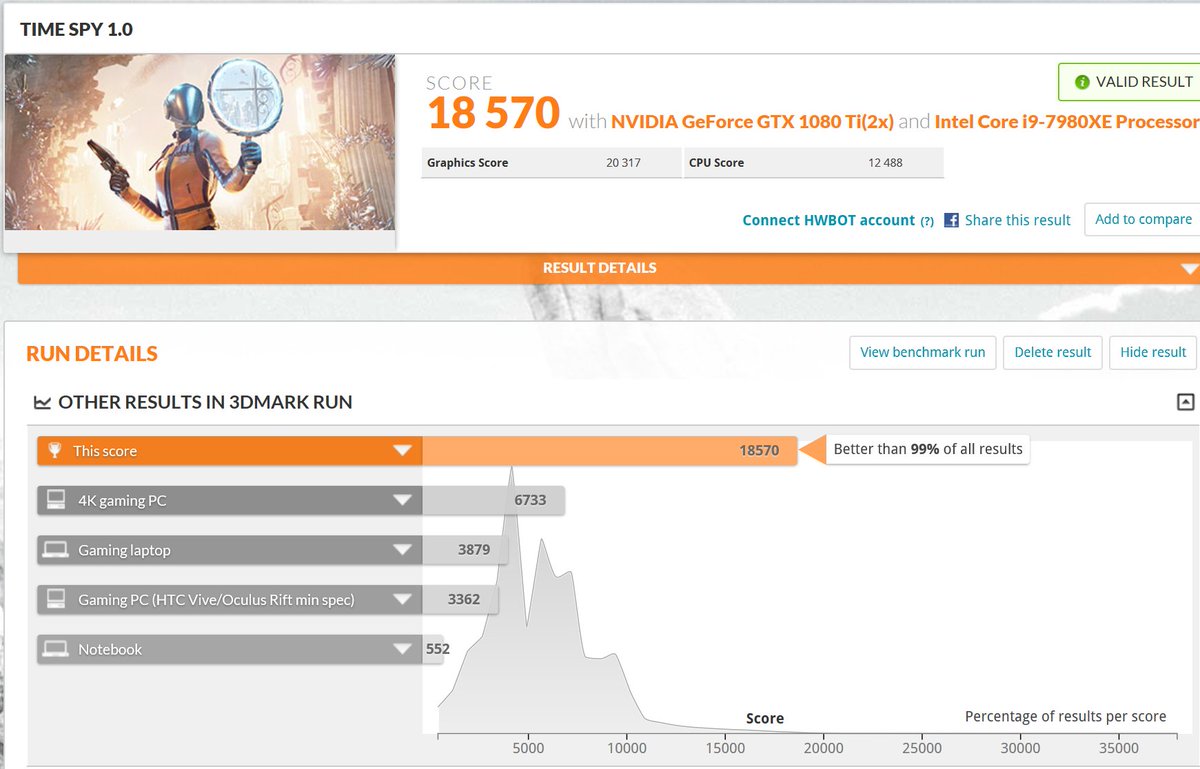
For reference, we started at 10k. Overclocking squeezed an additional 71% of performance out of the same hardware - almost feels like the brain damage of water cooling was worth it. ;) 3dmark.com/compare/spy/39…
Everything is dialed in and stable - time to play my first game with #mylastpc and see what it can do.
Really need suggestions - the last game I played seriously on the PC was Team Fortress 2. :/
Really need suggestions - the last game I played seriously on the PC was Team Fortress 2. :/
First one I'm trying is PUBG as folks have been talking about it.
Hopped in game with an avatar that had nothing but underroos, a belt and a big red fro, thinking I was novel.
I was not.
Hopped in game with an avatar that had nothing but underroos, a belt and a big red fro, thinking I was novel.
I was not.
Ditching PUBG for Fortnite. Hopefully this'll be more fun.
Love the post-war sci-fi vibe.
Love the post-war sci-fi vibe.
Took most of the weekend and ultimately abandoning a stripe for the OS partition, but finally got my Linux environment up on #mylastpc.
Won't lie - top makes me drool a little bit.
Won't lie - top makes me drool a little bit.
Getting three monitors running on Nvidia Surround for Ubuntu was a definite bear, harkening back to those dark days of Xinerama. Definitely feeling Canonical's shift in focus in every release.
Kicked off the data transfer so will finally be able to get some ML benchmarks in a few days, but we're finally at the end of the road for building #mylastpc.
Thanks for tuning in - was super fun. Here's the final parts list: pcpartpicker.com/b/rcmqqs
Thanks for tuning in - was super fun. Here's the final parts list: pcpartpicker.com/b/rcmqqs