
,
27 tweets,
8 min read
Read on Twitter
If you’re an academic you need a website so that people can easily find info about your research and publications. Here’s how to make your own website for free in around an hour using the blogdown package in #Rstats [UPDATED 2019 THREAD]
I posted a similar thread about this time last year, but have now updated info reflecting recent software package changes, so if you're thinking you may have seen this thread before, that's why...
Ok, so why use blogdown? Sure, there are several free options available to start your own blog (e.g., Medium). However, you generally can’t list your publications or other information easily on these services. Also, who knows where these services will be in a few years?
There are also some great point-and-click services available (e.g., Squarespace). However, you need to pay about $10 a month for these services, and they’re generally not well suited for academic webpages.
Alternatively, "blogdown" and RStudio is free and can integrate with the Hugo framework, which provides several website templates. It also uses Markdown, which is a straightforward markup language. So let's get started!
Install blogdown in R using this command:
install.packages("blogdown”)
Then start a new project, entering “gcushen/hugo-academic” as the Hugo theme. Keep the other options ticked. This will download all the necessary files.
install.packages("blogdown”)
Then start a new project, entering “gcushen/hugo-academic” as the Hugo theme. Keep the other options ticked. This will download all the necessary files.
Now, load blogdown using this command:
library(blogdown)
and then install the "hugo" framework, which is the backbone of your website:
blogdown::install_hugo(force = TRUE)
library(blogdown)
and then install the "hugo" framework, which is the backbone of your website:
blogdown::install_hugo(force = TRUE)
Then build the template site using this command:
blogdown::serve_site()
The viewer window will render a mobile version of your site, but you can also see a desktop version in your browser.
blogdown::serve_site()
The viewer window will render a mobile version of your site, but you can also see a desktop version in your browser.
Let’s start by changing the title of your website, which can be edited in the "config.toml" file. To edit this file, and the others that are referred to in this guide, just select it in the RStudio file browser. 

In the "config/_default/params.toml" file you can change the color theme and font style of your website, so have a play around with these options.
Your main homepage is made up of a set of widgets, which you can customize or remove entirely. For example, let’s say we want to remove the big header image, called the “hero” widget. Let's open up the "content/home/hero.md" file and change "active = true" to "active = false"
Let’s now update the profile photo. Just save your profile in the "content/authors/admin" folder, calling the file "avatar.jpg". This will automatically update your profile picture.
Edit your biography details (e.g, position, affiliation, education details) in the "content/authors/admin/_index.md" file. In this file you can also add your social media details and a link to your Google Scholar profile page.
To edit your contact details, navigate to the "config/_default/params.toml" file, and scroll down to the "Contact Widget setup" section.
To add a PDF of your CV, copy your CV to "static/files/cv.pdf" and uncomment (i.e., remove the "#" signs) that prefix the CV section lines of the file.
To see how your updates look on your website, save the file in Rstudio, and then run the "blogdown:::serve_site()" command.
To see how your updates look on your website, save the file in Rstudio, and then run the "blogdown:::serve_site()" command.
These markdown (.md) files have detailed comments on what each bit code does. If you're still not sure what something does, just edit your script and see what happens. You can always undo your changes.

To edit your publications, go to the files found in the "content/publication/" folder. Each publication has a dedicated folder. To include your first publication, navigate to the "content/publication/journal-article" folder, and open up the "index" file.

Edit your publication's details and then save your file. You might want to rename your folder to make it easier to identify. For add more publications, simply copy and paste the example folder and edit accordingly.
To include an image to be associated with your paper (e.g., a figure from your paper), just add it to your publication's folder and call it "featured.jpg".

To change what appears in your website's header menu, edit the "config/_default/menus.toml" file. Just edit or delete sections as you wish. If you would like to add your CV to the menu, just add a menu item, which includes "url = "files/cv.pdf".
When you’re done with your edits and you're happy with your page, it’s time to put it online. The easiest way to do this is via a free account with @Netlify netlify.com
Simply just drag the "public" folder into the box at the bottom of the "deploys" section of your Netlify admin settings. It should take about 5-10 seconds for your site to go live.
You can edit your domain name, which will include "netlify” at the end of your address. If you would like a cleaner domain, you’ll can purchase one for about $10 per year. I recommend Namecheap, who is currently offering FREE domain names for uni students nc.me
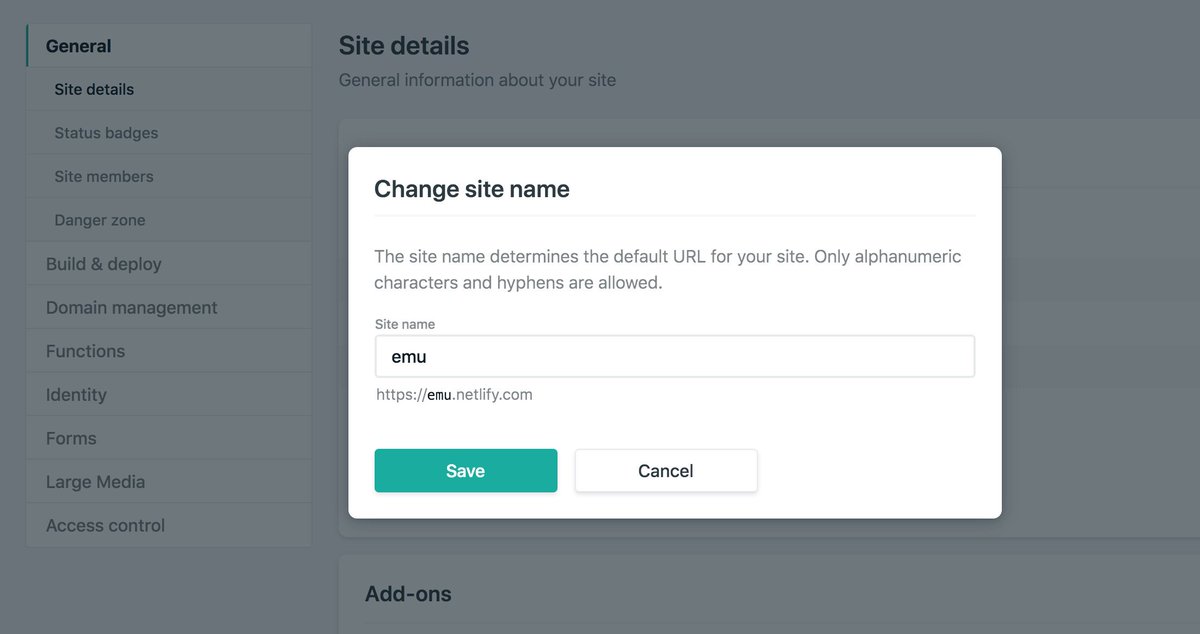
Here's the website we just made emu.netlify.com
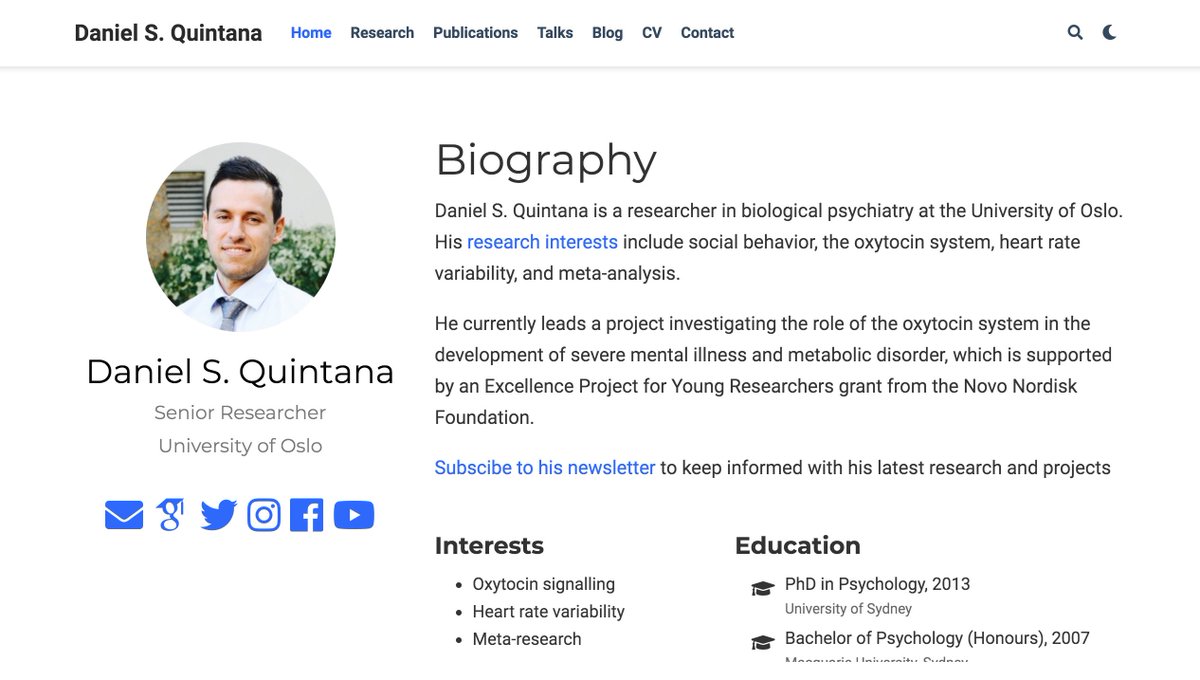
For a completed website, here's mine with a custom domain name dsquintana.com
For a completed website, here's mine with a custom domain name dsquintana.com
Here's a blogpost version of this post, if that's more your thing dsquintana.blog/free-website-i… If you’ve made your own website using this tutorial, let me know!
Have you tried following this thread but found one of the steps unclear? Is there a particular website feature you’d like me to include? Let me know so I can improve this tutorial
If you have more than a couple of publications, entering them manually can take a lot of time. Here’s a tool that can bulk import your publications from a BibTex file of your publications, which you can generate in Zotero github.com/sourcethemes/a…


