,
22 tweets,
21 min read
Read on Twitter
The #SEGA #MultiMega repair log of SN: Y001983. This poor unit has been with me for quite some time due to a lack of references or working systems to compare against until this year.
Also it has been previously professionally repaired by another party.
Also it has been previously professionally repaired by another party.


So, it turns on and play games; where's the issue?
Operation is somewhat haphazard at best. We're missing some audio effects, 6 button controllers do not work in 2P and are erratic for 1P, noise during operation in audio & video and CD games work intermittently after ten minutes
Operation is somewhat haphazard at best. We're missing some audio effects, 6 button controllers do not work in 2P and are erratic for 1P, noise during operation in audio & video and CD games work intermittently after ten minutes


So it had been "recapped" along with having the SEGA 315-5660 ASIC replaced due to corrosion. The latter is no small feat to be taken likely for such a fragile multi-layer board. Sadly the quality of the rework is not up to scratch nor are the trace repairs. Also, missing a pin.
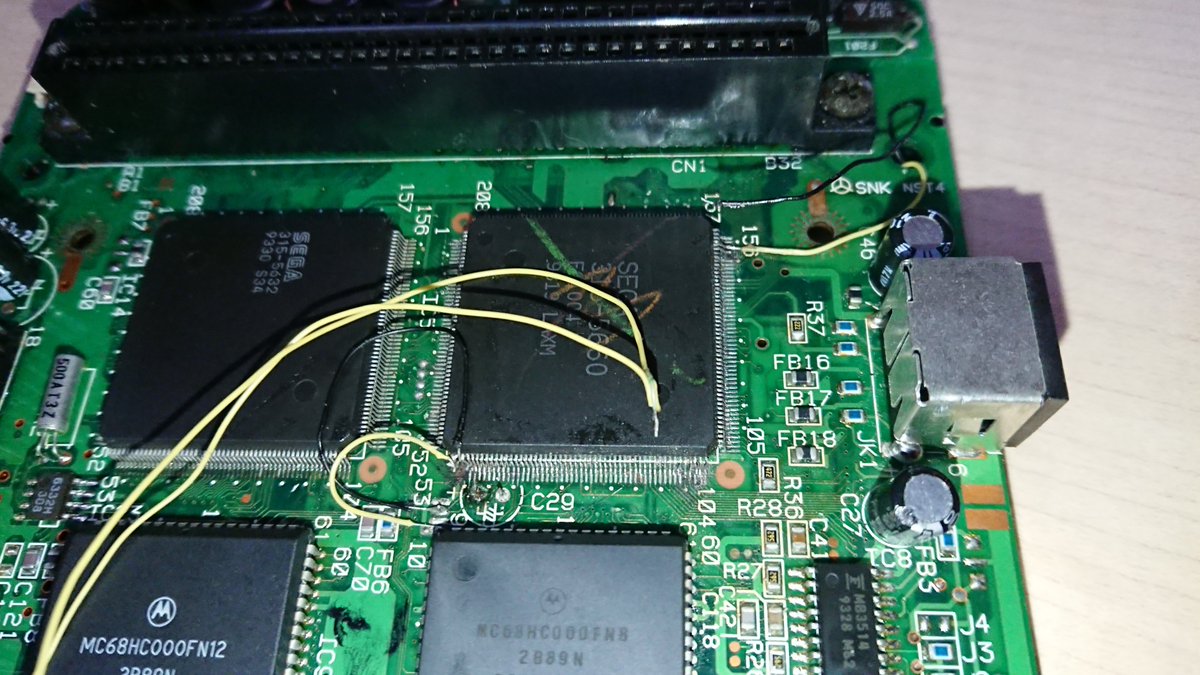


Quickly progressing through some of the repair work here as I've posted a few of these photos before closer to the time it had been worked on. Some of the pin damage on the 315-5660 and surrounding pads is quite severe.


About as fun as it looks.


So this is the bulk of the main board work completed. This restored the Z80, left channel audio returned, 1P 6 button support working, 2P now working along with 6-button support as well. Excellent 👍


So the Mega Drive side of the system is operating correctly, however CD games are still experiencing odd behaviour requiring the system to "warm up" before it will read a disc. Then the tracking started to behave odd & finally refusing to detect a disc entirely.


Sadly the same quality of work has been carried out on the optical drive board. Issues are not immediately as obvious as the main board.


So, many of the capacitors have been removed improperly causing massive damage to the through hole vias and attached traces. This is sadly present across the entire board.


Queue several weeks of trying replacement lasers until chancing upon a SF-C93 10 pin that was actually in spec. Any you will buy will be refurbished units; nothing inherently wrong with this, but for a system that has a finite range to work in, this is a big issue Vs say a Porche


So, finally a working laser unit that calibrates within the correct range expected. Still have unreliability issues at this time but at least it will boot a game on occasion.


So, After checking through the board I came across a fair amount of solder blobs & swarf near various capacitor uprootings. My attention was drawn to the Sanyo LC78835KM which had a huge lump of solder pump material trapped under it & had been intermittently bridging pins.


So with the LC78835KM replaced it was time to visit the next disaster; tracking motor had seized completely. The bushings had failed and ground into a nice mess of carbon material. Sourcing a replacement for this Matsushita HXN3A3RDYT has been somewhat a labour of love.


By this time, I'm working on several other Multi-Mega units and what was a massive unique issue became something of a common occurrence for consoles with moisture or battery damage:
It had also led me to research in where the BOM came from (it's not SEGA).
It had also led me to research in where the BOM came from (it's not SEGA).


Oh, hello Minebea-Matsushita replacement :)
So it seems Panasonic (Matsushita) has dealings with Minebea around the time these were produced (they later joint ventured in 2004 as well) and they follow the same exact specification (Unlike Mabuchi & Hitachi of this era).
So it seems Panasonic (Matsushita) has dealings with Minebea around the time these were produced (they later joint ventured in 2004 as well) and they follow the same exact specification (Unlike Mabuchi & Hitachi of this era).


We're up and running again now :)
Still have the warm up issue to resolve but the issues are coming to a close. I suggested that we try replacing the optical drive caps to rule out any previous work leading to the remaining behaviour.
Still have the warm up issue to resolve but the issues are coming to a close. I suggested that we try replacing the optical drive caps to rule out any previous work leading to the remaining behaviour.


Found several new areas of trace damage hiding under what was formerly a full replacement kit on the top side of the board. Oh wonderful.
They're through hole components, not bloody turnips!
They're through hole components, not bloody turnips!


Some obscenities may have been uttered for this top level board via repair work. Loads more may have been uttered verbosely for the bottom of the board.
Warm up issue has been resolved, the unit now boots games first time and every time.
Warm up issue has been resolved, the unit now boots games first time and every time.


Board clean up and quality checks - all passed 👍


Just getting ready to reassemble and I noticed a post support has been broken. Apparently not like that when it was sent off originally but arrived back like it - excellent! This causes the power button to jam due to uneven pressure on the board - fixed with some extra plastic.


Also required a couple of 0.5mm washers as the PCB grounding pads have been bored down to the silicon later.
Anyways, onto the testing part - on the left is my own unit which has had many the prod with a multimeter for continuity testing reference points :)
Anyways, onto the testing part - on the left is my own unit which has had many the prod with a multimeter for continuity testing reference points :)


All good here - owner has it back now and is very pleased to have it back. :)