Okay internet garden peeps, let’s talk about grow bags! I’ve been meaning to show how I make them. (Was gonna stream it, but we have three people streaming meetings, school and games in the house, so internet’s at a premium.)
Grow bags are great! The bags let air in, which results in something called “air-pruning” of the roots, which I guess is good. I am not a botanist! But I still get good results with these.
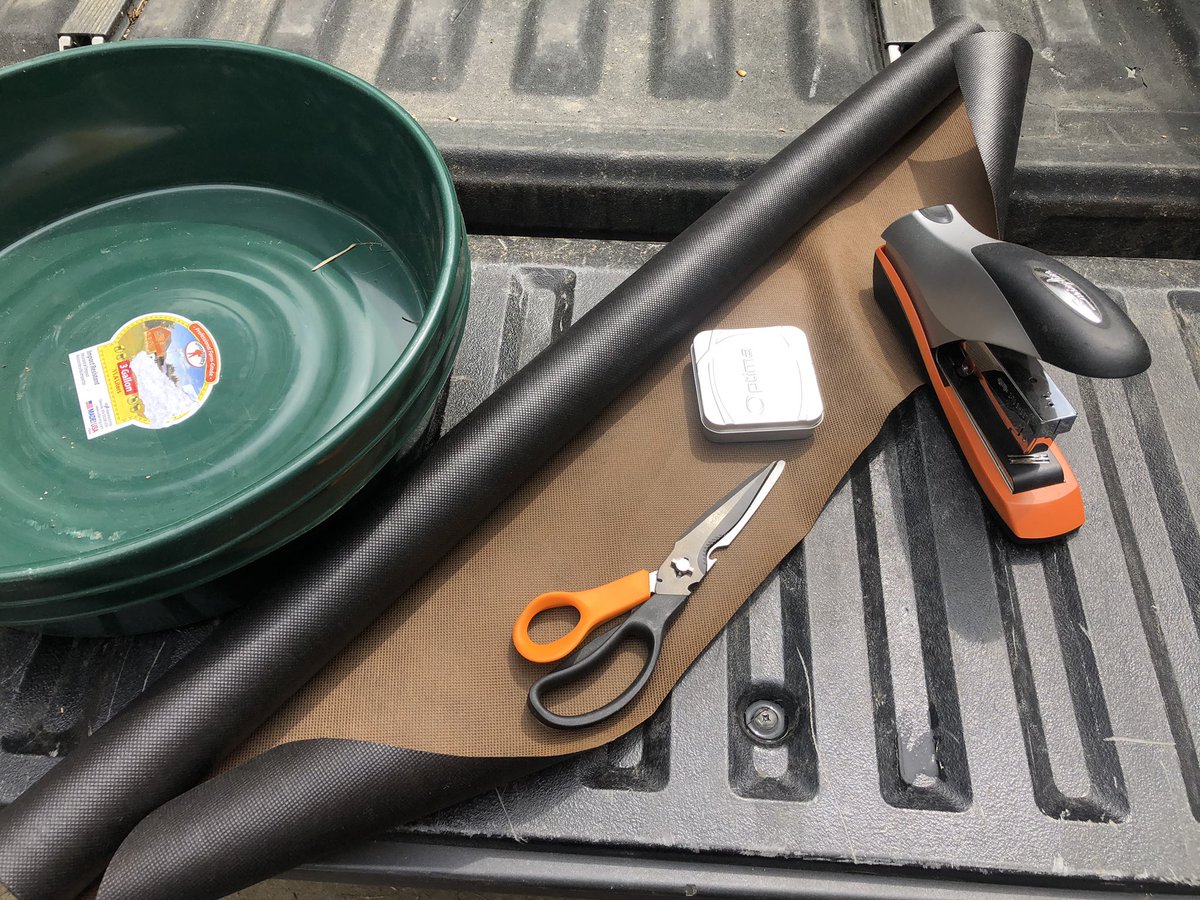
You Will Need:
Landscape fabric. The Premium, but not professional. Should be thick and have one brown side.
Stapler
Heavy Duty Staples - I use Optima Heavy Duty
Scissors
A pan a few inches deep
Landscape fabric. The Premium, but not professional. Should be thick and have one brown side.
Stapler
Heavy Duty Staples - I use Optima Heavy Duty
Scissors
A pan a few inches deep
OR you can sew them. Use a thread that is tough and NOT biodegradable. The landscape fabric lasts years, make sure the thread will too.
OPTIONAL (but nice):
A wire basket that fits in the pan
A smallish clay pot
A wire basket that fits in the pan
A smallish clay pot

I have dozens of wire baskets because I haunt craft and home stores during sales. look for storage baskets, wire wastebaskets, and hampers. You can almost always find them on Uber sale or damaged. They’re totally not essential, but they make moving bags WAY easier.
Eyeball how much fabric you need to go around your basket, or just eyeball the pan. Yes, you can measure if you’re that kind of person, but seriously, this ain’t the Ritz. No one will care.

Cut it. Is the line straight? Good for you! Mine isn’t. No one will notice.

Flip to the brown side and fold it in half so you have the edges kinda lined up.

Start stapling your edges to make a seam! Do they line up perfectly? Are the staples evenly spaced? Hell no! Plants don’t care. The plant will not judge your staples.

Staples should be close enough that there aren’t huge gaps for dirt to fall through. That’s literally the only concern. Also probably don’t staple your hand.
Now, most landscape fabric is three feet wide, which makes a pretty tall grow bag. You do want it taller than the basket, but maybe not three feet. Hack off a few inches at the top, unless you have a truly ginormous basket and water reservoir.

Did you cut that top line straight? Good for you! I did not.

Optional step, but makes life easier—fold over what will be the top maybe an inch and staple it. You only need a couple staples for this, just enough to hold the fold in place.

You now should have a big squareish tube like so. Yes, I am working on the tailgate of my truck. My garden work table is full of seedlings.

Now! There are two methods for doing the bottom here. The first is just to staple straight across, like a pocket. It’s inelegant, but it holds dirt. It will not want to sit up quite as well, so basket is handy.
Go ahead and do that if you want. Again, plants deeply do not care.
The other, marginally more elegant method, is to fold in a corner like so. Not too far, just make a sort of S-shape.

Stapled in place, the side will look like so.

Do both sides! Staple across the bottom! Learn that you did not get an equal amount of fabric on each side and it’s now got a wrinkle! Vow not to give a shit! THIS! IS! GARDENNNN!

Turn your new bag inside out! Hey, look at that! The corner is all tucked in and stuff! Neat!

Did your corner not look like that? It’s okay, I botched the other one of mine, too. Shove the fabric into some kind of position, throw a staple in it. It’s gonna be under a pile of dirt, no one will know.
Put bag in basket! Hey, look at that! Is it too big? Doesn’t fit the shape quite right? You know the drill by now, Internet. It’s gonna be full if wet dirt, it’ll figure it out.

Tuck the bottom in however. Make sure there’s no huge gaps that dirt will fall through.

Fold the top over again to give it a little more structure.

Now, this is a big pot that would take a lot of dirt, and a lot of that dirt would be underwater and not much use. So I like to put a ceramic pot in to take up space but also wick moisture up into the soil. You could also put it gravel if you wanted.

You can also use plastic pots or soda bottles or whatever to fill the bottom. Just make sure at least some dirt or a wicking material is touching the bottom. The water reservoir doesn’t do any good if the dirt can’t reach it.
If you have a big enough grow bag, you can throw something at the bottom like yard waste and try to compost it in situ. Might even work. I don’t know that I’d use garden dirt for this, it’s very heavy. Potting soil is great.

Place your growbag and reservoir where you want it BEFORE you fill with dirt. Learn from my bad back.

Fill with soil! I am not actually going to show this step because I would have to open another bag of potting soil and it’s wet and weighs like ten tons, but I’m pretty confident you can figure that out yourself.
Do kinda wiggle the dirt around so that it fills the creases and pushes up against the side of the basket though. Here is one I made a couple days ago.

You don’t actually have to fill it all the way to the top. It won’t hurt anything. Just make sure you have plenty of dirt NOT submerged. You can see here, at least three quarters of the bag is above the waterline.

...huh. I just got a message that my rate limit was exceeded. Weird.
Now, if you use this fabric, it will wick moisture up and be damp. After a season of use, that means it will grow moss, small weeds, and in my backyard, ferns. I actually think that’s kinda cool.

Your reservoir is there to hold water so that you don’t have to water every day, AND you just fill the reservoir instead of having to water down the whole pot. So you’d think a bigger reservoir would be better, and it can be, IF you are careful to keep 3/4ths above water.
This pot, for example, is in a big metal tub and is set up on a cinder block to keep it from drowning. But then it can’t get to the water lower than the cinderblock! What to do?

Well, I got fancy with that one, cut a wide strip of synthetic chamois, which wicks AMAZINGLY, and stapled it into the grow bag as I was making it. So a foot or so hangs into the water, pulling it from the bottom, and the rest is halfway up the pot. It...kinda works?
I don’t know if it’s as successful as I’d like. It does work with smaller baskets, though. Also terra-cotta pots, which wick moisture, will help pull water up, though in hot weather, it evaporates faster than terra-cotta pulls.
I have done a LOT of weird halfass engineering experiments with these, believe me, and at the end of the day, nothing wicks water as well as dirt.
Sometimes I think maybe a very narrow PVC pipe shoved through the bottom and full of soil, with drill holes at the top, but that’s a lot of tool use. Anyway, if any of you tinker with the design and have improvements, super want to hear them!
Finally, let us address the issue of mosquitoes! You are leaving out shallow pans of stagnant water! You will get larvae! SO MUCH LARVAE! Don’t let that happen, it’s rude.
If you’re watering with a hose and shallow pans and you are not under water restrictions, you can literally just blast the little wrigglers to hell with the hose. Do so.
If you have big tubs like the one I showed you earlier, and moreover, if they have become home to frogs (which mine instantly do) throw in a mosquito dunk. They last a month and you just toss in more as the season progresses.
Final note! Make these any size you like! Use a circle of hardware cloth instead of a basket to make one the size of Toledo if you like! I usually limit mine to sizes I can move easily.
BUT! Caveat! Talk and super narrow? Disappointing.
BUT! Caveat! Talk and super narrow? Disappointing.
Tall, not talk. Blah. Anyway, my theory is that the air pruning on super narrow ones keeps the roots from expanding very far. Always disappointed by those. Also, if you’re growing beans or peas, add an innocuous this or worm tea or manure or something.
Innoculant! Dammit, autocorrect is conspiring. I will stop now. Good luck! Happy gardening!
If you have any questions, drop them in comments and I’ll see what I can do.
Oh! One more note—these can last for years. The weak point is the seams. The baskets cut down on having the seams rip when you lift them, since the weight’s distributed. If you improvise a holder out of hardware cloth or chicken wire, just don’t move them, I guess.
Great question! There’s a couple.
1) the air-pruning thing
2) convenient watering - instead of standing there for ten minutes hoping things soak in, you just fill the reservoir. You can dump liquid fertilizer in there too.
2) convenient watering - instead of standing there for ten minutes hoping things soak in, you just fill the reservoir. You can dump liquid fertilizer in there too.
3) same as any container, you can place it where it’s convenient and you aren’t fighting hardpan clay on a stripped lot.
4) Also, we get hurricanes and it keeps them from drowning.
4) Also, we get hurricanes and it keeps them from drowning.
5) the big one—cost! A roll of landscape fabric is $15, a box of heavy-duty staples is $8 for 2000, the basket’s anywhere from $5-10, and the pan is probably $10-12 if you actually buy one instead of using an old drinks tray or whatever.
You can make like a dozen big bags out of one roll of fabric, so let’s say a materials cost around $2-3, plus whatever you want to spend on basket and pan. A big ceramic pot can run $200, easy.
...that said, let’s be honest, these are not super attractive objects, so if you want to hide one inside a big attractive pot, no one will hear it from me.